Welcome back! In our last lesson, you got your hands dirty building your first scene with a Label node. We established the fundamental concepts of scenes, nodes, and the all-important parent-child hierarchy.
Today, we'll take a major step toward making your game look like a game. We're moving beyond simple text and will learn how to display images. This is the core skill needed to bring your player character, enemies, and items to life. Our goal is to add and configure a Sprite2D node to display an image. For your project—a top-down adventure inspired by The Legend of Zelda: Link's Awakening—mastering sprites is absolutely essential.
From Text to Textures
In Godot, the node responsible for displaying a 2D image is called a Sprite2D. Think of it as a digital picture frame. You add the frame (Sprite2D) to your scene, and then you tell it which picture (an image file called a "texture") to display.
Let's start by creating a new, clean slate.
- Create a new scene.
- In the Scene dock, click 2D Scene to create a
Node2Das your root node. - Save the scene as
player.tscninside ascenesfolder if you created one, or just in the root (res://) for now.
Now, with your Node2D selected, it's time to add the sprite.
- Click the
+button at the top of the Scene dock to add a child node. - In the "Create New Node" dialog, search for
Sprite2D.
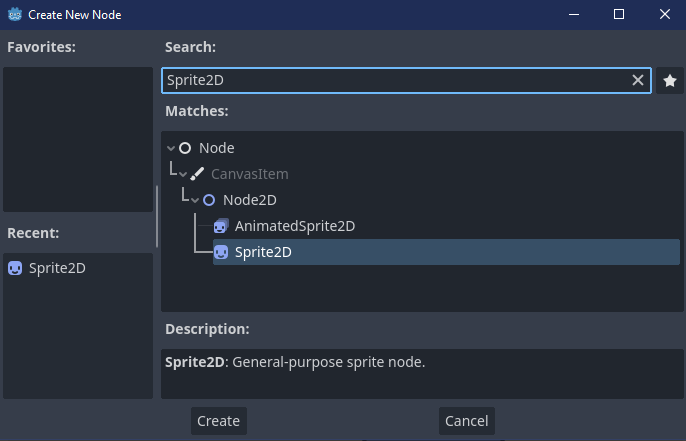
- Select
Sprite2Dand click "Create".
You now have a Sprite2D node as a child of your Node2D. If you select the Sprite2D in the Scene dock, you'll see its properties appear in the Inspector panel on the right. Notice the Texture property, which currently says [empty].
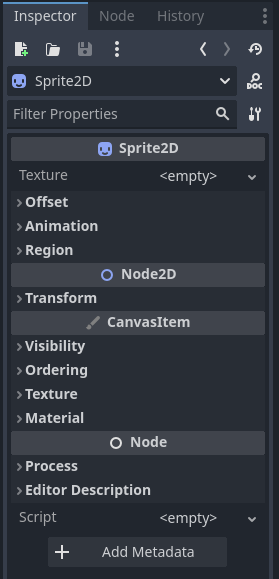
Assigning a Texture
To assign an image, you simply need to drag it from the FileSystem dock into this Texture slot. For this first exercise, we can use the default icon that comes with every Godot project.
Watch this short clip from the "Godot 4 Crash Course" by Net Ninja. It demonstrates the exact process of adding a Sprite2D and dragging the icon.svg file into its texture slot.
Godot 4 Crash Course #1 - The Basics
This video covers adding a Sprite2D node and assigning a texture.
Pay close attention to the sequence from adding the sprite to applying the texture. The instructor first adds the Sprite2D node and then drags the icon.svg from the FileSystem dock into the Texture property in the Inspector.
Go ahead and try this in your player.tscn scene. You should now see the Godot logo appear in the center of your 2D editor viewport. You've just displayed your first image!
Importing Your Own Assets
The default icon is great for testing, but for your game, you'll need your own art. The process is just as simple. Any image files (like .png or .jpg) you drag into Godot's FileSystem dock are automatically imported and ready to be used as textures.
The following guide walks through the initial setup for an RPG, but the first part is relevant to any project: getting your assets into the engine.
Let's Learn Godot 4 by Making an RPG - Part 1 - DEV Community
This reading covers the essential first step of importing assets into your project.
Focus on the first two paragraphs under the heading "Now, onto the setup." Read the section about dragging the asset file into the FileSystem panel. The article also suggests creating folders for organization, which is excellent practice.
For now, you don't need to download the assets from that article. Simply find a character sprite you like (a site like kenney.nl offers great free assets) or create a simple one yourself, and drag it into your Godot project's FileSystem dock. Then, drag your new image file from the FileSystem onto the Texture property of your Sprite2D, replacing the Godot icon.
A Critical Step for Pixel Art: Fixing Blurriness
Once you've added your own character sprite, especially if it's pixel art, you might notice a problem when you zoom in: it looks blurry or fuzzy. This is because, by default, Godot uses Linear filtering, which smoothes the edges of pixels. This is great for high-resolution art but ruins the crisp look of pixel art.
The fix is simple: we need to tell Godot to use Nearest filtering, which preserves the sharp edges of each pixel. This is a non-negotiable step for achieving the retro aesthetic of games like Link's Awakening.
There are two primary ways to do this. For a game that will be entirely pixel art, it's best to change the project's default setting.
- Go to Project -> Project Settings...
- In the left-hand menu, under Rendering, click on Textures.
- Find the Default Texture Filter setting. Change it from Linear to Nearest.
- Close the Project Settings window.
The change is immediate. Your sprite in the editor should now look perfectly sharp.
The tutorial "Let's Learn Godot 4 by Making an RPG" also explains this exact issue and solution.
Let's Learn Godot 4 by Making an RPG - Part 1 - DEV Community
This section of the guide explains why pixel art can appear blurry and how to fix it with a project-wide setting change.
Read the part of the article starting from the explanation of the blurriness and the steps to fix it in the Project Settings. This reinforces the steps we just took.
Conclusion
In this lesson, you've made a huge leap from an abstract scene structure to a visible game object. You now have one of the most fundamental skills for 2D game development in your toolkit.
Here are the key takeaways:
- The
Sprite2Dnode is used to display 2D images, or textures. - You assign a texture by dragging an image file from the
FileSystemdock to theTextureproperty in the Inspector. - For pixel art, it is crucial to set the default texture filter to
Nearestin the Project Settings to prevent blurriness.
You have successfully added a sprite and configured it to display correctly. You have a visible, albeit static, player scene. What's next? Making it come alive! In the next lesson, we will attach your very first script to the player scene. You'll learn how to use the _ready() function to make the game print a message to the console the moment it starts, opening the door to programming your game's logic.