Introduction
In our previous lesson, you learned how to add realistic surface variation using procedural noise textures. You created a material that has more depth and history than a simple, uniform surface. However, you were likely working in the Shader Editor, seeing your results on a small preview sphere or on your object in the default Solid viewport, which doesn't show these rich details.
Today, we'll bridge that gap. The goal of this lesson is to learn how to preview your materials accurately and efficiently using the Material Preview viewport shading mode. Understanding how to properly view your work-in-progress is a fundamental skill that allows you to make better artistic decisions as you develop the look of your sculptures.
1. Understanding Viewport Shading
When you work in Blender's 3D Viewport, you're not always looking at a final rendered image. For the sake of performance, especially with complex models, Blender offers different ways to display your objects. These are called Viewport Shading modes.
There are four main modes, each with a specific purpose:
- Wireframe Mode: Shows only the edges of your mesh. It's like looking at the underlying skeleton of your sculpture.
- Solid Mode: This is the default mode, optimized for fast performance during modeling and sculpting. It shows the basic shape with simple lighting but does not display any material properties like color, texture, or roughness.
- Material Preview Mode: This mode gives you a fast, real-time preview of your materials using built-in, high-quality lighting. This is your primary "look development" workspace.
- Rendered Mode: This provides a live preview of what your final render will look like, using the lights and world settings you've placed in your scene.
To get a quick visual overview of these four modes, please watch the beginning of the following video.
Understanding Viewport Modes in Blender (Tutorial)
This short clip from Ryan King Art's tutorial introduces the four viewport shading modes and where to find them.
Watch the first 21 seconds of the video (00:00 - 00:21). The narrator will point out the icons for each of the four modes in the top-right corner of the 3D viewport.
2. A Deep Dive into Material Preview Mode
Since our focus is on creating compelling materials, the Material Preview mode is where you'll be spending a lot of time.
Its main advantage is that it provides beautiful, neutral lighting "for free" by using built-in High Dynamic Range Images (HDRIs). An HDRI is a 360-degree image that wraps around your scene and emits light, simulating a realistic environment. This allows you to check your material under various lighting conditions (e.g., a bright studio, an outdoor sunset) without having to build a complex lighting setup yourself.
This next video segment demonstrates the key features of Material Preview mode.
Understanding Viewport Modes in Blender (Tutorial)
Let's explore the settings unique to Material Preview mode. Pay close attention to how you can swap out the built-in lighting environments.
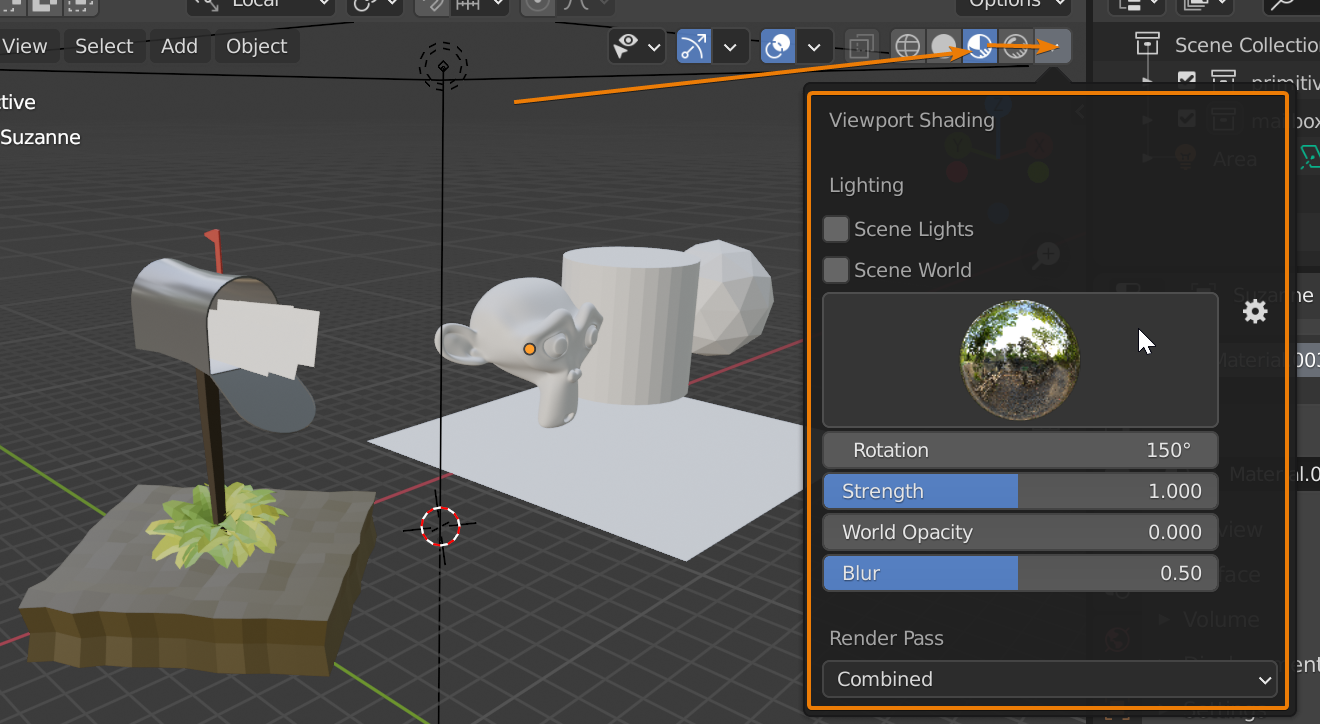
Watch from 06:40 to 07:55. Focus on: How Material Preview mode uses Blender's EEVEE engine for real-time results. How to click the dropdown arrow next to the viewport shading icons to access its settings. How to choose different HDRI spheres to change the lighting. What the Strength and Rotation sliders do.
The image below shows the menu you just saw in the video, with the Material Preview options clearly displayed. This is your control panel for the preview environment.
3. Hands-On Practice: Evaluating Your Material (15 min)
It's time to see the procedural material you created in the last lesson in its full glory.
- Open the Blender file containing the sculpture you worked on previously.
- Your viewport is likely in
Solidmode. Look at your object. You can see its form, but not the material details. - Now, switch to Material Preview mode. You can do this in two ways:
- The Icons: Click the third sphere icon from the left in the top-right of the 3D viewport.
- The Pie Menu (Recommended): Press and hold the
Zkey. A "pie menu" will appear. Without letting go ofZ, move your mouse to the right towardsMaterial Preview, then release the key. This is much faster once you get used to it.
- Notice the dramatic difference. You should now see the color variations and roughness details you created.
- Find the viewport shading settings dropdown (the arrow next to the mode icons).
- Click on the different HDRI spheres and observe how the lighting changes. Notice how different lighting setups reveal different aspects of your form and material. A sharp, high-contrast HDRI will show reflections clearly, while a soft, diffuse one will give a gentler look.
- Choose an HDRI you like. Now, adjust the Rotation slider. See how this spins the environment around, changing the position of highlights on your sculpture. This is incredibly useful for checking your form from all angles.
- Adjust the Strength slider to make the lighting brighter or darker.
This process of rotating the lighting environment is analogous to walking around a physical sculpture with a lamp in your hand to see how the light catches the surfaces you've carved.
4. Material Preview vs. Rendered Mode
You might notice the fourth icon, Rendered mode, looks similar. It's crucial to understand the difference.
- Material Preview Mode uses its own built-in HDRI lighting. It ignores any lights you've added to your scene. Its purpose is to let you develop a material in a neutral, controlled environment.
- Rendered Mode uses the actual lights, world, and render engine (EEVEE or Cycles) you have set up in your scene. Its purpose is to show you what your final image will look like.
Think of it this way: Material Preview is the workshop; Rendered mode is the gallery. You build the material in the workshop under perfect lighting, then you check how it looks in the gallery with the specific lighting you've designed for the final shot.
Blender viewport shading guide
For a concise written summary of this distinction and why you might see nothing when switching modes, this article from Artisticrender.com is very helpful.
First, read the section 'Blender viewport shading texture or color not showing.' This addresses the most common beginner question related to this topic. Then, read the section 'Viewport shading material preview mode' to reinforce what you've just learned.
Conclusion
You now have a clear understanding of how to view and evaluate your materials as you create them. This is a vital part of the 3D workflow that moves you from simply assembling nodes to making conscious artistic choices about how your surfaces should look and feel under light.
Key Takeaways:
- Blender offers four viewport shading modes for different tasks: Wireframe, Solid, Material Preview, and Rendered.
- Material Preview is the essential mode for developing materials, as it uses high-quality built-in HDRI lighting for fast, accurate previews.
- You can change the HDRI environment, its rotation, and its strength to see how your material behaves under different lighting conditions.
- The 'Z' key pie menu is the most efficient way to switch between shading modes.
- Material Preview is for developing the material in isolation, while Rendered mode is for previewing the final scene with its specific lighting.
Next Steps
So far, we've relied on Blender's excellent built-in lighting to check our work. To create a final, compelling image of your sculpture, however, you'll want complete artistic control over how it's lit. In the next lesson, we will enter the "gallery" and begin crafting our own lighting by learning how to set up a three-point lighting arrangement, a classic technique used in photography, cinema, and 3D rendering.