Introduction
In our last lesson, you learned how to act like an assembler, applying different, distinct materials to various parts of a single object using material slots. This allowed you to define separate components—like a chrome handle on a painted body.
However, if you look closely at any real-world object, its surface is never perfectly uniform. A metal plate has subtle scratches and smudges that affect its shininess. A stone surface has slight variations in color. These imperfections are what make an object feel real and tell a story about its history and environment.
Today, we'll move from the macro level of assigning materials to the micro level of adding these lifelike details. Our goal is to use a simple procedural noise texture to add subtle surface variation. This technique is a cornerstone of creating realistic materials and will help you break free from the unnaturally perfect "computer-generated" look.
1. What are Procedural Textures?
In your physical sculpting work, you might create texture by pressing a piece of fabric into clay or by using a photo to guide your paintwork. In Blender, we have two similar approaches:
- Image Textures: Using a photograph (like a JPG or PNG) of wood grain, metal scratches, or fabric.
- Procedural Textures: Using a mathematical algorithm to generate a pattern on the fly.
The Noise Texture is one of the most fundamental and useful procedural textures. Think of it not as a "noisy" or "grainy" image, but as a generator of random, organic patterns, much like the patterns in marble or clouds. The huge advantage is that it's infinitely detailed, never repeats, and you can change its characteristics instantly.
To understand this concept and see the Noise Texture node in action, let's watch a short segment.
Introduction to Procedural Shader Nodes for Complete Beginners (Blender Tutorial)
This clip from Ryan King Art's "Introduction to Procedural Shader Nodes" introduces the Noise Texture, explains its core parameters, and clarifies the crucial difference between procedural and image-based textures.
Watch from 06:58 to 10:29. Focus on: How to add a Noise Texture node (Shift+A > Search > Noise Texture). The effect of its main parameters: Scale, Detail, and Roughness. The conceptual difference between a procedural texture (generated by Blender) and an image texture (an external file).
2. Adding Variation: From a Single Value to a Map
So far, you've set properties like Roughness using a single slider—one value for the entire material. A procedural texture allows you to replace that single value with a whole map of values.
When you use the Factor output of a Noise Texture, you get a grayscale pattern. Blender interprets this pattern as a range of numbers from 0 (black) to 1 (white). By connecting this output to an input like Roughness, you can make parts of the surface shiny (black areas) and other parts matte (white areas), all at once. This is perfect for simulating smudges, wear, or a slightly wet surface.
This is one of the most effective ways to instantly add realism to a material. The following video gives a concise demonstration of exactly this technique.
How to Use the NOISE TEXTURE NODE in Blender! (Beginner Tutorial)
In this clip from "How to Use the NOISE TEXTURE NODE in Blender!" by The CG Essentials, you'll see how to directly control the roughness of a material using a noise pattern.
Watch from 03:10 to 04:49. Pay close attention to how connecting the noise texture's Factor output to the Roughness input of the Principled BSDF immediately creates variation in the surface reflections.
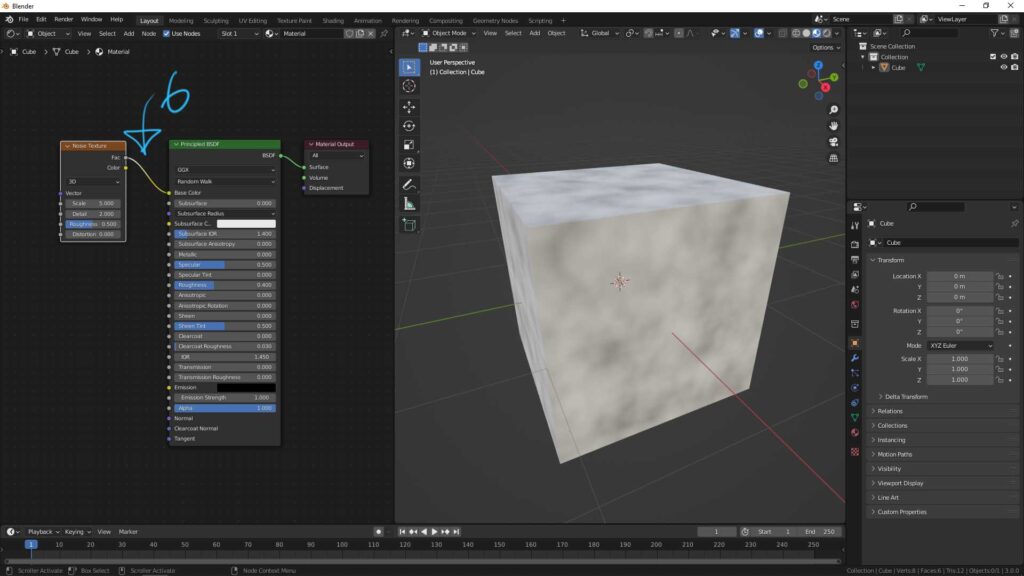
Hands-On Practice: Roughness Variation (10 min)
Let's try this now. Open one of your sculpture projects.
- Select your sculpted object and go to the Shading workspace.
- Select a material you want to enhance. Let's start with a metallic or dark plastic material, as roughness variations are very visible on them.
- Add a Noise Texture node (
Shift+A> Search >Noise Texture). - Drag a noodle (the connection wire) from the yellow
Factoroutput of the Noise Texture to theRoughnessinput of yourPrincipled BSDFnode. - Experiment with the Scale, Detail, and Roughness sliders on the Noise Texture node. Observe how this affects the reflections on your object. A larger
Scalewill create smaller patterns, while a smallerScalecreates larger, broader patches.
3. Gaining Control with the ColorRamp Node
Plugging the noise texture directly into the roughness or color input gives you a random, organic pattern. But what if you want more artistic control? What if you want the surface to be mostly shiny, with just a few dull spots? Or what if you want the color variation to be between two specific shades of blue, not just black and white?
For this, we use the ColorRamp node. It's an essential tool that acts as a gradient controller. You feed the grayscale noise pattern into it, and the ColorRamp "remaps" the brightness values to any colors or shades of gray you define.
You place it between the Noise Texture and the Principled BSDF.
Noise Texture -> ColorRamp -> Principled BSDF
This next video demonstrates a fantastic, practical example: creating a worn metal material by using a Noise Texture and a ColorRamp to control both the color and the roughness.
Introduction to Procedural Shader Nodes for Complete Beginners (Blender Tutorial)
Let's return to the Ryan King Art video. This segment demonstrates a complete workflow for creating a more complex material, showing how the ColorRamp node gives you precise control over the noise texture's effect.
Watch from 16:05 to 21:59. The creator builds a procedural metal material from scratch. Focus on: How the ColorRamp is placed after the Noise Texture to control the color variation (creating a dirty/rusty look). How the same noise texture is also used to drive the Roughness, creating a physically consistent effect where rusty spots are less shiny. How dragging the flags on the ColorRamp makes the effect sharper or softer.
4. Hands-On Project: Enhancing Your Sculpture (15 min)
Now it's your turn to be a material artist. Continue with the sculpture you were just working on.
Your Goal: Enhance your material by adding subtle variations in roughness and/or color.
- Refine Roughness: Insert a ColorRamp node (
Shift+A> Search >ColorRamp) between yourNoise Textureand theRoughnessinput. - Play with the black and white flags on the ColorRamp.
- To make the material overall more shiny but with some dull spots, slide the black flag to the right. This tells Blender to map most of the noise values to black (shiny).
- To make it mostly rough with a few glossy spots, slide the white flag to the left.
- Add Color Variation:
- Add a second ColorRamp node.
- Connect the
Factorfrom the sameNoise Textureinto theFacinput of this new ColorRamp. - Connect the
Coloroutput of this ColorRamp to theBase Colorinput of your Principled BSDF. - Change the black and white flags on this new ColorRamp to subtle variations of your material's main color. For example, if you have a blue plastic, try a dark blue and a slightly lighter blue. This will create a much more natural look than pure black and white.
- Spend some time adjusting the Noise Texture settings and the ColorRamp flags until you achieve a look you find interesting. The goal here is subtlety; often, less is more.
Conclusion
Excellent work. You've just unlocked one of the most powerful concepts in digital material creation. By moving beyond single values and using procedural textures to drive your material's properties, you can create surfaces with convincing depth, history, and realism. This is a skill you will use on nearly every project going forward.
Key Takeaways:
- Procedural textures, like the Noise Texture, are generated by Blender and offer infinite, non-repeating detail.
- They can be used to control any input on a shader, such as
Base ColororRoughness, to create surface variation. - Plugging a grayscale texture (like the
Factoroutput) into theRoughnessinput creates realistic variations in shininess. - The ColorRamp node is a crucial tool for gaining artistic control over a procedural texture's output, allowing you to remap its values to a custom gradient.
Next Steps
Now that you're creating materials with more sophisticated and subtle details, it becomes even more important to see them accurately. The standard solid-view shading doesn't show these effects. In the next lesson, we will explore the Material Preview viewport shading mode, and learn how to use its settings to get a fast, accurate preview of your materials as you build them.