Introduction
Welcome to the next stage of your journey in bringing your sculptures to life! In our last lesson, we focused on Material Preview mode, which uses built-in lighting to help you develop the look of your materials in a controlled environment. We called this the "workshop."
Today, we move into the "gallery." Your goal for this lesson is to learn how to set up a three-point lighting arrangement (key, fill, and rim) to illuminate your sculpture. This is a timeless, foundational technique used across photography, filmmaking, and 3D art. As a sculptor, you already have an intuitive understanding of how light and shadow define form. This lesson will give you the digital tools to control that interplay with precision and artistic intent, transforming a well-sculpted model into a professionally presented piece of art.
1. The Theory of Three-Point Lighting
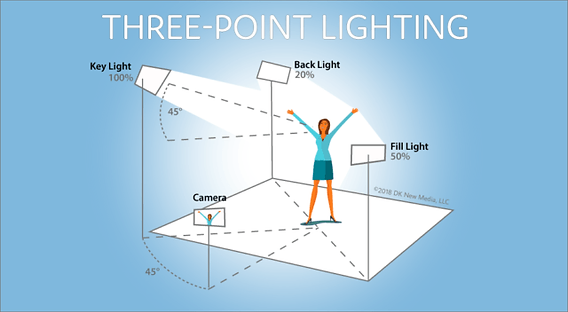
Before we add any lights in Blender, let's understand the role of each light in this classic setup. The name says it all: we use three distinct lights to sculpt an object, control shadows, and make it stand out.
- Key Light: This is your main, and usually brightest, light source. It establishes the primary direction of light, casts the most prominent shadows, and reveals the main form of your sculpture.
- Fill Light: This is a secondary, softer light positioned on the opposite side of the key light. Its job is not to create new shadows, but to "fill in" the dark shadows cast by the key light, ensuring that details in the darker areas aren't lost.
- Rim Light (or Backlight): Placed behind your subject, this light traces the edges of your sculpture with a bright line, or "rim." This effect visually separates your object from the background, giving it depth and preventing it from looking flat.
This diagram illustrates the classic arrangement.
To see these concepts explained in the context of Blender, the following short video provides an excellent overview.
Three Point Lighting - Blender 2.80 Fundamentals
The official Blender YouTube channel has a great fundamental tutorial on three-point lighting. This first part clearly defines the role of each light.
Watch from the beginning to 01:51. Pay close attention to the visual demonstration of what each light—key, fill, and rim—contributes to the final look.
2. Preparing Your Scene for Lighting
To see the effect of the lights we're about to add, we need to be in the correct viewing mode and ensure we're starting with a blank canvas, lighting-wise.
- Open one of your sculpture projects. Choose an abstract or hard-surface model you've worked on in previous lessons.
- Delete any existing lights. Select any light objects in your scene (they usually look like a small sun icon) and press
Xto delete them. We want to start from scratch. - Switch to Rendered Viewport Shading. In the top-right of the 3D viewport, click the far-right sphere icon. You can also use the pie menu by holding
Zand moving your mouse up. Your scene will likely go very dark—this is exactly what we want! We are now viewing the scene through our "gallery" lights, and since there are none, it's dark. - Darken the World. By default, Blender's "world" contributes a gray ambient light. To gain full control, we should turn this off.
- Go to the Properties panel on the right.
- Click the red globe icon to open the World Properties.
- Find the
Colorsetting near the top. Click it and drag the brightness slider all the way down to pure black.
Your sculpture should now be almost completely black, lit only by a faint ambient glow. You've created a perfect digital "black box" studio, ready for you to add your own lights.
3. Hands-On: Building Your Lighting Setup
Now we will add our three lights. While the video you watched uses Point lights, we will use Area lights, which simulate studio softboxes and give softer, more professional shadows. The process of adding, moving, and adjusting them is the same.
-
Add the Key Light:
- Press
Shift + Ato open the Add menu, go toLight, and select Area. - Using the Move tool (
G), position the light up and to one side of your object, roughly at a 45-degree angle from your camera's point of view. - In the Properties panel, go to the green light bulb tab (Object Data Properties).
- Increase the Power until the main side of your object is well-lit. A value between 500W and 1000W is a good starting point.
- Increase the Size of the light (e.g., to 1m or 2m). Notice how larger lights produce softer, more diffuse shadows. This is a direct parallel to using a large softbox in a physical photo studio.
- Press
-
Add the Fill Light:
- Select your Key Light. Press
Shift + Dto duplicate it, and right-click to release it in place. - Move this new light to the opposite side of your object. It's often placed lower and more front-facing than the key light.
- This is the most important step: Drastically reduce its Power. The fill light should be just strong enough to make the shadows less black, revealing detail. A common ratio is for the fill to be 25-50% of the key light's power. If your key is 800W, try 200W for the fill.
- Select your Key Light. Press
-
Add the Rim Light:
- Duplicate one of your existing lights again (
Shift + D). - Move this third light behind your sculpture, facing towards the camera.
- You'll likely need to increase its Power significantly to get a strong highlight on the edges of your model. Don't be afraid to use very high values.
- You may need to adjust its
Sizeand shape (you can change an Area light from Square to Rectangle) to get a rim of light that best complements your sculpture's form.
- Duplicate one of your existing lights again (
The image below shows a typical final arrangement in the Blender viewport.

For a guided walkthrough of this placement process, you can refer back to the Blender Fundamentals video.
Three Point Lighting - Blender 2.80 Fundamentals
Follow along with this video to see the process of positioning and adjusting the three lights. Although the video uses Point and Spot lights, the principles of placement and adjusting power are identical for the Area lights we are using.
Watch from 01:51 to 04:48. Key Light (01:51 - 03:17): Follow the process of placing the first light. Remember, we are using an Area light, not a Point light. Fill Light (03:17 - 03:55): Observe how the second light is duplicated and its power is reduced to soften shadows. Rim Light (03:55 - 04:48): See how the third light is placed behind the subject and its power increased to create the outline.
4. Practice and Experimentation (15-20 min)
The three-point setup is a starting point, not a rigid rule. The real artistry comes from adjusting it to suit your subject. Spend the rest of our time experimenting with your new lighting setup.
- Adjust Positions: How does the mood change if the key light is more to the side (creating more drama) versus more to the front (flatter lighting)?
- Tweak Power Ratios: What happens if your fill light is almost as bright as your key? What if it's very dim? This is called the "fill ratio" and it controls the overall contrast of your scene.
- Play with Color: In the light properties, you can change the
Colorof each light. Try giving your key light a slightly warm (yellow/orange) tint and your fill or rim light a slightly cool (blue) tint. This is a common technique for creating color contrast and visual interest.
Your background in traditional art gives you a strong foundation for this. Trust your eye. The goal is to use light to emphasize the forms you've sculpted.
Conclusion
You have now learned one of the most powerful and fundamental skills in 3D rendering. By mastering the three-point lighting setup, you've taken a massive step toward creating professional, compelling images of your digital sculptures.
Key Takeaways:
- Three-point lighting uses a Key, Fill, and Rim light to define form, control contrast, and create depth.
- The Key Light is the main light, the Fill Light softens its shadows, and the Rim Light separates the subject from the background.
- To set up lighting, you must switch to Rendered Viewport Shading and work in a "dark studio" by turning down the world light.
- Area lights are excellent for simulating soft studio lighting. Their
Sizedirectly impacts the softness of the shadows. - The setup is a guideline; artistic control comes from experimenting with the position, power, size, and color of each light.
Next Steps
The three-point setup gives you precise, studio-like control. However, sometimes you may want to place your sculpture in a more natural, realistic environment. In the next lesson, we will explore a completely different approach: using an HDRI to apply realistic image-based lighting and reflections, which is perfect for simulating outdoor or complex indoor scenes.