Introduction
In our last lesson, you mastered the art of creating a controlled "studio" environment using a three-point lighting setup. This gave you precise, manual control over how light and shadow define your sculptures. Today, we'll explore a powerful and complementary technique that brings the complexity of real-world lighting into your digital scene.
This lesson focuses on using a High Dynamic Range Image (HDRI) to apply realistic image-based lighting and reflections to a scene. Instead of placing individual lights, we will surround your sculpture with a special 360-degree photograph that emits light, bathing your object in a rich, naturalistic environment. For someone with your background in physical art, this is analogous to taking one of your sculptures out of the studio and placing it in a sunlit courtyard or a softly lit gallery—the environment itself becomes the light source.
1. What is an HDRI and Why Use It?
An HDRI is a panoramic image that contains a far greater range of light and dark values than a standard photograph. This "High Dynamic Range" allows it to not only serve as a background but also to cast realistic light and shadows, and create detailed reflections.

The core benefits of using an HDRI are:
- Realism: It captures the subtle colour variations and complex light bounces of a real environment, something very difficult to replicate with manual lights.
- Speed: You can achieve a beautiful, complex lighting setup in a matter of minutes.
- Reflections: For any material that is even slightly reflective (like polished stone, metal, or glazed ceramic), HDRIs provide a detailed world for the surface to reflect.
2. Finding and Applying Your First HDRI
First, you'll need an HDRI file. Fortunately, there are excellent free resources available.
How to Light your Scenes with HDRIs in Blender
The video "How to Light your Scenes with HDRIs in Blender" by Ryan King Art starts by pointing you to an excellent resource for free HDRIs and explains the basic download options.
Watch the first minute of this video (00:00 - 01:05). The creator recommends Poly Haven, which is the industry standard for free, high-quality assets. For now, you can follow his advice to download a 1K resolution HDR file; this is small and efficient for generating light without needing a detailed background.
Now that you know where to find an HDRI, let's apply it in Blender. For this exercise, start a new file or open one of your recent sculpture projects.
Hands-on Steps:
- Prepare a Test Object: If you're not using one of your own sculptures, add a UV Sphere (
Shift + A > Mesh > UV Sphere), apply smooth shading (right-click >Shade Smooth), and give it a metallic material. To do this, go to the Material Properties (checkerboard icon), create a new material, and in the Principled BSDF node settings, setMetallicto 1.0 andRoughnessto about 0.2. This will make the reflections very obvious. - Delete Existing Lights: Just like in our last lesson, select and delete any existing Light objects (
Xkey) so the HDRI is our only light source. - Go to Rendered View: Switch your viewport to Rendered Shading (hold
Zand move mouse up) to see the lighting effects in real-time. - Add the Environment Texture:
- In the Properties Panel on the right, go to the World Properties (red globe icon).
- Click the yellow dot next to
Color. - From the menu, select Environment Texture.
- Click the
Openbutton and navigate to the.hdrfile you downloaded.
Your scene should now be illuminated by the HDRI! You'll see the image in the background and its light reflected on your object.
3. Taking Control of the HDRI
Simply loading an HDRI is just the start. The real artistic control comes from adjusting its rotation, strength, and appearance. For this, we need to use the Shader Editor.
A. Rotating the HDRI to Control Light Direction
Changing the rotation of the HDRI is like physically turning your sculpture to catch the light in different ways. It allows you to control where the main light source (like the sun in the HDRI) is located and where the shadows fall.
How to Light your Scenes with HDRIs in Blender
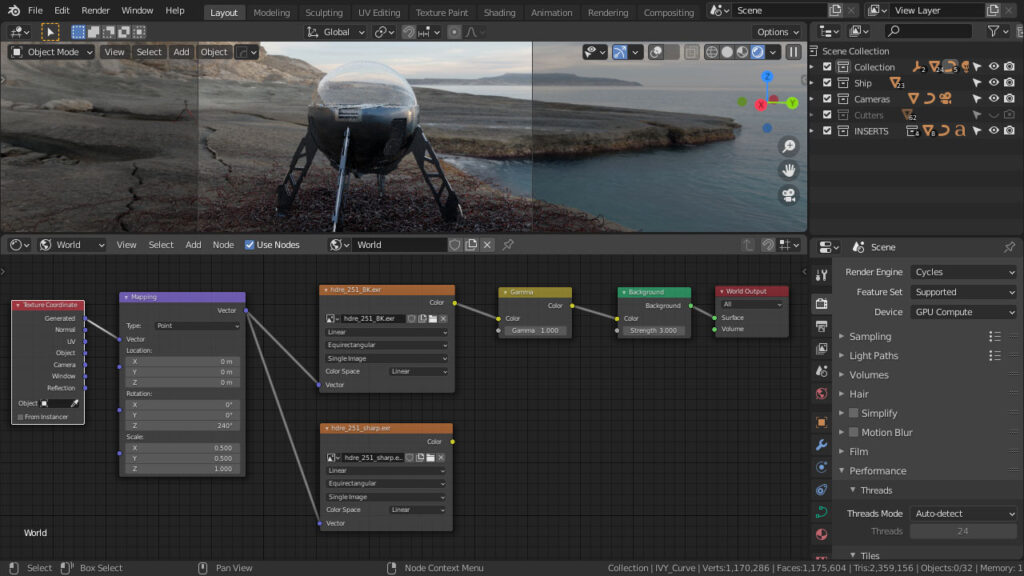
Let's return to the Ryan King Art video. It provides a very quick and clear guide on how to access the world nodes and use a standard Blender add-on to easily add rotation controls.
Watch from 01:05 to 02:44. He first shows the result of adding the HDRI. At 01:58, he switches to the Shading workspace and changes the editor context from Object to World. Crucially, at 02:11 he shows how to enable the Node Wrangler add-on. This is a vital tool. Please ensure you enable it as he demonstrates (Edit > Preferences > Add-ons). Once enabled, he selects the Environment Texture node and presses Ctrl + T. This automatically adds the Texture Coordinate and Mapping nodes. Follow along and experiment by changing the Z Rotation value in the new Mapping node. Observe how the light and reflections move across your object.
B. Adjusting Brightness and Exposure
Sometimes an HDRI will make your scene too bright or too dark. You have two main ways to adjust this:
- Strength: In the World Properties, the
Strengthvalue on the Background node acts as a simple multiplier for the HDRI's brightness. This is a quick and direct way to make adjustments. - Exposure: A more photographic and often more nuanced approach is to use the
Exposuresetting. This works like the exposure control on a camera.
Tutorial – How to use an HDRI environment texture in Blender 2.93
The article 'Tutorial – How to use an HDRI environment texture in Blender' from Aifosdesign has an excellent, concise section on fixing exposure issues.
Read the section titled 'To properly balance this...'. It's about halfway down the page. The instructions guide you to Render Properties > Color Management. Follow the steps to find and adjust the Exposure slider. This gives you a more physically-based way to control the scene's brightness.
C. Creating a Transparent Background
Often, you want the realistic lighting and reflections from an HDRI, but you don't want to see the image in the background. You might prefer a clean, neutral background to showcase your sculpture.
This is very simple to achieve.
- Go to the Render Properties (camera icon).
- Open the Film section.
- Check the box for Transparent.
The background will disappear, but your object will remain perfectly lit by the HDRI. If you render the image now, it will have a transparent background that you can easily use in graphic design or on a portfolio website.
4. Practice Exercise (15-20 min)
It's time to put these techniques into practice.
- Open the project file for one of your finished sculptures (either an abstract or hard-surface model).
- Go to Poly Haven and download three different HDRIs:
- An indoor one (e.g., "Photo Studio").
- An outdoor urban/man-made one (e.g., "Kloofendal Amphitheatre").
- An outdoor nature one (e.g., "Spruit Sunrise").
- For each HDRI, light your sculpture.
- Load the HDRI into the World.
- Adjust the Z Rotation until the light hits your sculpture in a way that best reveals its form.
- Fine-tune the overall brightness using either the
StrengthorExposuresetting. - Consider if the scene looks better with the HDRI visible or with a Transparent background.
- Render a still image of your favorite lighting setup for each of the three HDRIs. Compare the results. Notice how the mood and character of your sculpture change dramatically depending on its environment.
Conclusion
You have now added a second major lighting technique to your skillset. Where three-point lighting offers granular, artistic control, HDRI lighting provides fast, complex realism that is perfect for grounding your creations in a believable world.
Key Takeaways:
- An HDRI is a 360-degree image that provides both realistic light and reflections for a 3D scene.
- The primary workflow is to add an Environment Texture in the World Properties.
- The Shader Editor (in World mode) gives you advanced control. Using the Node Wrangler add-on (
Ctrl+T) to add a Mapping node is the standard way to control HDRI rotation. - You can adjust brightness with the Strength value or, more professionally, with the Exposure setting under Color Management.
- The Transparent option in the Film panel allows you to use an HDRI for lighting while hiding it from the final render.
Next Steps
You are now equipped to light your sculptures in two distinct and powerful ways. The next logical step is to frame your beautifully lit work. In the following lesson, we will focus entirely on the camera, learning how to adjust its position, focal length, and depth of field to compose a final, compelling shot.