Hello! Welcome to the final lesson in our first module, "Blender Essentials for Sculptors."
In our last session, we looked at how to control the surface appearance of your models using flat and smooth shading. You've now learned how to navigate the 3D space, create and transform basic shapes, and define how they look. However, all this work exists only temporarily in your computer's memory. If you close Blender or your computer crashes, it's gone.
Today, we'll address that with the most crucial practical skill for any digital artist: how to save, open, and manage your Blender project files. Mastering this will give you the confidence to experiment freely, knowing your creative efforts are safe and organized. This lesson is the capstone of our foundational module, ensuring you have all the essential skills before we dive into sculpting.
Your Project's Digital Home: The .blend File
Everything you create in a Blender session—your models, lighting, camera settings, and more—is stored in a single project file. This file has a .blend extension. Think of it as your digital studio or sketchbook for a particular project. Saving your work means writing this .blend file to your computer's hard drive.
The most basic save operations are found in the File menu in the top-left corner of the Blender window:
- Save (
Ctrl+S): Updates the currently open.blendfile with your latest changes. - Save As... (
Shift+Ctrl+S): Saves the current state of your project as a new.blendfile. This is what you'll use the first time you save a project, or when you want to create a new version.
Let's watch a short video that walks through the fundamental process of saving your work for the first time.
Beginners Blender 3D: Tutorial 3 - Saving Your Work in Blender
This video from bpwebmedia provides a clear, beginner-friendly walkthrough of the 'Save As' dialog, including how to create folders for your projects.
Watch from 00:24 to 01:57. Pay attention to how to navigate to a folder, create a new directory, and name your file. The concept of iterative saving is also introduced here, which we will explore next.
As the video shows, Blender's file browser is integrated directly into the Save As window, allowing you to organize your files without leaving the application.
A Professional Habit: Iterative Saving
In any creative process, whether physical sculpture or digital art, you often want to explore different ideas. You might reach a point you like but want to try a different direction without losing your progress. In digital art, we do this through iterative saving—saving multiple versions of your file as you work.
Instead of just overwriting my_sculpture.blend over and over, you'd save a sequence:
my_sculpture_v01.blendmy_sculpture_v02.blendmy_sculpture_v03.blend
This gives you a timeline of your project you can always go back to. Blender has excellent built-in tools to make this easy.
This next video explains two powerful methods for creating these versions.
Understanding .Blend1 Files and Incremental Saves in Blender
Ryan King Art demonstrates two professional workflows for iterative saving: using 'Save Increment' and the plus button in the 'Save As' dialog.
Watch from 01:56 to 03:23. The video will introduce 'Save Increment' (a fantastic shortcut) and show how to use the + and - buttons in the save window to change the version number in your filename.
To summarize those two powerful techniques:
- Save Increment (
Ctrl+Alt+S): This is the quickest method. It automatically adds or increases a number at the end of your filename and saves a new version, leaving your previous version untouched. - The
+Button: In theSave As(Shift+Ctrl+S) window, clicking the+button next to the filename field achieves the same result, giving you a chance to change the location or base name before saving.
Hands-On Practice (15 minutes)
Let's solidify these concepts. Please open Blender.
- Create a Simple Scene: Add a few primitive objects (e.g., a Cube, a Sphere, and a Cylinder) and move them around to create a simple composition. Use what you learned in the last lesson to apply
Shade Smooth by Angleto them. - First Save:
- Press
Shift+Ctrl+Sto open theSave Asdialog. - On the left, navigate to a place you can easily find, like your Desktop or Documents folder.
- Click the "Create New Directory" button (folder icon at the top) and name the folder
Blender Projects. Enter this new folder. - In the filename field at the bottom, type
first_sculpt_01.blendand pressEnteror click "Save Blender File".
- Press
- Make a Change: Select one of your objects and scale it to be much larger.
- Iterate!:
- Now, instead of just saving, press
Ctrl+Alt+S(Save Increment). - Notice that you are now working in a new file. The name at the very top of the Blender window should have changed to
first_sculpt_02.blend.
- Now, instead of just saving, press
- Open a Previous Version:
- Go to
File > Open...(Ctrl+O). - You should see both
first_sculpt_01.blendandfirst_sculpt_02.blend. Selectfirst_sculpt_01.blendand click "Open Blender File". - You are now back to your original composition, before you scaled the object.
- Go to
Feel free to practice this loop a few times. It's a fundamental workflow that will save you countless headaches.
Blender's Safety Nets: Recovery and Backups
Even with diligent saving, accidents happen. Blender might crash, or you might close it without saving your latest changes. Fortunately, Blender has robust, automatic systems to protect you.
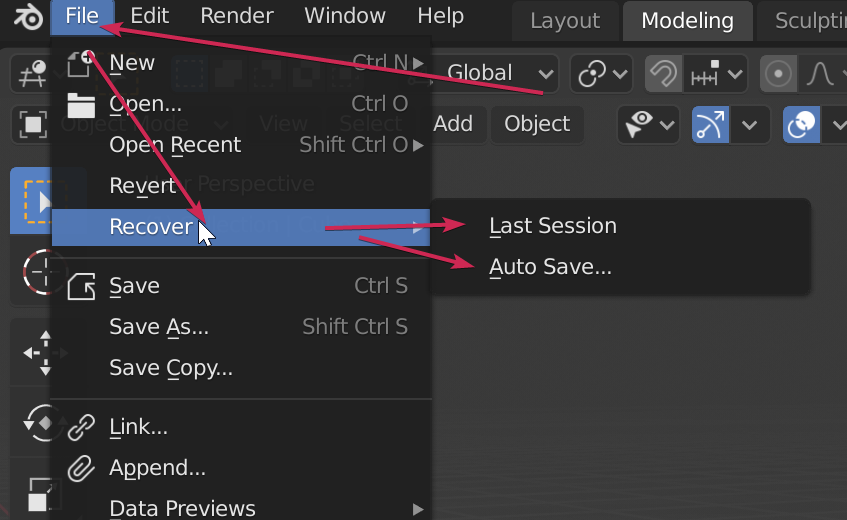
There are three key recovery mechanisms to understand:
-
.blend1 Files: Whenever you save your work (
Ctrl+S), Blender takes your previous save and renames it toyour_file.blend1. This acts as a single-version backup. If you make a mistake and save over it, you can often go into your folder, rename the.blend1file to.blend, and recover your previous state. -
Auto Save: By default, Blender automatically saves a copy of your entire project to a temporary folder every two minutes. If Blender crashes, you can recover this file. To do so, go to
File > Recover > Auto Save.... This will open a file browser where you can find and open these time-stamped backup files. -
Recover Last Session: If you accidentally close Blender without saving, Blender saves a snapshot of your work right before it quits. You can get it back by re-opening Blender and immediately going to
File > Recover > Last Session.
This article provides an excellent summary of these features.
Blender, saving and recovering: Don't lose your work ever again
For a detailed explanation of Blender's recovery systems, please read the following sections from the article 'Blender, saving and recovering' on ArtisticRender.com.
Please read the section titled 'Recovering work'. It clearly explains when to use 'Last session' versus 'Auto save...' and where Blender stores these temporary files.
The key takeaway is that Blender works hard in the background to protect your efforts. Your main job is to use Save As to establish a project location, and then use Save (Ctrl+S) or Save Increment (Ctrl+Alt+S) frequently.
Conclusion
Congratulations on completing the first module! You've built an essential toolkit for working in Blender, from navigating the world to creating, manipulating, shading, and now, reliably saving your work.
Key Takeaways:
- Your entire project is saved in a
.blendfile. - Use
Save As(Shift+Ctrl+S) to create a file andSave(Ctrl+S) to update it. - Adopt the professional habit of iterative saving using
Save Increment(Ctrl+Alt+S) to keep a history of your creative process. - Blender protects you from data loss with
.blend1backups, an Auto Save feature, and theRecover Last Sessionoption.
You now have a solid, practical foundation. You're ready to move from the technical essentials to the creative core of this course.
Next Steps
In our next lesson, we will begin Module 2: "First Steps in Digital Sculpting." We will finally switch into Sculpt Mode, customize the interface for sculpting, and you'll get your hands on your first digital clay and tools like the Draw, Clay Strips, and Smooth brushes. The real sculpting journey starts now