Hello! Welcome to your sixth lesson in "Blender Essentials for Sculptors."
In our last session, we focused on the very first step of any sculpting project: creating your initial block of material. You learned how to add and delete primitive mesh objects like spheres and cubes, and how to adjust their initial properties.
Today, we'll build on that by learning how to control the surface appearance of these objects. This is a fundamental concept that determines whether your sculpture looks faceted and geometric or smooth and organic. Our goal is to apply smooth and flat shading to control surface appearance. For a sculptor, this is the digital equivalent of choosing between a rough, chiseled finish and a finely polished one.
The Illusion of Smoothness
At their core, all 3D models in Blender are made of flat surfaces called polygons or "faces." Even a perfect-looking sphere is just an approximation made from many small, flat faces.
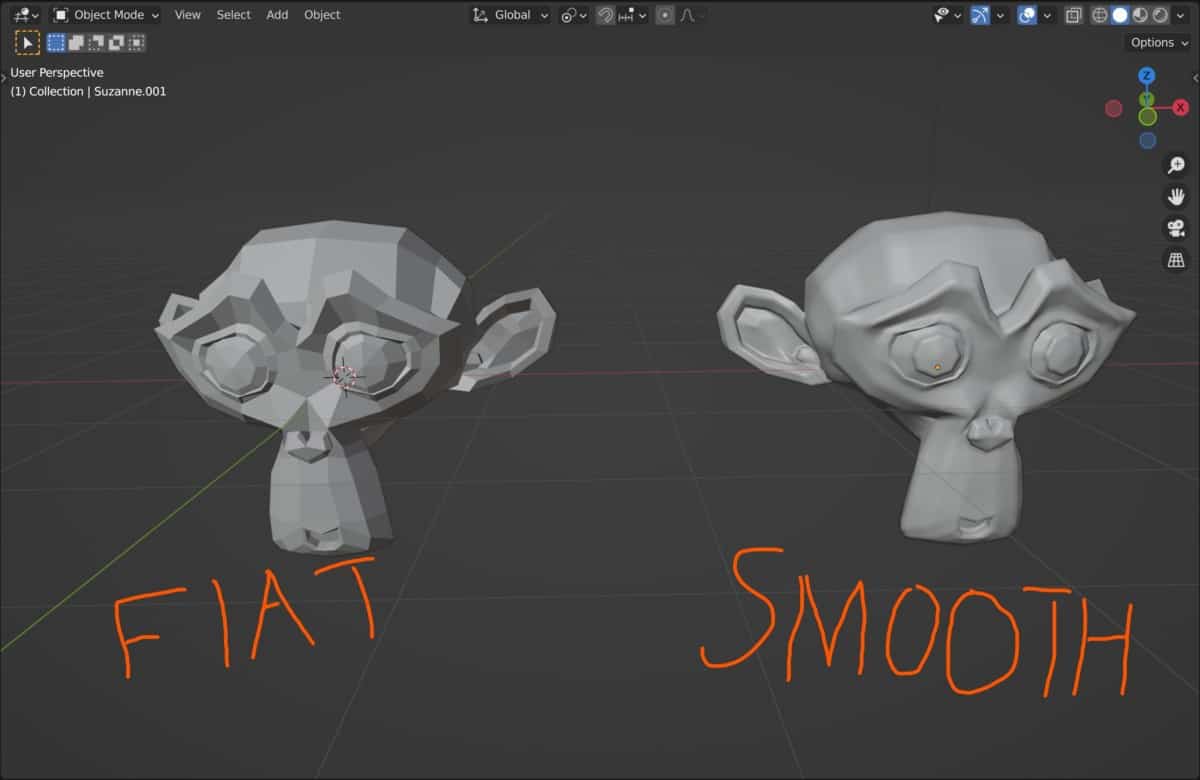
Flat Shading is the default behavior. Blender renders each face individually, making the underlying geometric structure clearly visible. This is great for a stylized, low-poly look.
Smooth Shading, on the other hand, tells Blender to create an illusion. It calculates how light would hit the surface as if it were perfectly smooth, blending the shading across the edges of the polygons.
This image shows the exact same model (Blender's mascot, Suzanne) with the two different shading modes. Notice how on the right, the surface appears curved and continuous, even though the underlying geometry is identical to the faceted model on the left.
Applying Basic Shading
Switching between these two modes is straightforward. In Object Mode, simply select your object, right-click to open the Object Context Menu, and choose either Shade Flat or Shade Smooth.

As you can see in the image above, a problem arises when you use Shade Smooth on an object that should have both curved and sharp parts, like a cylinder. The smooth shading tries to blend everything, resulting in strange visual artifacts along the sharp edges. This is where we need a more intelligent solution.
The Best of Both Worlds: Shading by Angle
To solve this problem, Blender offers a hybrid approach that keeps sharp edges crisp while smoothing out the rest of the model. This is done by telling Blender to only smooth edges that are below a certain angle threshold.
In older versions of Blender and many online tutorials, you'll see this feature referred to as "Auto Smooth." In Blender 4.1 and newer, this has been updated to a more intuitive system. It's important to know about this change to avoid confusion.
The modern way to achieve this is with an operator called Shade Smooth by Angle. This powerful tool combines the best of both worlds.
Let's watch a short, up-to-date video that explains how this new system works.
Where is Shade Auto Smooth in Blender 4.1? (Shade smooth by angle tutorial)
This video by Blender Inferno clearly demonstrates the new 'Shade Smooth by Angle' feature that replaces the old 'Auto Smooth' workflow.
Watch from the beginning to 00:49. The video will show you how to apply 'Shade Smooth by Angle' and how to adjust the angle threshold in the 'Adjust Last Operation' panel.
As you saw, applying Shade Smooth by Angle gives you immediate, intelligent results. It applies smooth shading but preserves hard edges based on an angle you define. You can tweak this angle in the Adjust Last Operation panel right after applying it.
- A low angle (e.g., 20°) will make more edges appear sharp.
- A high angle (e.g., 60°) will smooth more of the model.
The default of 30° is often a great starting point for many models.
A More Flexible Method: The Modifier Approach
What if you want to change the smoothing angle later? As you know, the Adjust Last Operation panel disappears once you do something else. For a more flexible, non-destructive workflow, you can use a modifier. This keeps the setting available for you to tweak at any time.
Here's the process:
- First, apply basic
Shade Smoothto the object (right-click >Shade Smooth). The object will look overly soft, which is normal. - Go to the Modifier Properties (the blue wrench icon) in the Properties panel.
- Click Add Modifier and find Smooth by Angle under the
Normalscategory. - The modifier will immediately fix the shading, and you can now adjust the
Anglesetting within the modifier's properties whenever you like.
This next clip from the same video demonstrates this exact workflow.
Where is Shade Auto Smooth in Blender 4.1? (Shade smooth by angle tutorial)
Now, let's look at the modifier-based method for controlling smoothing, which offers more long-term flexibility.
Watch from 01:29 to 01:59. This part shows how to add the 'Smooth by Angle' modifier to an object that has already been set to 'Shade Smooth'.
This modifier-based technique is excellent for hard-surface modeling, where you might be experimenting with different forms and need to adjust your shading on the fly.
Hands-On Practice (15-20 minutes)
Let's put this knowledge into practice. Please open Blender and follow along.
- Start fresh: Clear your scene (
Ato select all,Xto delete). - The Cube:
- Add a Cube (
Shift + A>Mesh>Cube). - Right-click and select
Shade Smooth. Observe the strange, dark shading at the edges. It doesn't look like a cube anymore. - Now, right-click and select
Shade Smooth by Angle. It should instantly snap back to looking like a proper cube. This is because all its angles are 90°, which is greater than the default 30° threshold.
- Add a Cube (
- The Cylinder:
- Delete the cube and add a Cylinder (
Shift + A>Mesh>Cylinder). - By default, it's
Shade Flat. You can see the facets along its curved side. - Right-click and
Shade Smooth. Notice the ugly shading on the flat top and bottom caps. - Right-click and
Shade Smooth by Angle. The sides are now smooth, and the top and bottom caps have a crisp, sharp edge. Perfect! - In the
Adjust Last Operationpanel in the bottom-left, drag theAnglevalue up past 90°. The ugly shading will return because you've told Blender to smooth even the 90° edges. Set it back to 30°.
- Delete the cube and add a Cylinder (
- The Icosphere:
- Delete the cylinder and add an Icosphere (
Shift + A>Mesh>Icosphere). - Right-click and
Shade Smooth. It should look perfectly smooth. Because an icosphere is designed with relatively uniform angles between its faces, basicShade Smoothworks very well here, which is why it's a favorite starting point for organic sculpting.
- Delete the cylinder and add an Icosphere (
Spend some time experimenting with different primitives and these shading options. This simple tool is one of the most important for controlling the final look and feel of your models.
Conclusion
Excellent work! You now have a critical tool for controlling the character of your 3D models. You've moved beyond just creating shapes to defining how their surfaces are perceived.
Key Takeaways:
- Shade Flat displays the individual polygons of a mesh, creating a faceted look.
- Shade Smooth blends the lighting across polygons to create the illusion of a smooth surface. It can cause visual problems on models with sharp edges.
- Shade Smooth by Angle is the modern, intelligent solution. It smooths surfaces below a defined angle while keeping sharper edges crisp.
- You can apply this effect either directly via the right-click menu or non-destructively using the Smooth by Angle modifier.
Next Steps
So far in this module, you've learned to navigate Blender, add objects, transform them, and control their basic shading. You're building a solid foundation. But all this work is for nothing if you can't save it! In our next and final lesson for this module, we will cover the essential and practical skill of saving, opening, and managing Blender project files.