Hello! Welcome to your fifth lesson.
In our last session, you mastered the fundamental transformations of move, rotate, and scale. You put this into practice by building a simple castle, which gave you a sneak peek at adding new objects. Today, we'll formalize that knowledge.
The goal of this lesson is to learn how to add and delete primitive mesh objects. For a sculptor, this is the equivalent of selecting your initial block of material—be it a cube of marble, a sphere of clay, or a cylinder of wood. These primitive shapes are the starting point for all your digital sculptures.
What are Primitive Meshes?
In Blender, "primitive meshes" are a collection of basic, predefined geometric shapes that you can add to your scene. They serve as the foundational building blocks for more complex models. Instead of starting from a single point in space, you'll almost always start your work by adding a primitive.
Here is a look at the standard primitives available in Blender:
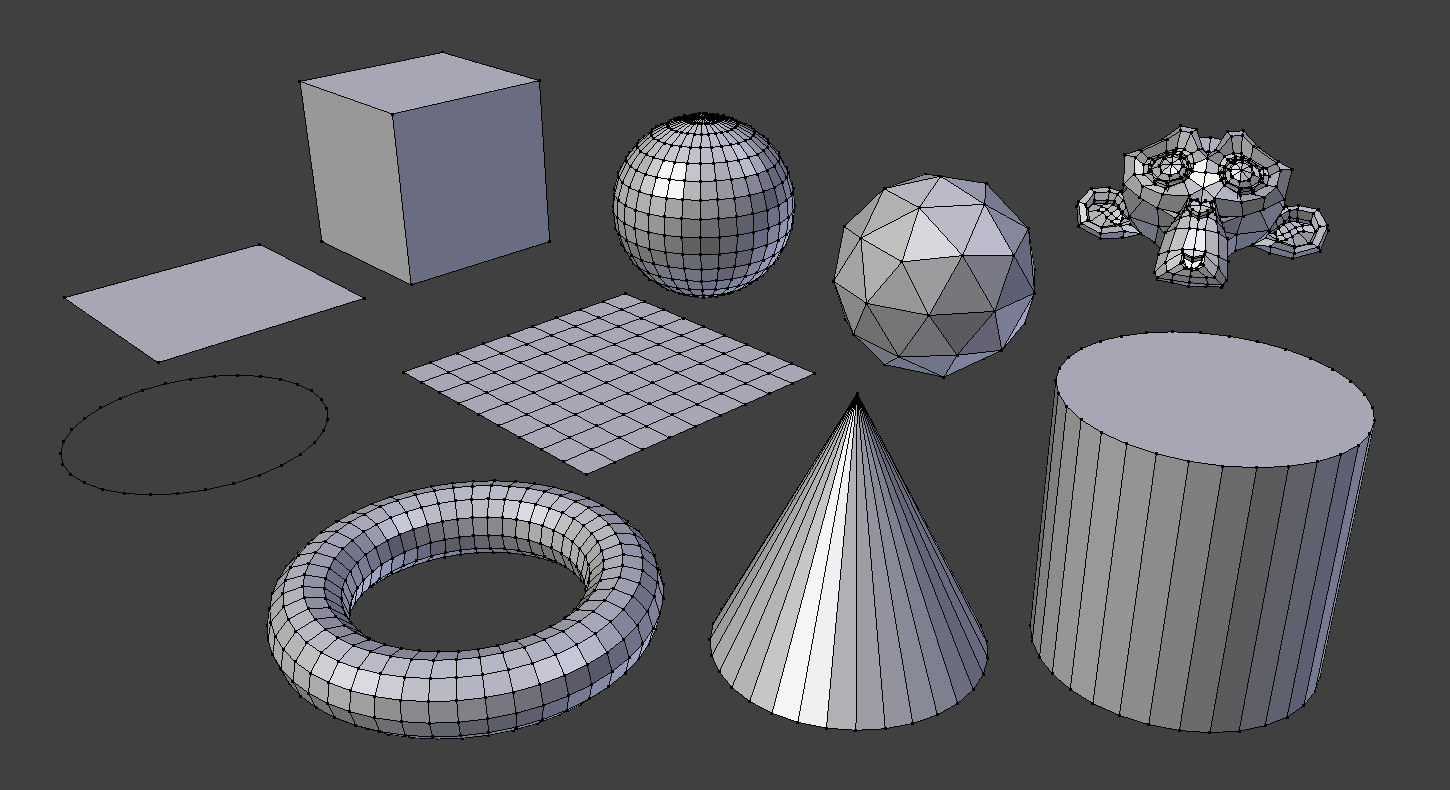
For sculpting, the most common starting points are the Cube (for blocky, hard-surface forms) and the Spheres (for organic forms).
The Core Workflow: Adding and Deleting
The process of adding and removing these base shapes is simple and relies on a couple of key shortcuts that you will use constantly.
To Add an Object:
The primary method is to use the shortcut Shift + A. This brings up the Add menu right at your cursor's location. From there, you navigate to Mesh and select the primitive you want to create.

Alternatively, you can find the same Add menu in the header of the 3D Viewport.
To Delete an Object:
Select the object you want to remove and press the X key or the Delete key. Blender will ask for confirmation; simply click Delete or press Enter.
Let's watch a short video that demonstrates this workflow clearly.
Blender Beginner Tutorial – Add & Delete Meshes
This video from Blender Academy will walk you through the basic actions of deleting the default cube and adding a new mesh. It also introduces a critical concept we will discuss right after.
Watch from 00:47 to 02:56. The video will first show you how to delete an object and then how to add a new one using the Shift + A shortcut.
The "Adjust Last Operation" Panel: Customizing Primitives
You may have noticed that when you add a new object, a small box appears in the bottom-left corner of the 3D Viewport. This is the Adjust Last Operation panel, and it is incredibly important.
This panel allows you to change the properties of the primitive you just created. For example, you can increase the number of segments in a sphere to make it smoother, or change the dimensions of a cube.
Crucially, this panel is only available immediately after an operation. If you click away, move the object, or perform any other action, the panel will disappear, and you won't be able to get it back for that specific operation.
The next segment of the video provides an excellent demonstration of this panel.
Blender Beginner Tutorial – Add & Delete Meshes
Let's see the 'Adjust Last Operation' panel in action. This part of the video explains how to use it to customize a UV Sphere as it's being created.
Watch from 04:02 to 09:01. Pay close attention to how you can change parameters like 'Segments', 'Rings', and 'Radius'. Notice that when the instructor clicks away from the object, the panel vanishes.
Understanding this panel is vital. It's your only chance to define the initial resolution and properties of your sculpting base before you begin transforming or sculpting it.
A Guide to Common Primitives
Now that you know how to add objects, let's learn what you're adding. Different primitives have different underlying structures, making them suitable for different tasks. The official Blender Manual is a great reference for this.
Mesh Primitives - Blender Manual
To understand the properties you were just adjusting, let's refer to the official Blender Manual. This document explains what each primitive is and what its creation parameters mean.
Please read the sections for the Cube, UV Sphere, and Icosphere. As you read, focus on the descriptions and the parameters you can adjust (like 'Size', 'Segments', 'Rings', 'Subdivisions'). This will clarify what the options in the 'Adjust Last Operation' panel actually do.
From your reading, you likely noted the key difference between the two types of spheres:
- UV Sphere: Constructed with lines of latitude (Rings) and longitude (Segments). This results in "poles" at the top and bottom where many edges converge. This can sometimes cause pinching or artifacts during sculpting.
- Icosphere: Constructed from evenly distributed triangles. This provides a much more uniform surface, which is often preferable for organic sculpting as it distributes detail more evenly and avoids the pole issue.
Hands-On Practice: Exploring the Primitives
It's time to explore these concepts yourself. This exercise is designed to build muscle memory and familiarity with the Add menu and the Adjust Last Operation panel.
- Start with a clean scene. If you have the default cube, select it and press
Xto delete it. - Add a Cube. Press
Shift + A>Mesh>Cube. - Adjust it. Open the
Adjust Last Operationpanel and change itsSize. - Delete it. Press
X. - Repeat for other primitives. Go through and add each of the following primitives one by one:
- UV Sphere: Adjust the
SegmentsandRings. See how low and high values affect its shape. - Icosphere: Adjust the
Subdivisions. Note how quickly the geometry becomes dense. - Cylinder: Adjust the
Verticesto see it change from a hexagonal prism to a smooth cylinder. Change theCap Fill Typeto see the different options for its ends. - Cone: Adjust the
Verticesand try settingRadius 2to a value greater than 0 to create a truncated cone. - Torus: Experiment with the
Major SegmentsandMinor Segments.
- UV Sphere: Adjust the
Take about 15-20 minutes for this exploration. The goal is not to make anything specific, but to become comfortable with the process and to see firsthand what each parameter does.
Conclusion
Great work. You now have the skills to create the initial "lump of clay" for any sculpture you want to make. You've learned how to bring new shapes into existence and how to control their fundamental properties right from the start.
Key Takeaways:
- Primitives are basic geometric shapes that act as starting points for modeling and sculpting.
- Use
Shift + Ato open theAddmenu and add a new mesh object. - Use
XorDeleteto remove selected objects. - The Adjust Last Operation panel is essential for customizing a new primitive's properties (like resolution) immediately after it is created.
- Different primitives, like the UV Sphere and Icosphere, have different geometric structures that make them suitable for different tasks.
Next Steps
Now that you can create your base shapes, the next logical step is to control their basic appearance. In the next lesson, we will cover how to apply smooth and flat shading. This will allow you to control whether an object appears faceted and geometric or smooth and organic, a fundamental choice in defining a sculpture's character.