Hello! Let's get started with your fourth lesson.
In our last session, we drew a crucial distinction between Object Mode and Edit Mode. You learned that Object Mode is for manipulating whole objects (like placing a block of marble), while Edit Mode is for changing an object's actual shape (like carving the marble).
Today, we'll master the fundamental tools for that first step: positioning your "block." The learning outcome for this lesson is to perform basic object transformations: move, rotate, and scale. These three actions are the bedrock of everything you will do in 3D space, from arranging complex scenes to shaping the initial forms for your sculptures.
The Three Fundamental Transformations
In any 3D environment, there are three primary ways to alter an object's position and size in space:
- Move (also called Translation): Changing the object's location along the X, Y, or Z axes.
- Rotate: Changing the object's orientation around the X, Y, or Z axes.
- Scale: Changing the object's size, either uniformly or along specific axes.
Blender offers two main ways to perform these actions: using visual gizmos from the toolbar or using faster keyboard shortcuts. We'll cover both, but I encourage you to focus on learning the shortcuts, as they will dramatically speed up your workflow.
Method 1: Using the Toolbar and Gizmos
On the left side of your 3D Viewport is the Toolbar. Here you'll find dedicated tools for Move, Rotate, and Scale. When you select one, a "gizmo" appears on your selected object. This gizmo is a visual controller with colored handles corresponding to the scene's axes (Red for X, Green for Y, Blue for Z).
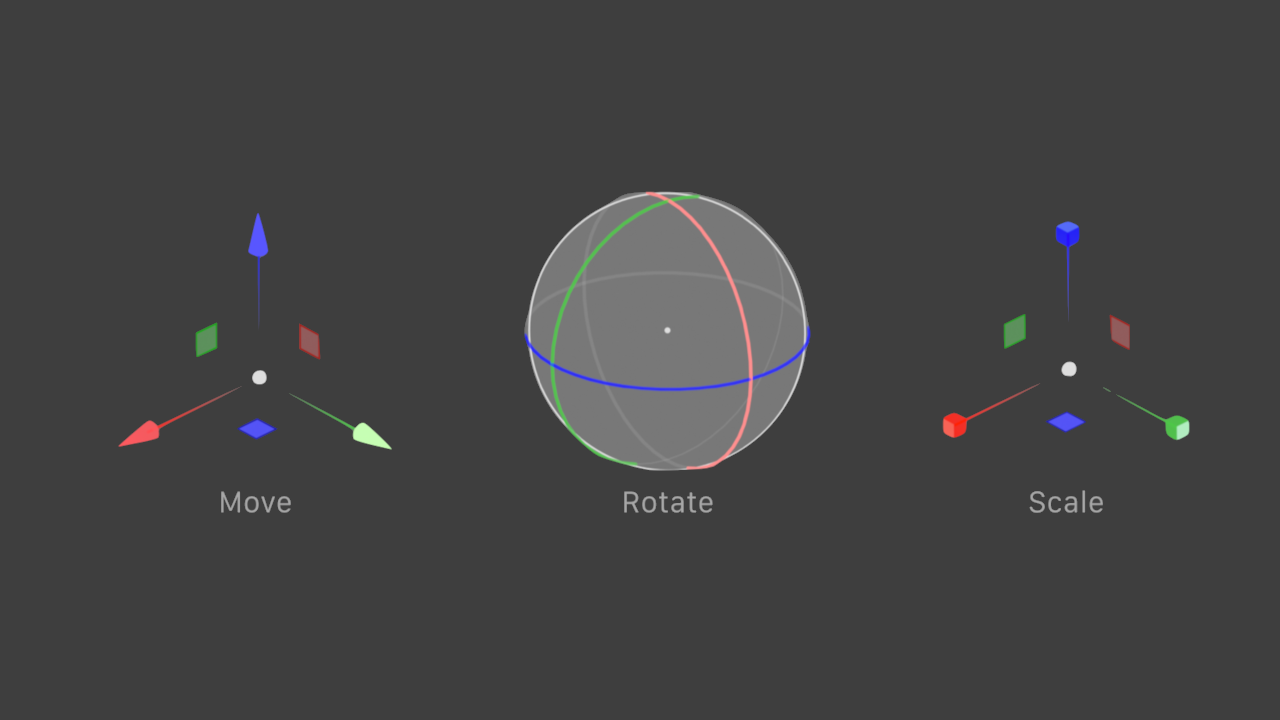
You can simply click and drag these handles to transform your object. While this method is intuitive, most experienced Blender users rely on keyboard shortcuts for speed and precision.
Method 2: Using Keyboard Shortcuts (The Professional Workflow)
Learning the hotkeys for transformation is one of the most important steps to becoming proficient in Blender. The following video by Blender Guru provides a great introduction to these essential shortcuts. We will watch it in segments.
Beginner Blender 4.0 Tutorial (2023)
First, let's learn how to move objects. This segment of the 'Beginner Blender 4.0 Tutorial' by Blender Guru will introduce you to the 'Grab' tool and the concept of constraining movement to an axis.
Watch from 06:32 to 09:32. Pay close attention to how to start a move (G key), confirm it (left-click), cancel it (right-click), and most importantly, how to lock the movement to the X, Y, or Z axis.
As you just saw, the core workflow is simple and powerful:
- Select the object you want to transform.
- Press
Gto Grab (or Move) the object. - Move your mouse to position the object.
- Press
X,Y, orZto constrain the movement to that specific axis. - Left-click to confirm the transformation.
- Right-click or press
Escto cancel.
This same principle of Hotkey -> Axis -> Confirm/Cancel applies to rotation and scaling as well. Now, let's watch the segments for those.
Beginner Blender 4.0 Tutorial (2023)
Next, let's see how rotation and scaling work. These clips from the same Blender Guru video demonstrate the 'Rotate' and 'Scale' shortcuts.
First, watch from 16:23 to 17:34 to learn about the Rotate tool (R key). Then, watch from 15:04 to 16:02 for the Scale tool (S key). Notice how locking to an axis (X, Y, or Z) works identically for all three transformations.
To summarize the essential hotkeys:
Gfor Move (Grab)Rfor RotateSfor Scale
After pressing any of these, you can press X, Y, or Z to lock the transformation to that axis. This is a universal rule in Blender and is absolutely fundamental.
Adding Precision: Numerical Input
Sometimes you need to transform an object by a precise amount. This is especially true for hard-surface modeling. Blender makes this easy: after initiating a transformation, you can simply type in a number.
- To rotate an object exactly 90 degrees around the Z-axis: press
R, thenZ, then type90, and pressEnter. - To move an object 5 units along the X-axis: press
G, thenX, then type5, and pressEnter. - To scale an object to be twice as large: press
S, type2, and pressEnter.
You can always see the exact values of your object's location, rotation, and scale in the Transform panel of the Sidebar (press N to show/hide it), which connects back to what we learned about the user interface.

Hands-On Project: Assembling a Simple Structure
Now it's time to put all this into practice. The best way to solidify these skills is to use them to build something. We will follow a guided exercise to create a simple castle structure out of primitive shapes.
This exercise will require you to use what you've just learned—Move, Rotate, and Scale—to assemble a scene. It will also give you a preview of the next lesson: adding new objects.
Blender - First Steps - Tutorials + Resources
This guide from UC Santa Cruz's library provides excellent animated examples and a step-by-step project. We will use it to practice our new skills.
First, quickly read the sections 'Transforming Objects - Moving', 'Transforming Objects - Rotating', and 'Transforming Objects - Scaling' to reinforce the concepts with text and GIFs. Then, follow the tutorial in the section 'Arranging a Scene' to build the simple castle. Don't worry about memorizing how to add or duplicate objects (Shift+A, Shift+D); just follow the instructions for now. We will cover that topic formally in the next lesson. The goal here is to get comfortable transforming objects.
Take your time with this exercise. The goal isn't to create a masterpiece, but to build muscle memory for the G/R/S -> X/Y/Z workflow.
Conclusion
Excellent work. You've just mastered the three most common and critical actions in Blender. Being able to confidently move, rotate, and scale objects is the foundation upon which all of your future creations will be built.
Key Takeaways:
- The three basic transformations are Move (
G), Rotate (R), and Scale (S). - You can perform transformations using the Toolbar Gizmos for visual control or Keyboard Shortcuts for speed and efficiency.
- After starting a transformation with a hotkey, you can press
X,Y, orZto constrain the action to a single axis. - You can type in numerical values during a transformation for absolute precision.
Next Steps
In the castle exercise, you had a brief introduction to adding new objects to the scene. In our next lesson, we will formally cover how to add and delete primitive mesh objects. These primitives—like cubes, spheres, and cylinders—will serve as the starting "clay" for your first digital sculptures.