Hello! Welcome to the second module of our course, "First Steps in Digital Sculpting."
In our last lesson, we wrapped up the fundamentals by ensuring you know how to save, version, and recover your work. With those essential skills in place, you're now ready to move from the technical setup to the creative heart of this course.
Today, we take that exciting first step. The goal of this lesson is to transition from Blender's general-purpose interface into the specialized Sculpting environment. You will learn how to switch to Sculpt Mode and, just as importantly, how to customize your workspace into a layout that's clean, efficient, and ready for creating art. This sets the stage for all the sculpting techniques we'll cover from here on out.
From Object Mode to Sculpt Mode
So far, you've been working exclusively in Object Mode. This mode is for managing whole objects in your scene—moving them, rotating them, and scaling them. To draw an analogy from your background in physical sculpture, Object Mode is like placing your block of wood or armature on the pedestal and positioning it under the lights.
Sculpt Mode, on the other hand, is where you pick up your chisels and tools to shape the material itself. Instead of manipulating the whole object, you'll be pushing, pulling, scraping, and smoothing the surface of a single, high-density mesh.
Blender organizes these different toolsets into Workspaces. These are pre-configured screen layouts optimized for specific tasks. Let's explore the Sculpting Workspace.
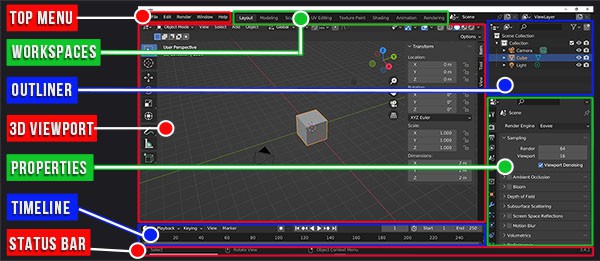
To get into our digital workshop, we simply switch to the Sculpting workspace.

When you click this tab, Blender does two things for you automatically:
- It switches from Object Mode to Sculpt Mode.
- It rearranges the interface, bringing the sculpting brushes and tools to the forefront.
Preparing Your Digital Clay
While you can sculpt on any object, the default cube is not a good starting point. Sculpting requires a mesh with a lot of polygons (faces) that are evenly distributed. A cube has very few polygons, which are concentrated at its corners.
A much better starting shape is a sphere. For sculpting, an Icosphere is often preferred over the standard UV Sphere because its triangular faces are more uniform in size and distribution, which leads to more consistent brush strokes.
Let's watch a short clip that shows how to set up a proper object for sculpting and then switch to the Sculpting workspace.
Sculpting in Blender: A Complete Beginner's Guide
In this segment from his beginner's guide, Grant Abbitt demonstrates how to replace the default cube with a high-resolution Icosphere, creating a perfect starting point for our sculpt.
Watch from 02:25 to 03:00. Focus on how he deletes the cube, adds the Icosphere, and increases its 'Subdivisions' to create a dense mesh to work with.
As you saw, increasing the subdivisions gives the mesh more geometry, which is like starting with a denser, higher-quality block of clay. This allows for finer details.
Customizing the Workspace for Sculpting
Now that you're in the Sculpting workspace with a good base mesh, let's tailor the layout for a more comfortable and focused experience. The goal is to maximize the space for your sculpture while keeping essential tools easily accessible.
This next video demonstrates a few common and highly effective customizations.
How I Setup Blender For Sculpting
Ryan King Art provides a concise walkthrough of how to set up a clean and efficient sculpting layout. We'll follow his steps to customize our own workspace.
Watch from 00:23 to 01:05. Pay attention to these three key adjustments: Expanding the brush toolbar to show two columns. Closing the Properties panel to maximize viewport space. Hiding the navigation gizmo for a cleaner view.
Let's break down those adjustments:
- Expand the Toolbar: The toolbar on the left contains all your sculpting brushes. By default, they are just icons. Dragging the right edge of the panel outwards reveals the brush names, making it much easier to learn and find the right tool.
- Maximize Viewport Space: While sculpting, you rarely need the Outliner or Properties panel. By collapsing them, you give yourself a much larger canvas to work on, allowing you to focus entirely on your model's form. You can always bring them back later by dragging the corner of the viewport window.
- Hide the Navigation Gizmo: Since you already know how to orbit, pan, and zoom with your mouse from Module 1, the colorful axis gizmo in the top-right corner is redundant. Hiding it declutters your view.
Hands-On Practice: Set Up Your Digital Studio (20 minutes)
It's time to put this all together and create your own personalized sculpting layout. Please open Blender and follow these steps.
- Start Fresh: Open a new general file (
File > New > General). Don't worry about saving the default scene. - Prepare the Mesh:
- Select the default Cube and press
Xto delete it. - Press
Shift+Ato open the Add menu, then go toMesh > Icosphere. - Before you do anything else, look for the "Add Icosphere" panel in the bottom-left corner of the viewport. Click to expand it and set the Subdivisions to
5. This gives you a dense, smooth sphere.
- Select the default Cube and press
- Enter the Sculpting Workspace:
- At the top of the screen, click the Sculpting tab.
- Notice how your cursor changes to a circle and the mode in the top-left now says "Sculpt Mode".
- Customize the Layout:
- Move your mouse to the right edge of the brush toolbar on the left. The cursor will change to a double-sided arrow. Click and drag it to the right until you have two columns of brushes.
- Move your mouse to the bottom-left corner of the Outliner panel (top right). The cursor will change to a crosshair. Click and drag it downwards and to the left, over the Properties panel, then release. This will collapse the Properties panel and expand the Outliner.
- Now, move the cursor to the bottom-left corner of the 3D Viewport. Click and drag to the right over the Outliner, then release. This will collapse the Outliner, giving you a full-screen sculpting view.
- Save Your Layout: You don't want to repeat this setup every time! You can save this customized layout as your default.
- Go to
File > Defaults > Save Startup File. - Confirm the action. Now, every time you open Blender, it will start with this clean, sculpting-ready layout. You can always reset it later with
File > Defaults > Load Factory Settings.
- Go to
Take a moment to simply move your cursor over the sphere. You'll see the brush indicator following the surface. You are officially ready to sculpt!
Conclusion
In this lesson, you successfully bridged the gap between Blender's general tools and its powerful sculpting environment. You've prepared your digital workspace, much like an artist would prepare their studio before starting a new piece.
Key Takeaways:
- Blender's Workspaces are optimized layouts for specific tasks like modeling, animation, and sculpting.
- The Sculpting Workspace automatically puts you in Sculpt Mode, where you can directly manipulate the surface of a mesh.
- A high-density, evenly-tessellated mesh, like a subdivided Icosphere, is an ideal starting point for sculpting.
- Customizing your layout by expanding the toolbar and maximizing the viewport creates a more focused and efficient sculpting environment.
Next Steps
Your studio is prepped and your digital clay is on the stand. In our next lesson, we will finally make our first marks. We'll cover the core concept of how digital sculpting works and introduce you to your three most fundamental tools: the Draw, Clay Strips, and Smooth brushes.