Hello! Welcome back to our journey into digital sculpting.
In our last lesson, you did the important work of setting up your digital studio. You learned how to switch to Blender's Sculpting workspace and customize it to create a clean, focused environment. With your digital workbench prepared, it's time to understand the nature of the material you're about to work with.
Today's lesson is a conceptual one. Before we pick up any tools, we're going to explore what "digital sculpting" truly means. The goal is to connect your deep experience with physical materials like clay to the digital equivalent: a high-density mesh. By the end of this lesson, you'll be able to explain how digital sculpting works and how it both mirrors and diverges from traditional sculpting.
From Physical Clay to Digital Polygons
In your physical sculpting work, the process starts with a material—a block of clay, a piece of wood, or stone. The quality and amount of that material dictate the level of detail you can achieve. A fine-grained clay allows for more subtle forms than a coarse, groggy one.
In the digital world, our "clay" is a mesh. A mesh is a collection of three simple things:
- Vertices: Single points in 3D space.
- Edges: Lines connecting two vertices.
- Faces: Flat surfaces (usually triangles or quadrilaterals) enclosed by edges.
When you sculpt digitally, you are not manipulating a solid volume. Instead, you are using brushes to push, pull, and move a vast number of these vertices simultaneously. The more vertices and faces a mesh has, the more "material" you have to work with.
What is a "High-Density Mesh"?
To create smooth, organic, and detailed forms, you need a mesh with a very high number of faces—this is what we call a high-density or high-poly (high-polygon) mesh.
Think of it like pixels in a photograph. A low-resolution image looks blocky and lacks detail. A high-resolution image, with millions of pixels, can capture fine textures and smooth gradients. The same is true for 3D meshes.
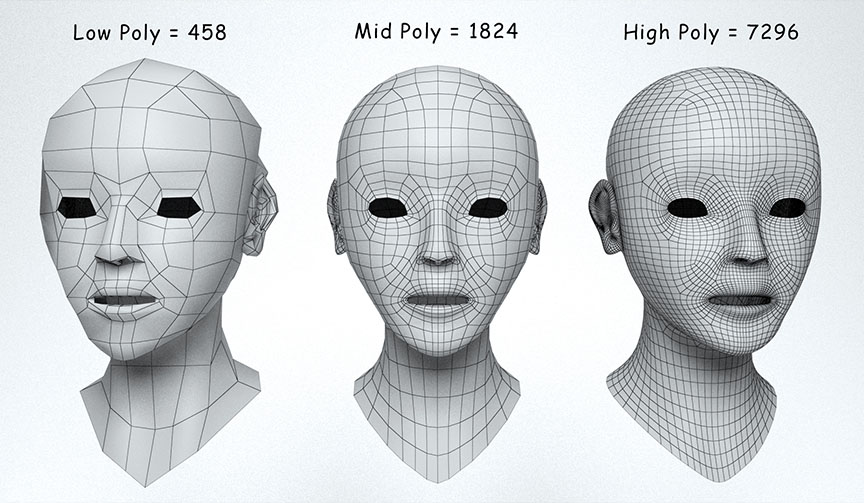
Digital sculpting almost always involves meshes with hundreds of thousands, or even millions, of polygons. This density is what allows for the creation of wrinkles on skin, the texture of rock, or the subtle curves of an abstract form.
Let's watch a short video that explains this core idea.
3D Modeling vs Sculpting, What Are The Differences
This clip from InspirationTuts clearly explains the fundamental difference between traditional 3D modeling and sculpting, highlighting why sculpting requires a high-density mesh.
Please watch from 01:57 to 02:56 to understand how sculpting treats the mesh like a whole piece of clay. Then, continue from 04:16 to 05:14 to see why millions of polygons are necessary for creating fine details.
As the video explained, sculpting is about morphing a dense mesh as a whole, rather than manipulating it piece by piece. This is the key concept that makes it feel so much like working with clay.
Bridging Your Experience: The "Digital Clay" Mindset
Your background in traditional sculpture gives you a fantastic advantage. You already possess an intuitive understanding of form, volume, and silhouette. The main challenge is learning to translate that intuition to a new medium. Many artists find it helpful to think of the digital mesh as "digital clay."

This analogy is more than just a convenient metaphor; it's a practical way to approach the workflow. Let's hear from an artist who, like you, transitioned from traditional to digital methods.
Ep. 62 | Traditional vs Digital Sculpting - MiniTalk
In this video, sculptor Tom Mason discusses his journey and shares a crucial piece of advice he received about adopting a 'digital clay' mindset. His perspective will likely resonate with your own transition.
Watch the segment from 05:22 to 07:34. Pay close attention to how he compares the learning curve of physical mediums to the digital process and the idea of treating the software's material like clay.
Exploring the Parallels and a New Kind of Freedom
While the "digital clay" analogy is powerful, it's also important to understand where the two disciplines differ. Digital sculpting offers a kind of freedom that is impossible to achieve in the physical world.
I'd like you to read a short article that directly compares the two worlds. It does a great job of explaining the similarities in tooling and the profound differences in limitations.
Digital vs. Traditional Sculpting
This article from CG Cookie, titled 'Digital vs. Traditional Sculpting', provides an excellent overview comparing the tools, mediums, and workflows of both disciplines.
Please read the following sections of the article: Start from the beginning and read down to the heading 'What Tools Do You Use?'. This introduces the core concept. Read the sections 'What Tools Do You Use?' and 'The Stuff You Shape: Mediums'. Focus on the comparison between physical tools and digital 'brushes', and especially the concept of 'dynamic topology' as 'unlimited digital clay'. Finally, read the sections on 'Mirroring' and 'Limitations: The Laws of Physics'. These highlight some of the unique 'superpowers' you gain as a digital sculptor. As you read, think about how these concepts relate to your own sculpting experience.
Let's summarize the key points from that reading and our discussion:
- Digital Clay: This is your high-density mesh. Its "resolution" or polygon count determines how much detail you can add.
- Digital Tools: Blender's "brushes" are direct analogs to your physical tools. They are designed to blob, crease, scrape, and smooth the digital clay.
- Unlimited Material: With tools like Dynamic Topology (Dyntopo), Blender can add more polygons on the fly, exactly where you need them. It's like having an infinite supply of clay that appears magically under your tool as you pull out a new form. We'll learn how to use this in a future lesson.
- Defying Physics: Your digital sculptures are not bound by gravity or structural integrity. You can create impossibly thin structures, floating elements, and dynamic poses without worrying about armatures or collapse.
- Perfect Symmetry: As you read, you can mirror your actions across an axis. This is incredibly powerful for creating symmetrical forms, whether for characters or abstract patterns, allowing you to focus on the design on one side and have it perfectly replicated.
- The Power of Undo: Perhaps the biggest difference is the ability to undo mistakes. Every action is non-permanent until you decide it is. This freedom to experiment without risk of "ruining" the piece is a cornerstone of the digital workflow.
Conclusion
Today, we've built the conceptual foundation for everything that comes next. You've connected your knowledge of physical sculpture to the core ideas of the digital world, ensuring you're not just learning which buttons to press, but why you're pressing them.
Key Takeaways:
- Digital sculpting is the art of shaping a high-density mesh made of vertices, edges, and faces.
- This mesh functions as "digital clay"; the higher its polygon count, the more detail you can achieve.
- Digital sculpting uses brushes that mimic the function of physical tools to push, pull, scrape, and smooth the mesh.
- The digital medium offers unique advantages not possible in the physical world, such as undoing mistakes, perfect symmetry, freedom from physical laws, and dynamically adding more material with Dyntopo.
Next Steps
Your digital studio is ready, and you now understand the nature of your digital clay. In the next lesson, we will finally get our hands dirty. You will learn to use your first and most essential set of tools: the Draw, Clay Strips, and Smooth brushes to make your first marks and start shaping your base mesh.