Hello and welcome back to your Blender sculpting journey!
In the last few lessons, we've focused on the "how" of sculpting: using brushes, managing mesh density with Dyntopo, and creating balanced forms with symmetry. Now, we're going to address an equally important question: how do you see the form you're creating? Just as a traditional sculptor uses light to reveal the subtleties of their work, a digital sculptor needs tools to clearly visualize their model in real-time.
This lesson introduces the tools for just that. We will move away from the default flat-gray view and learn how to use Blender’s powerful viewport shading options to make your sculptures easier to read and more satisfying to work on.
By the end of this lesson, you will be able to use MatCaps and Studio Lighting for clear real-time visualization of sculpted forms, a fundamental skill for any digital sculptor.
1. The Importance of Good Lighting
In physical sculpture, you constantly move around your piece, and you might have a movable lamp to cast shadows and create highlights. This play of light and shadow is what defines the form to your eye. Without it, a complex shape can look flat and ambiguous.
The same principle applies in digital sculpting. The default lighting can hide imperfections and make it difficult to judge the curvature and depth of your work. Blender's viewport shading options are your digital toolkit for controlling this light.
You can find all the settings we'll discuss today in the Viewport Shading dropdown menu, located in the top-right corner of the 3D Viewport. Make sure your shading mode is set to Solid, which is the standard mode for modeling and sculpting.
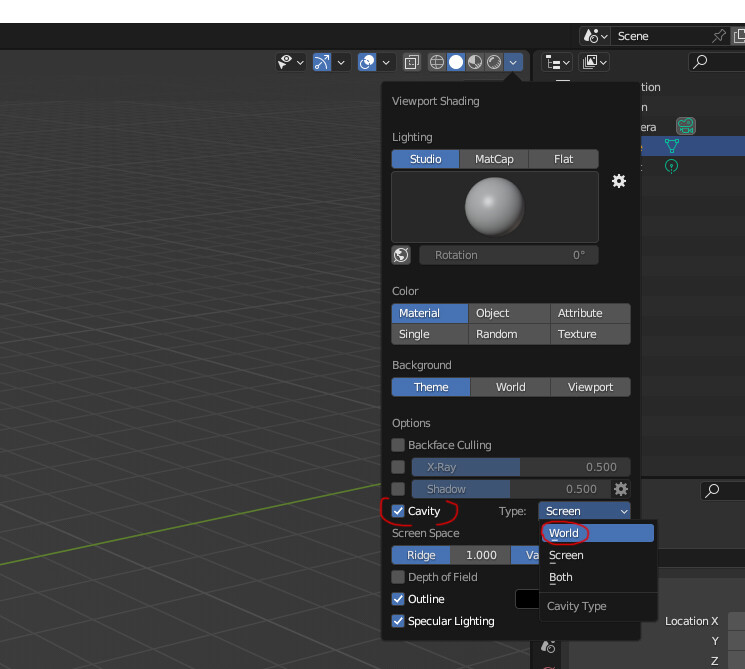
2. Studio Lighting: Your Basic Workshop Lights
The simplest way to improve on the default view is with Studio Lighting. These are a collection of clean, pre-built lighting environments designed to give clear and neutral illumination to your model.
The real power of Studio Lights is the ability to rotate them, which simulates moving a light source around your sculpture to inspect it from all angles.
To see how this works, let's watch a segment from a helpful tutorial.
How to Customize the Viewport Shading in Blender
The video 'How to Customize the Viewport Shading in Blender' by Ryan King Art provides an excellent overview of these settings. We'll start with Studio Lighting.
Watch from 02:45 to 04:45. Focus on: The difference between Studio, MatCap, and Flat lighting. How to select different Studio light presets. How to enable rotation and drag the small sphere to change the lighting direction.
As you saw, a simple switch to a Studio light and a quick rotation can dramatically change how you perceive the volume and curves of your object.
3. MatCaps: Sculpting with "Material Capture"
While Studio Lights are great, MatCaps are often the preferred choice for sculptors. The term is short for "Material Capture," and they offer a fast, effective way to simulate complex materials and lighting.
So, what is a MatCap?
What is Blender MatCap and How To Create One? - 3DModels.org
To understand the concept, let's read a clear definition from the article 'What is Blender MatCap and How To Create One?' on 3DModels.org.
Please read two short sections: Start at the heading 'What is a MatCap?' and read until the next heading. Then, skip down to the heading 'How do MatCaps Work?' and read that paragraph. Focus on understanding that a MatCap is a pre-rendered image of a sphere that gets mapped onto your model.
The core idea is simple but powerful: the MatCap is an image of a sphere with a specific material and lighting. Blender looks at the surface angle of your model and applies the corresponding color from that sphere image. This is incredibly efficient and provides instant visual feedback.

Blender comes with a variety of MatCaps. Some look like clay, others are glossy like ceramic or metal.
- Clay-like MatCaps are excellent for general sculpting, giving a natural feel.
- Glossy MatCaps are invaluable for checking surface smoothness and finding unwanted bumps or dents, as imperfections will distort the reflections.
4. Making Details Pop with Cavity
One of the most useful visualization aids for sculpting is the Cavity setting. This feature darkens the crevices (valleys) and brightens the sharp edges (ridges) of your model in real-time. It mimics the effect of ambient occlusion and makes all the fine details you're sculpting significantly easier to see.
For sculptors, this is not just a nice effect; it's a critical tool for understanding the form.
The official Blender Manual has a concise description of this feature. In Solid mode options, under "Cavity", it highlights its purpose: "Highlight ridges and valleys in the scene geometry."
Let's see it in action.
How to Customize the Viewport Shading in Blender
We'll return to the Ryan King Art video, which has a great demonstration of the Cavity setting and why it's so useful.
Watch the segment from 07:16 to 10:46. Pay close attention to: The visual difference when Cavity is turned on and off. The effect of the Ridge and Valley sliders. The difference between Screen, World, and the recommended Both type.
Most sculptors turn on Cavity and leave it on for the entire sculpting process. It provides an immediate and dramatic improvement in form clarity.
Hands-On Practice (25 minutes)
Time to apply these tools. Open Blender and start a new file using the Sculpting workspace preset.
1. Prepare Your Sculpture
- You should have a default sphere. If not, add one (
Add > Mesh > UV Sphere). - In the header, find the Dyntopo settings. Enable it and set the Detailing to
Constant Detail. A resolution of around20-30is a good starting point. - Use the Grab (
G), Draw, and Clay Strips brushes to create a simple abstract form. Don't worry about making it perfect; the goal is to have some curves, lumps, and crevices to look at.
2. Explore Studio Lights
- Go to the Viewport Shading dropdown.
- Under Lighting, select Studio.
- Click the sphere preview to open the list of Studio Lights. Click through a few different options. Notice how some are softer and others have harsher highlights. Which ones make it easiest to see the overall volume?
- Now, click the gear icon next to the presets and check World Space Lighting. Drag the white dot in the rotation sphere. See how the light moves across your model's surface, revealing different aspects of its form.
3. Experiment with MatCaps
- Switch the Lighting type to MatCap.
- First, select one of the reddish-brown clay MatCaps. This gives a very traditional sculpting feel.
- Next, select a glossy or metallic MatCap (one with bright, sharp highlights). Rotate your view (
Middle Mouse Button). See how the reflections warp and move over the surface? This is fantastic for spotting unintended bumps or flat spots. - Try sculpting a bit with a glossy MatCap active. It provides instant feedback on the quality of your surface.
4. Enhance with Cavity
- Choose your favorite MatCap from the previous step.
- Now, check the box for Cavity. You should immediately see your details become more prominent.
- Change the Type to Both.
- Play with the Ridge and Valley sliders. Increase the Valley to make shadows in crevices deeper. Increase the Ridge to make sharp edges brighter. Find a balance that you find visually clear and pleasing.
- Try sculpting a few small details with the Draw brush while Cavity is active. Notice how much easier it is to see what you're doing.
Conclusion
You've now learned how to control the most important aspect of your sculpting workspace: how you see your model. Moving beyond the default shading is a major step in taking your digital sculpting seriously.
Key Takeaways:
- Studio Lights provide clean, simple lighting setups that you can rotate to inspect your model's form.
- MatCaps are powerful presets that simulate both lighting and material, giving you instant visual feedback. Different MatCaps are useful for different tasks, like checking for smoothness or getting a feel for the overall shape.
- Cavity is an essential tool that enhances the visibility of details by darkening crevices and highlighting ridges, making your sculpt much easier to read.
Next Steps
Now that we can see our form clearly, our next challenge is gaining more control over where our brushes have an effect. In the next lesson, we will learn how to apply masks to protect parts of a mesh from being affected by brushes. This will open the door to creating much more precise and intentional details.