Hello and welcome back!
In our last lesson, we explored Dynamic Topology (Dyntopo), a fantastic tool that gives you the freedom to add detail anywhere, much like adding a piece of clay to a physical sculpture. This is perfect for creative, freeform exploration. However, many objects, both natural and man-made, have an inherent balance or repetition. Sculpting a creature's face or designing a mechanical gear requires precision and efficiency.
This lesson focuses on a fundamental technique to achieve that efficiency: Symmetry. We will explore how to use Blender's sculpting symmetry options to mirror your actions across your model. This not only cuts your work in half but also helps in creating the balanced and harmonious forms that are key to compelling sculpture.
By the end of this lesson, you will be able to use sculpting symmetry options (e.g., X-axis mirror) for efficient modeling, a skill that is essential for almost any sculpting project you'll tackle.
1. Mirror Symmetry: Your Digital Assistant
The most common type of symmetry is Mirror symmetry. When it's active, any stroke you make on one side of an axis is automatically replicated on the other side. For sculpting anything like a face, a body, or a symmetrical vehicle, this is indispensable.
The symmetry options are located in the header of the 3D Viewport. The X, Y, and Z buttons toggle the mirroring for each respective axis.
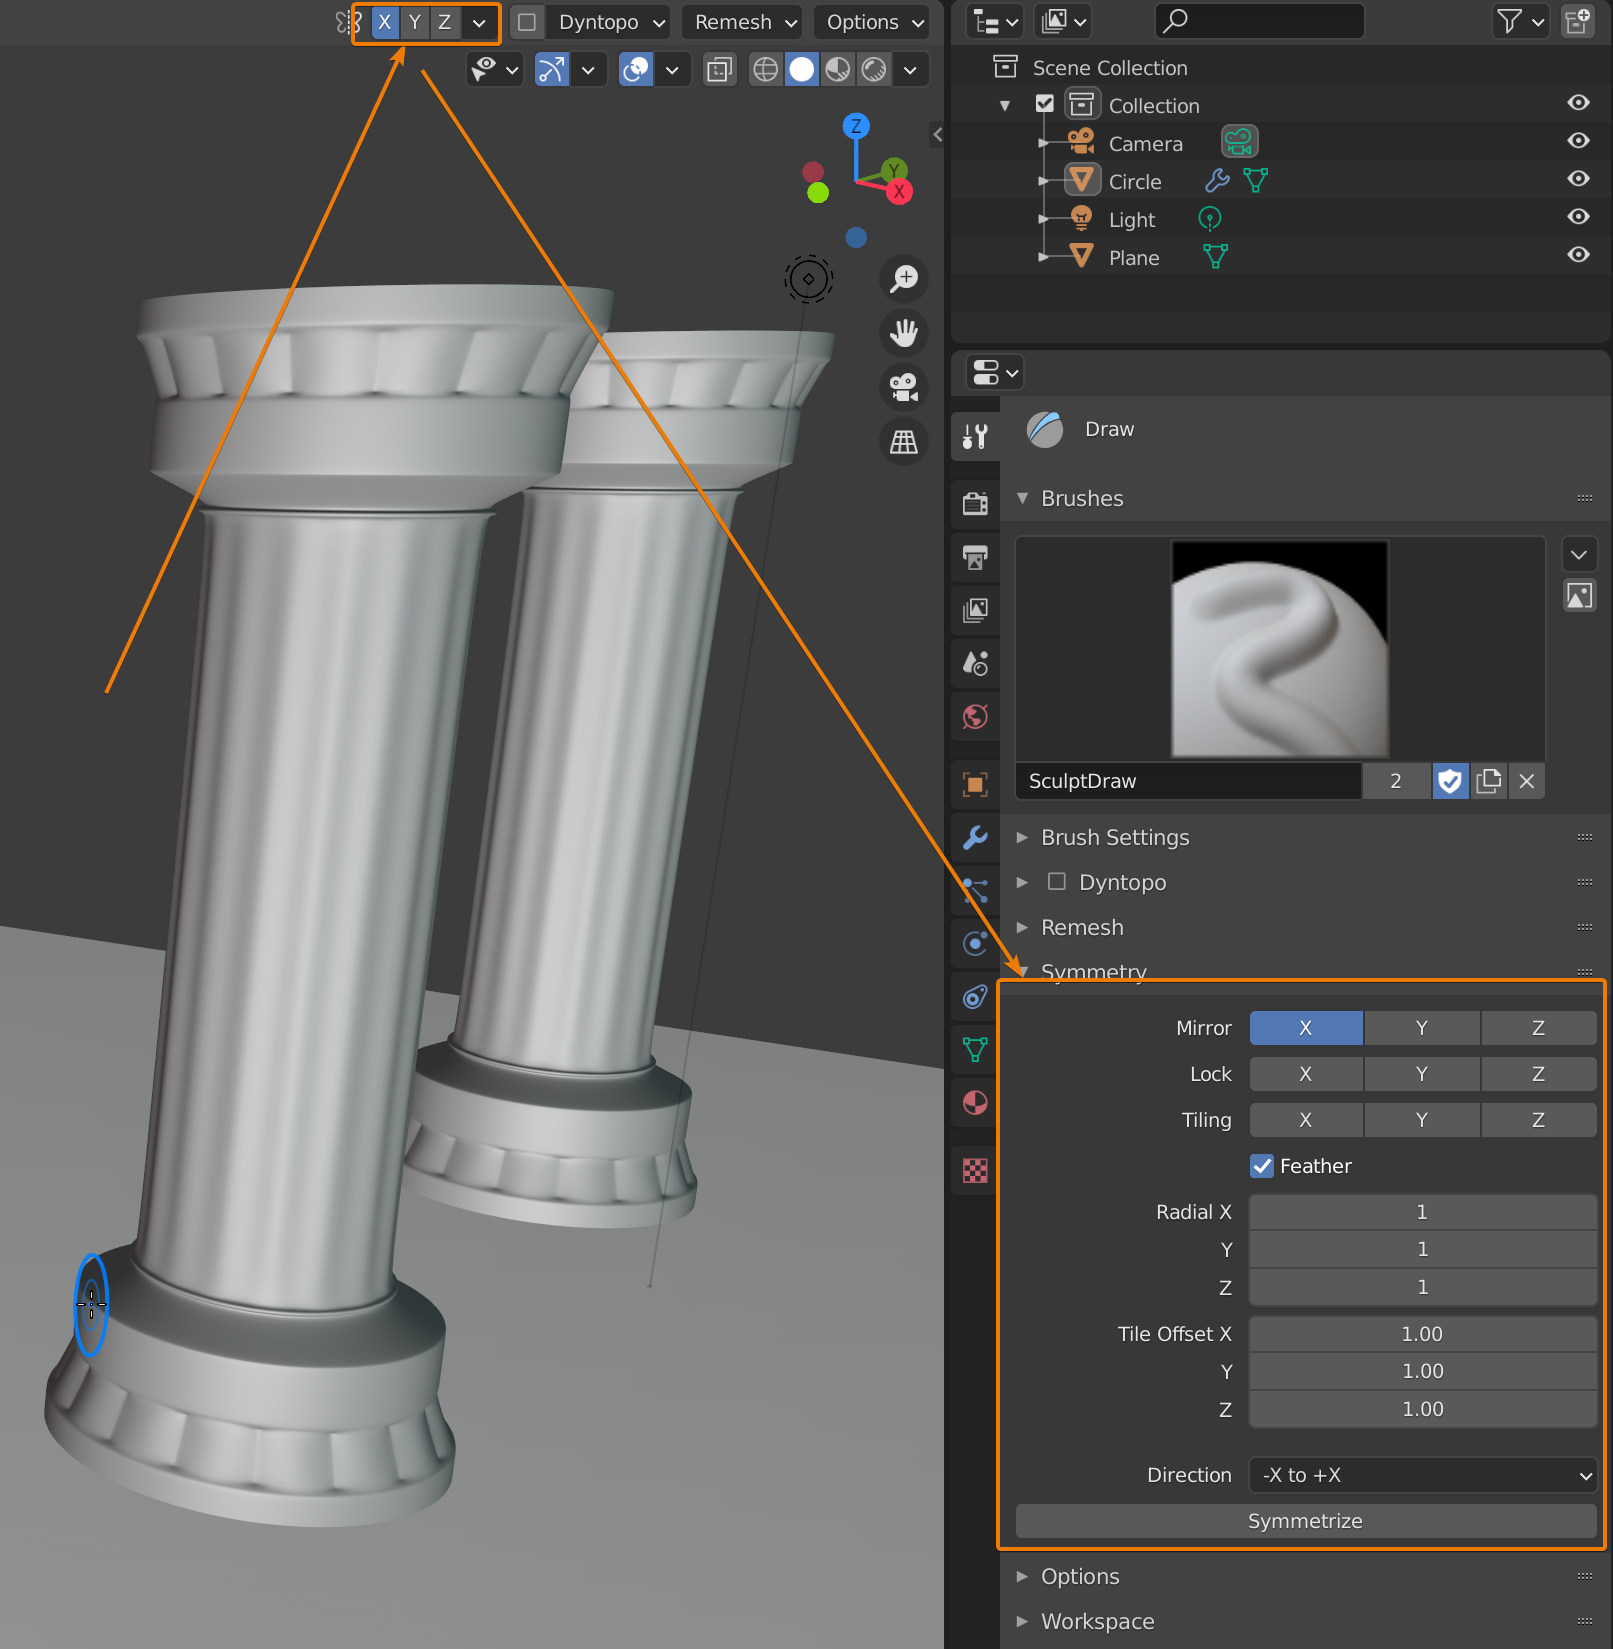
To see how to enable and use these options in real-time, the following video provides a clear demonstration.
How to Mirror/Symmetrize Your Sculpts (Blender Tutorial)
The video 'How to Mirror/Symmetrize Your Sculpts' by Ryan King Art clearly demonstrates the basic mirror symmetry settings.
Watch from the start until 01:52. Pay attention to how activating the X, Y, and Z symmetry options changes the number of brush indicators on the model and mirrors the sculpting strokes.
As the video shows, X symmetry is the default for most organic subjects, mirroring from left to right. Activating multiple axes at once can create more complex, repeating patterns, which can be very useful for abstract forms.
2. Fixing Asymmetry with the Symmetrize Operator
What happens if you've been sculpting for a while and realize you forgot to turn on symmetry? Or perhaps you intentionally sculpted one side asymmetrically and now want to mirror it to the other. You don't have to start over. Blender has a tool for this called Symmetrize.
This operator copies the mesh from one side of the object and mirrors it to the other, replacing whatever was there.
The same video explains this process very well.
How to Mirror/Symmetrize Your Sculpts (Blender Tutorial)
Let's continue with the same video to see how to fix a model that has become asymmetrical.
Watch the segment from 01:52 to 03:07. Notice how you need to choose a direction (e.g., from negative X to positive X) before clicking the Symmetrize button. A crucial takeaway here is to remember to turn mirror symmetry back on after using Symmetrize to continue working symmetrically.
3. The Object Origin: Your Center of Symmetry
A very common issue for beginners is when symmetry doesn't seem to work correctly; the mirrored stroke appears in a weird location or is distorted.
This almost always happens because Blender uses the object's origin point as the center for symmetry. The origin is the small orange dot that marks the object's location, rotation, and scale pivot. If this origin point is not at the geometric center of your sculpture, the symmetry will be skewed.
The solution is to reset the origin to the center of your mesh. This next video clip explains the problem and the fix perfectly.
Sculpting with Radial Symmetry in Blender (Tutorial)
In this tutorial on radial symmetry, Ryan King Art first explains the critical role of the object origin for all symmetry operations.
Watch from 01:44 to 02:33. The video clearly demonstrates how an off-center origin breaks symmetry and how to fix it by going to Object Mode and using the Object > Set Origin > Origin to Geometry menu.
You can also find this vital tip in a text-based format in the article "Introduction to Sculpting in Blender" under the troubleshooting section "Symmetry Not Working," which reinforces the same solution.
4. Beyond Mirroring: Radial Symmetry
Symmetry isn't just about left-to-right mirroring. Radial symmetry allows you to repeat your strokes around a central axis, like the spokes of a wheel or petals on a flower. This is incredibly powerful for creating intricate patterns, mechanical details, and complex abstract shapes.

Let's return to the video on radial symmetry to see it in action.
Sculpting with Radial Symmetry in Blender (Tutorial)
This video shows how to enable radial symmetry and use it to create interesting forms.
Please watch the following parts: Enabling Radial Symmetry (00:21 - 01:44): See how to switch from mirror to radial symmetry and adjust the count. The example of sculpting a pot with the Grab brush is a very intuitive demonstration. Practical Examples (02:33 - 04:21): Watch how radial symmetry is used to add detailed gills under a mushroom and to create an ornate metal button. This should give you some great ideas for your own abstract and hard-surface projects.
Hands-On Practice
Now it's time to put these concepts into practice.
Setup:
- Open Blender and start a new Sculpting workspace. You'll have a default sphere.
- Make sure you are in Sculpt Mode.
Exercise 1: Symmetrical Creature Bust (15 minutes)
- In the top header, enable X symmetry. You should see two dots for your brush cursor now.
- Use the Grab brush (
G) with a large radius to pull out the basic shape of a simple head and neck. - Use the Clay Strips brush to build up forms for a brow, nose, and chin.
- Use the Draw brush (holding
Ctrlto invert) to carve in eye sockets. - Now, turn off X symmetry and add an asymmetrical detail on one side, like a scar or a small horn.
- Imagine you changed your mind and want it to be symmetrical again. Go to the Symmetrize menu (next to the X,Y,Z buttons), choose the correct direction (e.g.,
-X to +Xif you want to copy the left side to the right), and click the Symmetrize button. - Remember to turn X symmetry back on to continue sculpting.
Exercise 2: Radial Abstract Form (15 minutes)
- Hide your first sculpt and add a new object: a UV Sphere (
Add > Mesh > UV Sphere). - With the new sphere selected, go to the symmetry menu in the header. Click the little dropdown arrow next to the XYZ buttons.
- Under Radial, set the
Zaxis value to10. - Use the Grab brush to pull the sphere into a more dynamic, flower-like or gear-like shape. Notice how all 10 points move together.
- Switch to the Draw brush. Try drawing some patterns on the top or bottom of the shape. Experiment with holding
Ctrlto carve patterns inward. - Try using the Snake Hook brush to pull out 10 spiraling tentacles from the center. This works best if you have Dyntopo enabled! Feel free to combine the techniques from our last lesson with today's topic.
Conclusion
You have now learned how to use one of the most significant time-saving features in digital sculpting. By leveraging symmetry, you can focus on the creative aspects of your design while Blender handles the repetitive work.
Key Takeaways:
- Mirror Symmetry (
X,Y,Z) duplicates your strokes across an axis, which is essential for creating balanced forms efficiently. - The
Symmetrizeoperator is a powerful tool for fixing or restoring symmetry to a model that has become asymmetrical. - All symmetry operations depend on the object's origin point. If symmetry is behaving strangely, check that the origin is centered.
- Radial Symmetry repeats your strokes around an axis, enabling you to create complex, circular patterns with ease.
This lesson concludes our module on the "First Steps in Digital Sculpting." You now have a solid foundation: you can navigate the workspace, manage your mesh with Dyntopo, and use the core sculpting brushes with and without symmetry.
Next Steps
So far, we've focused entirely on creating form. But how do we see that form clearly? The default gray material can sometimes make it hard to read the shapes you're creating. In our next lesson, which begins the "Core Sculpting Workflow" module, we'll learn how to use MatCaps and Studio Lighting to better visualize our sculpts in real-time.