Hello! Welcome to our next lesson on digital sculpting in Blender.
In our last session, we mastered the Snake Hook brush, a fantastic tool for pulling new, dramatic forms out of a single mesh, especially when paired with Dyntopo. This allowed us to create organic, expressive shapes with a great deal of freedom.
Today, we're going to tackle a new challenge: what if your sculpture isn't made from a single piece, but from several? The goal of this lesson is to learn how to join multiple objects into a single, unified mesh for a seamless sculpt.
This technique is fundamental. Just as in physical sculpture where you might combine several blocks of wood or lumps of clay to create a base form, in digital sculpting, we often "block out" a complex shape by arranging and then fusing simpler objects. This is a critical step for creating anything from characters to the abstract and hard-surface forms you're interested in.
1. The "Block Out" Philosophy
Before we dive into the tools, let's talk about the workflow. Many complex sculptures start with a process called blocking out. This involves using simple primitive shapes—spheres, cubes, cylinders—to build a rough, low-detail version of your final idea. The focus is purely on the main forms, proportions, and silhouette, not on the fine details.
This method allows you to establish the overall composition and mass of your sculpture quickly before committing to the time-intensive work of detailed sculpting.
2. The Two-Step Process: Join and Remesh
To turn a collection of separate, overlapping primitive shapes into a single, continuous surface that you can sculpt on, we use a simple two-step process in Blender.
Step 1: The Join Command
First, we need to tell Blender that our separate objects belong together as a single entity.
- In Object Mode, you can select multiple objects by holding down the
Shiftkey while clicking on them. - Once selected, pressing
Ctrl + Jwill join them.
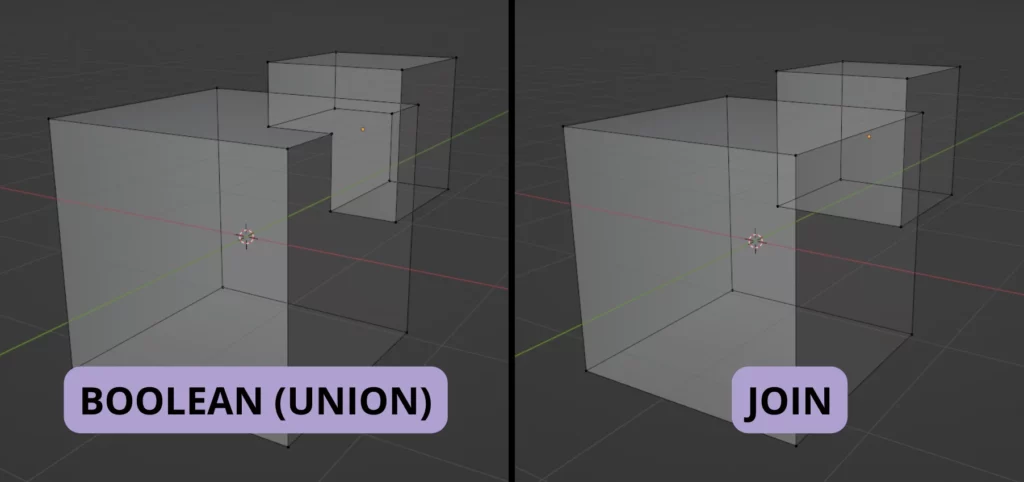
The result is a single object in the Outliner panel. You can now move, rotate, and scale them all as one. However, a crucial point to understand is that their underlying geometry is not yet merged. If you were to look inside the mesh, you'd see the original shapes are still distinct, with surfaces overlapping. You cannot sculpt smoothly across the "seam" between them.
The image below illustrates this distinction. "Join" simply groups the objects. To truly merge them, we need another step.
Step 2: The Remesh Command
This is where the magic happens. After joining your objects, you switch to Sculpt Mode. You'll notice that you can't sculpt smoothly over the seams.
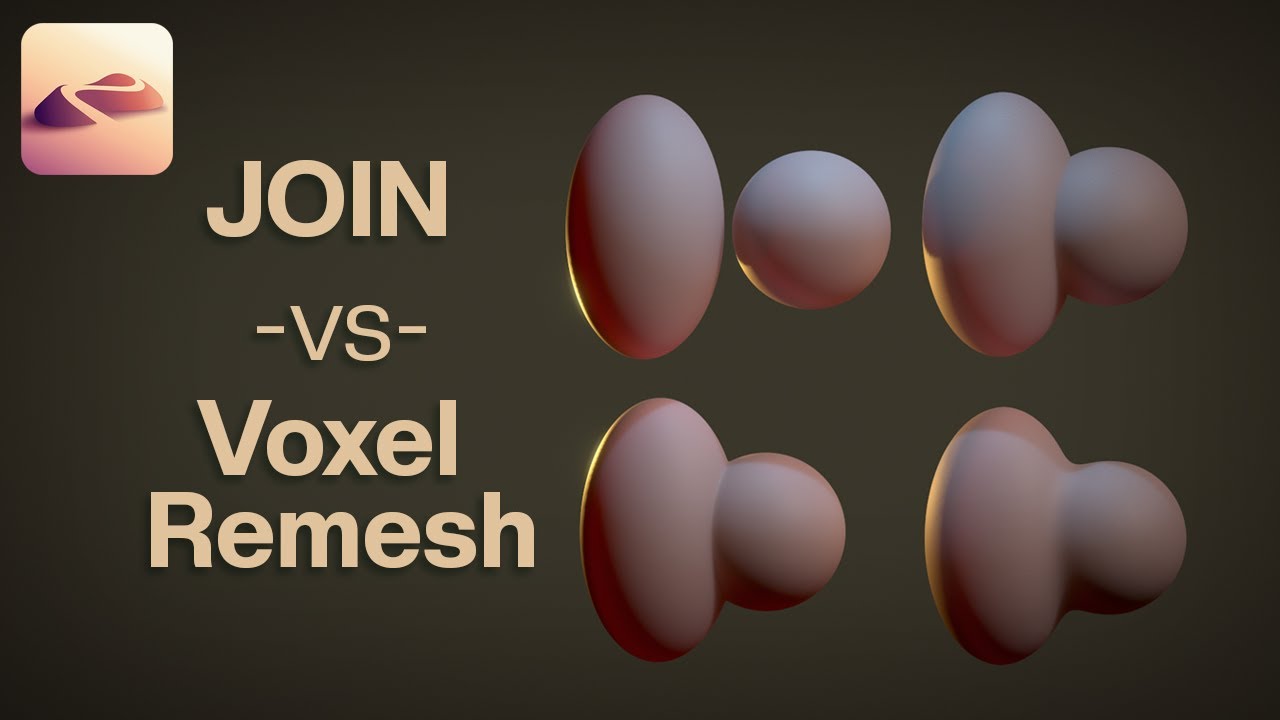
To fix this, we use the Voxel Remesher, which you learned about in a previous lesson. When you remesh the joined object, Blender calculates a completely new mesh based on the outer "shell" of all the combined shapes. It discards all the internal, overlapping geometry and produces a single, unified, and continuous surface ready for sculpting.
This image perfectly demonstrates the result.
3. Watching It in Action
This workflow is a cornerstone of sculpting in Blender. Let's watch a concise video that demonstrates this exact process.
How to Use Blender's Sculpting Remesh Feature (Tutorial)
The YouTube channel Ryan King Art has a tutorial on remeshing that includes a perfect demonstration of this join-then-remesh workflow. He uses it to build a character's arm from separate cylinders.
Please watch from 04:21 to 05:18. The video will show you: Several cylinder objects positioned to form an arm. How they are joined into one object using Ctrl + J. The problem: trying to sculpt across the seam doesn't work. The solution: using Remesh (Ctrl + R) to create a unified surface that can be sculpted on seamlessly.
As the video shows, this Join + Remesh combination is powerful and straightforward. For a quick text-based summary of this same process, you can review the following resource.
How to Make a Game Character in Blender?
This article from Game Design Skills on creating a game character also details this exact technique in the context of blocking out a model.
Please read the text under the heading '4. Model the face, hands, and other features'. Focus on the paragraph that begins 'Blender’s Remesh tool helps combine the pieces...'. It reinforces the Ctrl + J and Ctrl + R (Remesh in Sculpt Mode) workflow we're learning.
4. Hands-On Practice: Creating a Simple Abstract Form
Now, let's put this into practice by building a small abstract composition.
- Set Up Your Scene: Open a new Blender file. In Object Mode, delete the default cube.
- Add Your Base Shapes:
- Add a UV Sphere (
Shift + A> Mesh > UV Sphere). - Add a Cylinder (
Shift + A> Mesh > Cylinder). Use the Move tool (hotkeyG) and Rotate tool (hotkeyR) to position it so it penetrates the sphere. - Add a Cube (
Shift + A> Mesh > Cube). Scale it (S) and position it so it intersects with one of the other shapes.
- Add a UV Sphere (
- Join the Objects:
- While in Object Mode, hold
Shiftand click on each of your three objects to select them all. - Press
Ctrl + J. You will see in the Outliner panel that you now have only one object.
- While in Object Mode, hold
- Test the Seam:
- Switch to the Sculpting workspace.
- Select the Draw brush and try to sculpt over the line where two of your original shapes meet. You'll see it doesn't work cleanly; the geometry is still separate.
- Unify with Remesh:
- In the 3D Viewport header, find the Remesh options. Set the Voxel Size to around
0.05 mand click the Remesh button. (Alternatively, pressCtrl + Rin the viewport). - The model will update, and the seams will vanish!
- In the 3D Viewport header, find the Remesh options. Set the Voxel Size to around
- Sculpt Your Unified Form:
- Now, try sculpting over the same area again. The surface is completely continuous.
- Use the Grab brush to pull on the forms and adjust the silhouette.
- Use the Smooth brush (
Shift+ Click) to soften the transitions between the original shapes.
You have successfully created a complex base mesh from simple primitives!
A Glimpse of Another Method: Booleans
The Join + Remesh workflow is perfect for organic sculpting. For hard-surface models, there is another common method called Boolean operations. A Boolean "Union" performs a similar function, mathematically merging the volumes of two objects.
This is typically done non-destructively using a Boolean Modifier. We will explore this powerful system in depth in Module 5 when we focus on hard-surface techniques. For now, it's useful to simply know that it exists as an alternative and is particularly important for creating clean, sharp intersections between shapes.
Conclusion
You've now unlocked a core technique for creating complex sculptures. By blocking out forms with simple primitives and then unifying them with the Join and Remesh commands, you can build a solid foundation for any idea.
Key Takeaways:
- Blocking out with primitive shapes is an efficient way to establish the primary forms of a sculpture.
- The
Ctrl + Jcommand joins multiple objects into a single object entity but does not merge their geometry. - The Voxel Remesher is used after joining to create a single, seamless, and sculptable mesh by recalculating the surface topology.
- This
Join + Remeshworkflow is essential for building complex base meshes for both organic and abstract sculpting.
Next Steps
In this module, you've learned to visualize your sculpt with MatCaps, protect areas with masks, manage your geometry with Dyntopo and Remesh, and create new forms with the Snake Hook brush. Now, with the ability to combine objects, your toolkit is becoming quite powerful.
In the next module, we will begin our first major project: sculpting a complete abstract form. We will use the Join + Remesh workflow you learned today as our starting point to block out and build a compelling sculptural composition from scratch.