Hello! Welcome back to our course.
In our last lesson, we focused on restructuring data by splitting information from a single column into multiple columns using Text to Columns and text functions. This is a vital skill for getting your data into the right shape.
Now that your data is properly structured, the next logical step in cleaning is to handle redundant information. In any dataset, especially those compiled from multiple sources or involving manual entry, you're likely to encounter duplicate records. These duplicates can skew your analysis, leading to incorrect sums, counts, and other metrics in your MIS reports.
Our learning outcome for this lesson is to identify and remove duplicate entries using the built-in Remove Duplicates tool. We will adopt a professional workflow: first, visually identifying the duplicates to be sure, and then using Excel's powerful tool to remove them safely and effectively.
1. The Professional's Workflow: Identify First, Remove Second
Before deleting anything, a good data analyst always verifies what they are about to remove. A "measure twice, cut once" approach prevents irreversible mistakes. The safest way to start is by highlighting potential duplicates to visually inspect them.
Excel’s Conditional Formatting feature is perfect for this. It can instantly apply a specific format (like a colored background) to all cells in a range that contain duplicate values. This gives you a chance to review the duplicates and confirm they are indeed redundant before taking the next step.
How to Remove Duplicates in Microsoft Excel
The first part of this video from Cody Baldwin shows you how to quickly highlight duplicate values using Conditional Formatting. This is the ideal first step in our workflow.
Please watch from the beginning until 00:37. Focus on how to access the 'Duplicate Values' rule from the 'Conditional Formatting' menu on the Home tab.
This quick visual check is an invaluable safety net, especially when you're working with critical data like you did in your cyber review and incident response roles.
2. Using the 'Remove Duplicates' Tool
Once you've identified the duplicates and are confident about removing them, you can use Excel's built-in Remove Duplicates tool. This feature permanently deletes rows based on the criteria you set.
Best Practice #1: Always Work on a Copy
Because this action deletes data permanently, the most important rule is to never work on your original dataset. Always create a copy of your worksheet or your data range before you begin. If you make a mistake, you can always go back to the original source. You can quickly duplicate a sheet by right-clicking its tab and selecting "Move or Copy".
Removing Duplicates: The Process
The Remove Duplicates tool is straightforward but powerful. The key is telling Excel how to define a duplicate. Is it a row where every single column is identical? Or is it a row where just one specific key, like a "Candidate ID" or "Incident ID," is the same?
This video provides an excellent overview of the entire process, from defining what a duplicate is to applying the tool in different scenarios.
Three EASY Ways to Find and Remove Duplicates in Excel
This video from Leila Gharani at XelPlus clearly explains the concept of duplicates and provides a step-by-step walkthrough of the 'Remove Duplicates' tool.
Please watch from 00:34 to 03:10. Pay close attention to these key points: The importance of creating a copy of your data first. How to access the tool from the 'Data' tab. The difference between removing duplicates based on all columns (for exact row matches) versus a single column (to get a unique list).
As you saw in the video, the tool is located in the Data tab of the Excel ribbon.
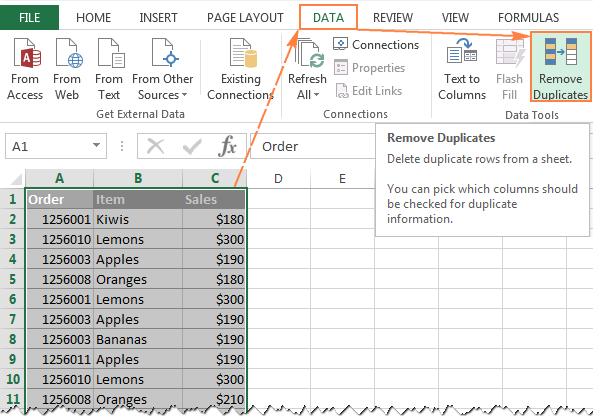
To solidify this, let's review the steps and some additional best practices in a written guide.
How to Remove Duplicates in Excel | Step-by-Step Guide
This guide, 'How to Remove Duplicates in Excel', summarizes the process and adds some important tips. It's a great reference to have.
Please read the following sections from the article: 'Where to Find the Remove Duplicates Option': Note that if your data is formatted as an Excel Table (which we covered in Module 2), you can also find the tool on the 'Table Design' tab. 'How to Use Remove Duplicates in Excel (Step-by-Step)': Read through this section to reinforce the process shown in the video. Pay attention to the dialog box where you select the columns for comparison. 'Tips for Managing Duplicates Effectively': This section reinforces our professional workflow: back up data and use conditional formatting to inspect duplicates first.
By mastering this tool, you ensure that the data you use for your MIS reports is clean, accurate, and free from the distortions caused by redundant entries.
3. Hands-On Practice
Let's apply this to a scenario related to your experience in cybersecurity incident response. You have been given a log of alerts from a security system. Your task is to clean up this data before creating a summary report.
First, copy the table below into a new Excel worksheet. Remember our best practice: create a second copy of this data to work on.
| Alert ID | Timestamp | Analyst | System | Status |
|---|---|---|---|---|
| INC-0451 | 2023-10-25 09:15 | A. Kumar | Firewall | Open |
| INC-0452 | 2023-10-25 09:20 | S. Chen | Antivirus | Open |
| INC-0451 | 2023-10-25 09:15 | A. Kumar | Firewall | Open |
| INC-0453 | 2023-10-25 09:30 | M. Jones | IDS | Closed |
| INC-0452 | 2023-10-25 09:35 | S. Chen | Antivirus | Open |
| INC-0454 | 2023-10-25 09:40 | A. Kumar | Firewall | Open |
| INC-0451 | 2023-10-25 09:15 | A. Kumar | Firewall | Open |
| INC-0453 | 2023-10-25 09:30 | M. Jones | IDS | Closed |
Your Task:
- Identify Duplicates: First, use Conditional Formatting to highlight all duplicate rows. Which rows are highlighted?
- Remove Exact Duplicates: Use the Remove Duplicates tool to delete rows that are identical across all columns. How many duplicate records were removed?
- Remove Duplicates by Key: After step 2, you'll notice there is still a duplicate
Alert ID(INC-0452). This can happen if a system generates a slightly delayed second alert for the same incident. For your report, you only want the first recorded instance of eachAlert ID. Use the Remove Duplicates tool again, but this time, configure it to remove duplicates based only on the 'Alert ID' column. How many unique records remain?
Take your time to work through these steps. This two-phase cleanup is a very common task for an MIS Executive.
Click here to see the solution and a step-by-step breakdown
1. Identify Duplicates:
When you apply Conditional Formatting (Home > Conditional Formatting > Highlight Cells Rules > Duplicate Values) to the entire dataset, you should see that the rows for INC-0451 and INC-0453 are highlighted, as they are exact duplicates of other rows.
2. Remove Exact Duplicates:
- Select your data range.
- Go to
Data > Remove Duplicates. - In the dialog box, ensure all columns are checked (
Alert ID,Timestamp,Analyst,System,Status). - Click OK.
- Excel should report: "3 duplicate values found and removed; 5 unique values remain."
Your data should now look like this:
| Alert ID | Timestamp | Analyst | System | Status |
|---|---|---|---|---|
| INC-0451 | 2023-10-25 09:15 | A. Kumar | Firewall | Open |
| INC-0452 | 2023-10-25 09:20 | S. Chen | Antivirus | Open |
| INC-0453 | 2023-10-25 09:30 | M. Jones | IDS | Closed |
| INC-0452 | 2023-10-25 09:35 | S. Chen | Antivirus | Open |
| INC-0454 | 2023-10-25 09:40 | A. Kumar | Firewall | Open |
3. Remove Duplicates by Key:
- Select the remaining data.
- Go to
Data > Remove Duplicatesagain. - In the dialog box, click Unselect All, and then check only the 'Alert ID' column.
- Click OK.
- Excel keeps the first occurrence of each
Alert IDand removes any subsequent ones. It will report: "1 duplicate value found and removed; 4 unique values remain."
Your final, clean dataset will be:
| Alert ID | Timestamp | Analyst | System | Status |
|---|---|---|---|---|
| INC-0451 | 2023-10-25 09:15 | A. Kumar | Firewall | Open |
| INC-0452 | 2023-10-25 09:20 | S. Chen | Antivirus | Open |
| INC-0453 | 2023-10-25 09:30 | M. Jones | IDS | Closed |
| INC-0454 | 2023-10-25 09:40 | A. Kumar | Firewall | Open |
Key Takeaways
- Duplicate records are a common data quality issue that can lead to inaccurate MIS reports.
- A professional workflow involves first identifying duplicates visually with Conditional Formatting, then removing them.
- Always work on a copy of your data to prevent accidental data loss.
- The
Remove Duplicatestool can remove rows based on an exact match across all columns or based on duplicates in one or more specific key columns.
Next Lesson
We have now covered several key data cleaning techniques: standardizing text, splitting columns, and removing duplicates. These skills are focused on fixing existing data. In our next lesson, we will shift to a proactive approach: we will learn how to set up data validation rules to ensure data entry consistency, preventing bad data from getting into your trackers in the first place.