Hello! Welcome to the next lesson in our journey to master Excel for an MIS Executive role.
In our last lesson, we focused on a reactive data cleaning task: identifying and removing duplicate records from an existing dataset. This is crucial for fixing data that has already become messy.
Today, we shift to a proactive approach. Instead of cleaning up errors after they happen, we'll learn how to prevent them from being entered in the first place. This is the core of maintaining high-quality data for your trackers and reports.
Our learning outcome for this lesson is to set up data validation rules (e.g., dropdown lists, date ranges) to ensure data entry consistency. In your previous roles handling incident and recruitment data, you know how critical it is for fields like "Status" or "Priority" to be consistent. A simple typo ("Clsed" instead of "Closed") can break your summary reports. Data Validation is the tool that solves this problem.
1. What is Data Validation?
Data Validation is an Excel feature that allows you to control what type of data can be entered into a cell. You can set up rules that restrict entries to a specific format, such as:
- Numbers: Only whole numbers or decimals.
- Dates/Times: Only dates within a specific period.
- Text Length: Only text of a certain character count.
- A Predefined List: Users must choose from a dropdown list of options.
This feature is found on the Data tab in the Data Tools group. When you click it, you'll see a dialog box with three important tabs:
- Settings: This is where you define the validation rule itself.
- Input Message: An optional pop-up message that guides the user before they enter data.
- Error Alert: A custom message that appears after a user enters invalid data.
2. Setting Up Basic Validation Rules
Let's start with some of the most common validation types: restricting entries to whole numbers and specific date ranges. These are fundamental for fields like "Quantity," "Age," or "Transaction Date."
This video provides a great introduction to the Data Validation dialog box and demonstrates how to set up these basic rules.
Watch these segments from the 'MS Excel - Data Validation' video by TutorialsPoint to see how to apply rules for numbers and dates.
Please watch the following parts: Whole Numbers (00:00 - 02:18): See how to restrict a column to only accept whole numbers between a minimum and maximum value. Dates (03:23 - 05:10): Learn how to set a rule that only allows dates within a specific start and end date.
A common practice for MIS reports is to reference the start and end dates from other cells on the worksheet. This makes them easy to update without having to edit the validation rule itself. For example, you could have cells named StartDate and EndDate that your validation rule points to.

For a more detailed guide on various ways to validate dates, you can refer to the "Use Excel Data Validation for Entering Dates" article from Contextures. It covers everything from fixed ranges to dynamic formulas.
3. The Most Powerful Tool for Consistency: Dropdown Lists
For an MIS role, dropdown lists are arguably the most important type of data validation. They are perfect for standardizing entries in categorical fields like 'Status', 'Priority', 'Department', or 'Incident Type'. By forcing users to select from a predefined list, you eliminate typos and variations, ensuring your SUMIFS, COUNTIFS, and PivotTables work perfectly.
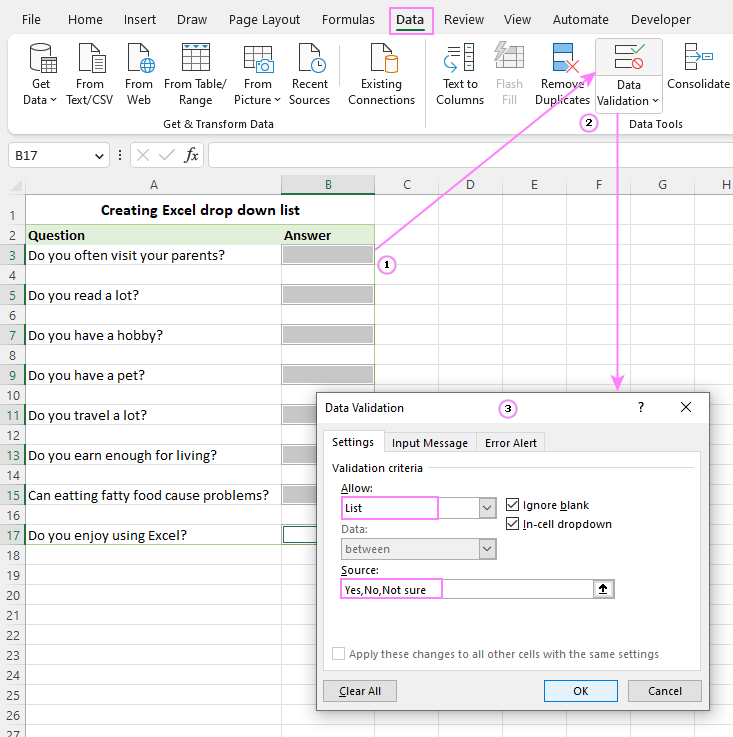
There are two ways to create the source for your list:
- Manual Entry: Type the items directly into the 'Source' box, separated by commas (e.g.,
Open,Closed,Pending). This is quick for very short, static lists. - From a Range: Reference a range of cells that contain your list items. This is the best practice, as it's much easier to manage and update.
This next video demonstrates the "from a range" method and shares essential tips for managing your source list professionally.
Advanced Excel - Data Validation and Drop-Down Lists
This video from 'Technology for Teachers and Students' provides a very practical guide to creating and managing dropdown lists.
Please watch from 06:28 to 12:26. Focus on these key takeaways: Creating the List (06:28 - 08:43): How to set the 'Source' of your validation list to a range of cells. Managing the Source List (08:43 - 11:18): Crucial tips on how to sort your list alphabetically and correctly add new items so they appear in the dropdown. Hiding the Source List (11:18 - 12:26): Professional techniques to hide the source list (e.g., in another sheet or a hidden column) to prevent it from being accidentally deleted or modified.
Pro Tip: Dynamic Dropdown Lists with Excel Tables
Remember how we used Excel Tables in Module 2? If you format your source list as an Excel Table, your dropdown list can become dynamic automatically. When you add a new item to the bottom of the table, the table expands, and the dropdown list will include the new item without you needing to re-define the source range.
The article "Create a Drop-down List in Excel" from Excel Easy explains this under the "Table Magic" section, and it is a highly recommended technique for building robust trackers.
4. Hands-On Practice: Building an Incident Tracker
Let's apply these concepts to build a small incident log, a task directly related to your cybersecurity experience.
Please copy the following headers into a new Excel worksheet. On a separate sheet (or in columns far to the right), create the source lists for 'Priority' and 'Status' as shown.
Main Tracker Sheet:
| Incident ID | Date Reported | Priority | Status | Assigned To |
|---|---|---|---|---|
List Source Sheet:
| Priority Options | Status Options |
|---|---|
| High | Open |
| Medium | In Progress |
| Low | Closed |
| Pending User |
Your Task:
- Set Up Dropdowns:
- In the 'Priority' column of your main tracker, apply data validation to create a dropdown list sourced from your 'Priority Options' range.
- Do the same for the 'Status' column, using the 'Status Options' range.
- Set Up Date Validation:
- In the 'Date Reported' column, apply data validation to allow only dates from the current year. This requires a custom formula.
- Hint: Go to
Data Validation > Settings. ChooseAllow: Custom. The formula you need is=YEAR(B2)=YEAR(TODAY())(assumingB2is the first cell in the 'Date Reported' column you are applying the rule to). This formula checks if the year of the entered date matches the year of today's date.
- Test Your Rules:
- Try entering data. Can you select 'High' from the Priority dropdown?
- Can you type "closed" (lowercase) in the Status column? (You shouldn't be able to).
- Can you enter yesterday's date? What about a date from last year?
Click here to see the step-by-step solution
1. Set Up Dropdowns:
-
For 'Priority':
- Select the cells in the 'Priority' column where you want the dropdown (e.g., C2:C10).
- Go to
Data > Data Validation. - On the
Settingstab, setAllow:to List. - Click in the
Source:box. Navigate to your list source sheet and select the range containing "High", "Medium", and "Low". The source box should show something like=Sheet2!$A$2:$A$4. - Click OK.
-
For 'Status':
- Select the cells in the 'Status' column (e.g., D2:D10).
- Go to
Data > Data Validation. - Set
Allow:to List. - Click in the
Source:box, and select the range containing your four status options. - Click OK.
2. Set Up Date Validation:
- Select the cells in the 'Date Reported' column (e.g., B2:B10).
- Go to
Data > Data Validation. - On the
Settingstab, setAllow:to Custom. - In the
Formula:box, type=YEAR(B2)=YEAR(TODAY()). Important: You must use a relative reference (B2, not $B$2) so that the rule adjusts for each cell in the selection (C2, D2, etc.). - Click OK.
3. Testing:
- You should now see dropdown arrows in the 'Priority' and 'Status' columns.
- Typing an invalid status like "closed" should trigger an error message.
- Entering a date from the current year (e.g.,
01/01/2024) should be accepted. - Entering a date from last year (e.g.,
12/31/2023) should trigger an error.
Key Takeaways
- Data Validation is a proactive feature that enforces rules to ensure data integrity at the point of entry.
- Dropdown lists are essential for standardizing categorical data, which is critical for accurate reporting and analysis in MIS.
- Using a cell range (especially one formatted as an Excel Table) for your dropdown source is a flexible and scalable best practice.
- You can create rules for numbers, dates, text length, and even use custom formulas for more complex logic.
Next Lesson
Now that we know how to keep our data clean and consistent, our next step is to make it visually communicate insights quickly. In the next lesson, we will learn how to apply conditional formatting to highlight duplicates, blanks, outliers, or specific statuses, turning your raw data into a more analytical tool.