Hello! Welcome back to your Embedded Interview Preparation Bootcamp.
In our previous lessons on device drivers, we've explored how to represent devices in the kernel, manage their hardware dependencies like pin multiplexing (pinctrl) and clocks (CCF), and provide basic I/O through character device interfaces. While read() and write() are robust, they come with a hidden performance cost that becomes critical in high-throughput applications like video processing, high-speed data acquisition, or large DMA transfers.
This lesson tackles that performance bottleneck head-on. We'll explore a powerful technique that is a staple of high-performance Linux drivers and a frequent topic in senior-level interviews at semiconductor companies.
Your learning outcome for this lesson is to: Explain zero-copy techniques like mmap for high-performance I/O between user space and a device.
1. The Problem: The High Cost of Copying
To understand the solution, we must first appreciate the problem. When a user-space application calls write() to send data to your driver, the kernel doesn't pass a pointer to the user's buffer directly to the driver. For security and stability, it performs a series of steps:
- Context Switch: The process transitions from user mode to kernel mode.
- Data Copy: The kernel executes
copy_from_user(), which copies the data from the user-space buffer into a temporary buffer in kernel space. - Driver Execution: Your driver's
write()implementation is called, and it processes the data from the kernel buffer (e.g., sending it to hardware). - Context Switch: The system call returns, and the process transitions back to user mode.
A read() operation follows a similar path in reverse. For small amounts of data, this is fine. But for megabytes of data, the CPU spends a significant amount of time just copying bytes from one memory location to another. This is the "copy overhead" we want to eliminate.
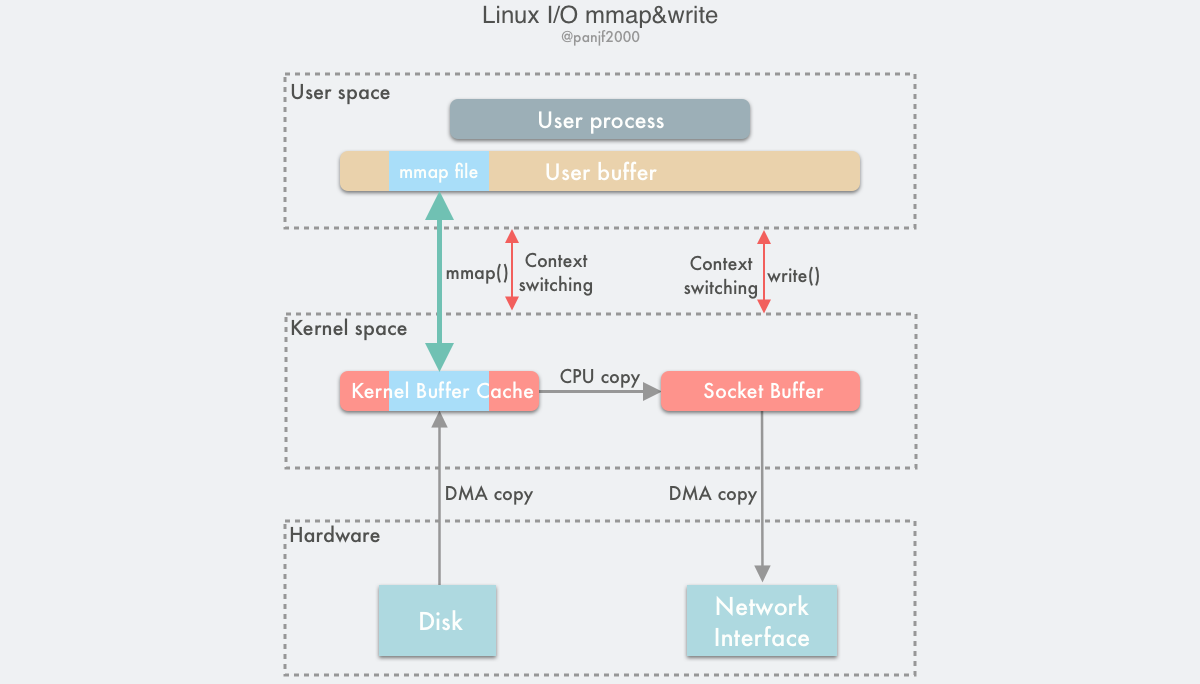
2. The Zero-Copy Principle with mmap
The mmap() system call provides an elegant solution. Instead of copying data, mmap maps a region of kernel memory directly into the user process's virtual address space.
What does this mean?
- The kernel and the user process get different virtual addresses.
- The Memory Management Unit (MMU) is configured so that both of these virtual addresses point to the exact same physical RAM pages.
Now, when the user application writes to its mmap'd buffer, it is directly modifying the memory that the driver can access. No copy_from_user() is needed. This is the essence of zero-copy I/O: the CPU does no work to move the primary data between user and kernel space.
Let's watch a short video that frames the efficiency of mmap in terms of reducing expensive system calls.
understanding mmap, the workhorse behind keeping memory access efficient in linux
To start, let's solidify the high-level concept of why mmap is more efficient than a series of read/write calls for bulk data transfer.
Watch the segment from 07:11 to 10:28. The key takeaway is how mmap replaces numerous, expensive system calls (each involving context switches and copies) with direct memory access after an initial setup call.
3. Implementing mmap in a Device Driver
To enable this functionality, your driver must implement the .mmap handler in its file_operations structure. This function's job is to tell the kernel which physical memory pages to map into the user process's address space.
The core of this implementation relies on a few key concepts and kernel APIs. Let's review the official documentation to understand them.
Memory mapping — The Linux Kernel documentation
To implement mmap in a driver, you need to be familiar with the key kernel structures and functions that manage memory areas and page table mappings.
Read the sections 'Structures used for memory mapping' and 'Device driver memory mapping'. Focus on: The role of struct vm_area_struct (VMA), which represents the user process's memory region. The purpose of remap_pfn_range(), the function that does the actual mapping. How to get the Page Frame Number (PFN) for memory allocated with kmalloc (virt_to_phys >> PAGE_SHIFT).
As you just read, the process inside your driver's .mmap function is:
- The kernel provides a pointer to a
struct vm_area_struct(VMA), which describes the user-space virtual memory region the process wants to map. - Your driver needs a buffer of physically contiguous memory. This is typically allocated with
kmalloc()orkzalloc()(with theGFP_KERNELflag) at initialization.vmalloc()is not suitable because it provides virtually contiguous memory which may be scattered across physical RAM. - You convert the kernel virtual address of your buffer to its physical address using
virt_to_phys(). - You convert the physical address to a Page Frame Number (PFN) by right-shifting it by
PAGE_SHIFT. A PFN is essentially an index for a physical page. - You call
remap_pfn_range(), passing it the VMA, the PFN of your buffer, and the size. This function modifies the process's page tables to create the mapping.

4. A Practical Walkthrough
Theory is essential, but seeing the code brings it all together. The following video walks through creating a simple character driver that implements and tests the mmap callback.
Let's code a Linux Driver - 32: The mmap Callback
This video provides a complete, practical demonstration of implementing and testing the mmap callback in a character driver, covering both the kernel and user-space code.
Watch the following two segments: Driver Implementation (06:42 - 11:53): This is the core of the lesson. Follow how the my_memory_map function is built. Pay special attention to the conversion from a kernel virtual address to a PFN (virt_to_phys >> PAGE_SHIFT) and the call to remap_pfn_range(). User-Space Test App (11:53 - 15:08): Observe how the user-space application uses the mmap() system call and then treats the returned pointer just like a normal memory buffer. This completes the picture.
5. Key Design Rules and Interview Perspective
When preparing for an interview, it's crucial to consolidate your knowledge into clear, concise points. The mmap implementation has several non-negotiable rules.
Linux Driver mmap Explained: Zero-Copy User–Kernel IO
This article provides an excellent summary of the key design requirements and directly compares mmap with traditional copy-based I/O.
Read the sections 'Key Design Requirements' and 'mmap vs copy_to_user()'. This will reinforce the critical rules you must follow, such as using physically contiguous memory and understanding the performance trade-offs.
Let's frame this knowledge for an interview setting.
-
Question: "What is zero-copy I/O, and why is it a critical optimization in an embedded Linux driver?"
- Your Answer: "Zero-copy I/O is a technique that avoids redundant data copies between user space and kernel space. In a traditional
read()orwrite()call, the CPU explicitly copies data between a user buffer and a kernel buffer. For high-bandwidth peripherals like cameras or network interfaces, this copy overhead becomes a major performance bottleneck. Zero-copy, implemented usingmmap, eliminates this by mapping the same physical memory pages into both the driver's (kernel) and the application's (user) address spaces, allowing them to share data directly."
- Your Answer: "Zero-copy I/O is a technique that avoids redundant data copies between user space and kernel space. In a traditional
-
Question: "Walk me through the main steps a driver takes to implement the
mmapfile operation."- Your Answer: "First, the driver allocates a physically contiguous buffer, usually with
kmalloc. Inside the.mmapcallback, it gets the virtual memory area (VMA) from the kernel. It then converts its buffer's kernel virtual address to a Page Frame Number (PFN) by first getting the physical address withvirt_to_physand then right-shifting byPAGE_SHIFT. Finally, it callsremap_pfn_range()with the VMA and PFN to instruct the kernel to build the page table entries that link the user process's virtual address space to the driver's physical pages."
- Your Answer: "First, the driver allocates a physically contiguous buffer, usually with
-
Question: "You mentioned needing a physically contiguous buffer. Why is a
vmalloc'd buffer unsuitable for a simplemmapimplementation?"- Your Answer: "
remap_pfn_rangeis designed to map a range of contiguous physical pages.vmallocprovides memory that is contiguous in the kernel's virtual address space, but these virtual pages can be backed by physically scattered pages. Tommapavmalloc'd area, you would have to loop through each page individually, find its PFN usingvmalloc_to_pfn, and callremap_pfn_rangefor each page one at a time, which is much more complex."
- Your Answer: "
Conclusion
You have now mastered one of the most powerful performance optimizations available to a Linux device driver developer. Understanding mmap demonstrates a deep knowledge of the Linux memory management subsystem and its practical application in solving real-world performance problems—a key differentiator for senior embedded roles.
Key Takeaways:
- Traditional I/O with
read()/write()incurs significant overhead from data copying between user and kernel space. mmapenables zero-copy I/O by mapping the same physical memory into both user and kernel virtual address spaces.- The driver implements the
.mmapcallback infile_operations. - The core of the implementation is the
remap_pfn_range()function, which requires a Page Frame Number (PFN) derived from a physically contiguous kernel buffer.
Preview of the Next Lesson:
Having explored the full spectrum of software interfaces for a device driver, from basic read/write to high-performance mmap, we will now shift our focus down the stack to the hardware itself. In the next module, we will begin our deep dive into the low-level communication protocols that connect the SoC to the outside world. Our first lesson will be to compare I2C and SPI protocols, detailing their signaling, addressing, clocking (CPOL/CPHA), and arbitration mechanisms.