Hello! Welcome to the next lesson in our module on Strategic Foresight & Failure Analysis.
In our previous lessons, we've built a solid foundation for thinking about what can go wrong. We used inversion and pre-mortem analysis to systematically identify potential failure modes. Then, we learned to classify a system's fundamental response to stress as fragile, robust, or antifragile.
So far, our focus has been on identification and analysis. Today, we shift from analysis to action. Identifying a potential disaster is only half the battle; the other half is preventing it or minimizing its impact. As a system architect, your role is not just to be a Cassandra, predicting doom, but to be a Vulcan, logically designing solutions.
Your learning outcome for this lesson is to propose mitigation strategies for the top identified failure modes in a product.
1. A Framework for Action: Failure Mode and Effects Analysis (FMEA)
Given your background in mechanical engineering, you may already be familiar with FMEA. It's a systematic, proactive method for evaluating a process to identify where and how it might fail and to assess the relative impact of different failures. Originally developed by the US military and famously used by NASA for the Apollo missions, it's a cornerstone of risk management in engineering and manufacturing. It's also incredibly effective for digital product design.
The core idea is to move from a vague sense of risk to a prioritized action plan. FMEA achieves this by quantifying risk using three factors:
- Severity (S): How badly will the user or business be impacted by the failure? (Rated 1-10)
- Occurrence (O): How likely is the cause of this failure to happen? (Rated 1-10)
- Detection (D): How likely are we to detect the failure before it reaches the user? (Rated 1-10, where a high number means unlikely to detect)
These are multiplied to get a Risk Priority Number (RPN):
A high RPN indicates a critical failure mode that demands immediate attention. The final, and most important, step in the FMEA process is to devise recommended actions—or mitigation strategies—to reduce the RPN.
To get a comprehensive overview of this process, let's watch a video that breaks it down step-by-step.
Mastering FMEA | Failure Modes and Effects Analysis Explained | Lean Six Sigma| Anexas | FMEA Guide
This video from Anexas provides a clear, detailed walkthrough of the FMEA process. It explains each column of the FMEA table and demonstrates how to calculate and use the RPN to drive action.
Please watch from 02:29 to 07:24. Focus on understanding each component of the analysis (Failure Mode, Effect, Severity, Cause, Occurrence, Controls, Detection) and how they culminate in the RPN and, most importantly, the 'recommendations' column.
The FMEA form is the central artifact for this work. It provides the structure to ensure a thorough analysis.

2. The Architect's Toolbox: Types of Mitigation Strategies
The goal of a mitigation strategy is to lower the RPN. You can do this by targeting any of its three components:
- Reduce Occurrence: Modify the system to make the root cause of the failure less likely. This is about prevention.
- Improve Detection: Implement better controls or monitoring to catch the failure before it has an impact. This is about interception.
- Reduce Severity: Redesign the experience or system so that even if the failure occurs, its negative impact is minimized. This is about damage control.
As the video you just watched explained, the best strategy is often to reduce the occurrence, but improving detection and reducing severity are also powerful levers.
Another video explains how this step of implementing "corrective actions" is the entire point of the FMEA exercise.
FMEA, the 10 Step Process to do an FMEA (PFMEA or DFMEA)
This video from CQE Academy reinforces the FMEA process and places strong emphasis on the final step: taking corrective action.
Watch from 19:12 to 20:34. This section focuses on using the RPN to prioritize and implement corrective actions, and then documenting the 'before and after' to show the risk reduction.
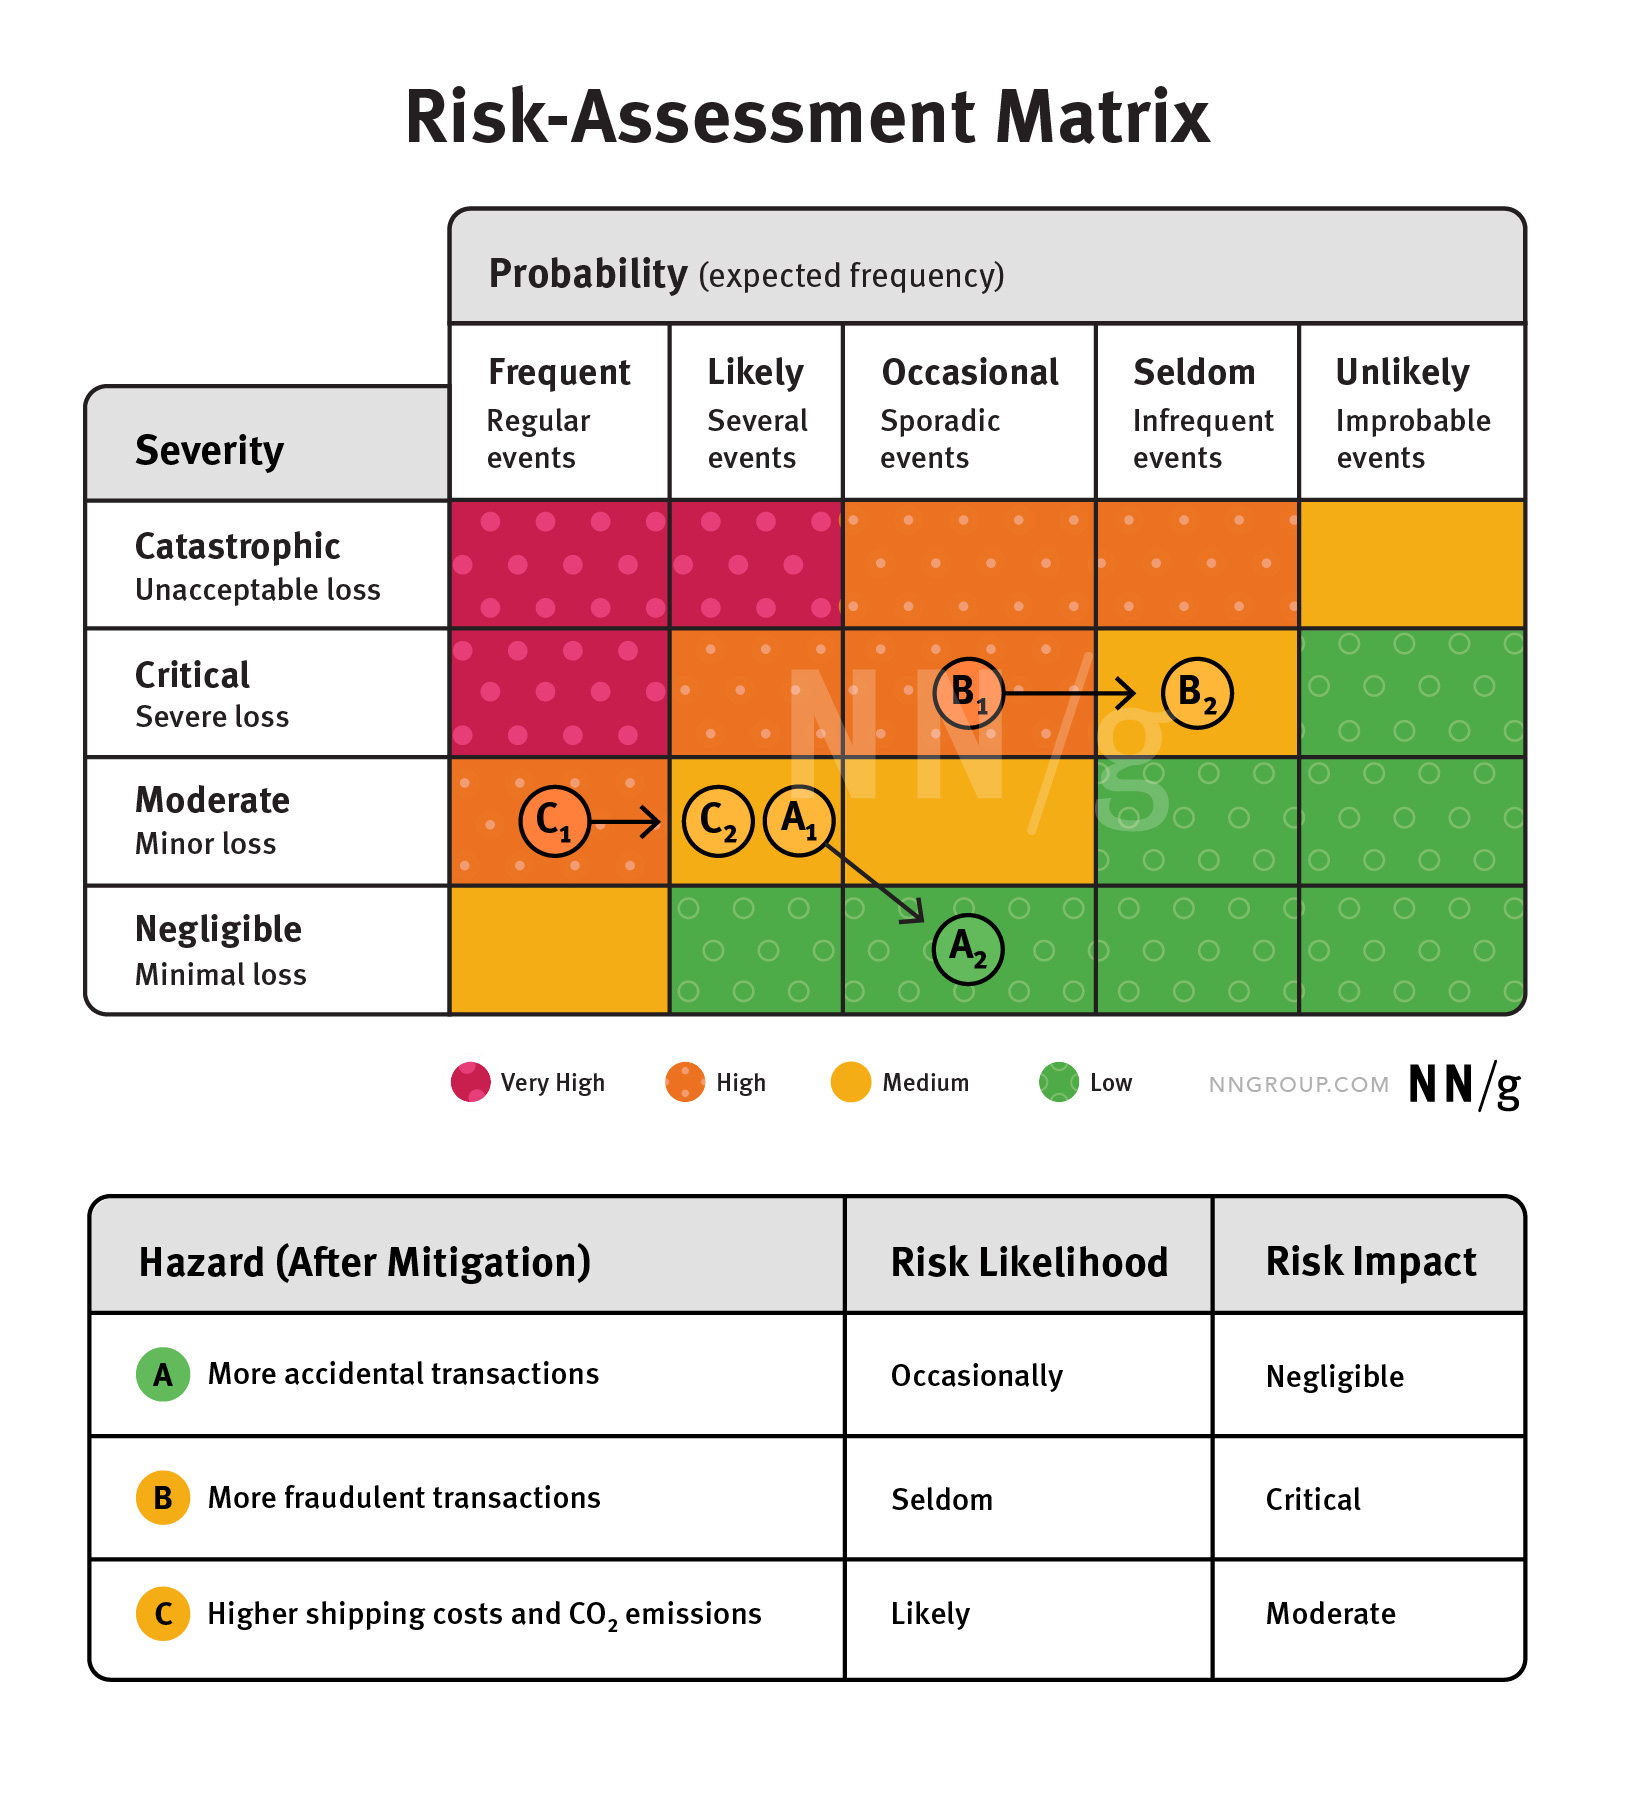
This "before and after" effect of mitigation can be visualized using a risk matrix. The goal is to move a risk from the red or orange zones to yellow or green.
3. Mitigation Through Design: The UX Designer's Role
As a UI/UX designer, you are in a prime position to propose and design powerful mitigation strategies, particularly those that reduce the severity of a failure's impact. A well-handled error can be the difference between a user abandoning your product in frustration and them feeling supported and guided.
The article below provides an excellent framework and concrete patterns for designing user-facing mitigations.
Error handling - UX design patterns
This article from Bootcamp on Medium, 'Error handling - UX design patterns,' breaks down how to handle errors from a user-centric perspective. It's full of actionable advice that constitutes a set of mitigation patterns.
Please read the following sections: 'Principles for handling errors like a boss' (introduces Nielsen's core principles). 'Slips vs Mistakes' (explains how the type of user error should influence the mitigation strategy). '3 Levels of errors - and how to handle them' (categorizes errors by origin and provides specific strategies for each). 'Checklist: Error Handling Like a Boss' (a great summary). Focus on how each piece of advice is a strategy to reduce the severity of an error by making recovery easier and less stressful for the user.
The key insight here is that good error handling is a form of risk mitigation. By providing clear, actionable feedback when things go wrong, you reduce the harm (Severity) the failure causes to the user's progress and their trust in your product.
4. Advanced Mitigation: Architecting for AI Systems
While the FMEA framework and UX patterns are universally useful, AI-powered systems introduce unique failure modes that require more systemic mitigation strategies. Problems like algorithmic bias, model drift, and hallucination are not simple bugs; they are often emergent properties of the system.
Mitigating these requires thinking at an architectural and governance level.
Designing Encapsulated Workflows to Anticipate AI Side Effects
The article 'Designing Encapsulated Workflows to Anticipate AI Side Effects' introduces advanced, process-oriented patterns for mitigating the complex risks inherent in AI systems.
This is a dense but important resource. Please read these two key sections: 'Practical Patterns for Designers and Strategists': Focus on the three main techniques proposed: Systems Consequences Thinking, Bias and Harm Audits, and Technologies of Humility. Think of these not as single fixes, but as ongoing processes that act as powerful, proactive mitigation strategies. 'Using Dual Evaluation to Detect Unintended Consequences Early': This section describes a monitoring strategy that can detect when a system is drifting toward failure, allowing you to intervene. This is a form of improving detection at a systemic level. As you read, consider how these strategies go beyond fixing individual failures to building a resilient governance structure around the AI.
These patterns—like conducting regular harm audits or implementing dual evaluation dashboards—are mitigation strategies that an architect proposes. They are designed to reduce the occurrence of systemic harms and improve the detection of dangerous drift before it causes a major failure.
5. Practical Exercise: Proposing Mitigations
Let's apply what you've learned. Imagine your team is developing a new AI-powered "smart reply" feature for a customer support platform. A pre-mortem analysis has identified the following top failure modes.
For each failure mode, propose at least one mitigation strategy. Try to use a mix of strategies: reducing occurrence, improving detection, and reducing severity. Briefly explain your reasoning.
Scenario: AI Smart Reply Feature
-
Failure Mode 1: The AI suggests a reply that is factually incorrect or nonsensical (a "hallucination").
- Proposed Mitigation(s):
- Reasoning:
-
Failure Mode 2: The AI suggests a reply that is factually correct but has an offensive or inappropriate tone for the customer's situation.
- Proposed Mitigation(s):
- Reasoning:
-
Failure Mode 3: Over-reliance on the feature leads to the "deskilling" of support agents, who lose the ability to compose thoughtful replies on their own, especially for complex cases.
- Proposed Mitigation(s):
- Reasoning:
-
Failure Mode 4: The system automatically sends a suggested reply without agent confirmation due to a bug.
- Proposed Mitigation(s):
- Reasoning:
Take about 15 minutes to think through your proposals. There are no single "right" answers; the goal is to practice applying the frameworks from this lesson.
Conclusion
Today, we've transitioned from identifying risks to actively planning to control them. This is a critical skill for any system architect.
Key Takeaways:
- FMEA provides a structured, quantifiable process to analyze failure modes and prioritize mitigations based on a Risk Priority Number (RPN).
- Mitigation strategies can aim to reduce occurrence (prevention), improve detection (interception), or reduce severity (damage control).
- UX design patterns for error handling are a powerful tool for reducing the severity of failures, making systems more forgiving and trustworthy.
- Complex AI systems require systemic mitigation strategies like harm audits, designed escalation paths, and dual-evaluation monitoring to manage emergent risks.
Next Lesson Preview:
In our next lesson, we will conclude this module by tackling the Phase 1 Case Study. You will analyze a real-world trust-collapse scenario on a major social platform. This will require you to use causal loop diagrams to model the systemic dynamics of the failure and analyze the decisions made in terms of their first and second-order consequences. It will be a fantastic opportunity to synthesize everything we've learned about systems thinking and failure analysis.