Hello! Welcome back to your course on Finite State Machines.
In the last lesson, you built a robust transitionTo function that validates transitions, ensuring your FSM can only move between states in ways you've explicitly allowed. This was a crucial step in making our FSMs reliable and preventing unexpected behavior.
However, as our FSMs grow to manage complex NPC AI or UI flows, just knowing a transition was valid isn't enough. We need to be able to see what is happening and when. This is where debugging comes in. Today's lesson focuses on a fundamental but powerful debugging technique: logging.
The learning outcome for this lesson is to test and debug an FSM by printing state transitions to the output console. You'll learn how to turn simple print statements into a structured logging system that gives you a clear, real-time trace of your FSM's activity.
1. The Power of a Good Log
When an NPC gets stuck in a wall or a menu doesn't appear when it should, your first question will be, "What state is the FSM in?". A well-designed logging system answers that question instantly. The goal isn't just to print messages, but to create a readable history of the FSM's life.
A good log for an FSM should tell you:
- Which state the FSM just entered or exited.
- What event triggered a transition.
- When an invalid transition was attempted and blocked.
- The exact sequence of these events.
Look at the following image from a game development console. This is the kind of clarity we're aiming for.
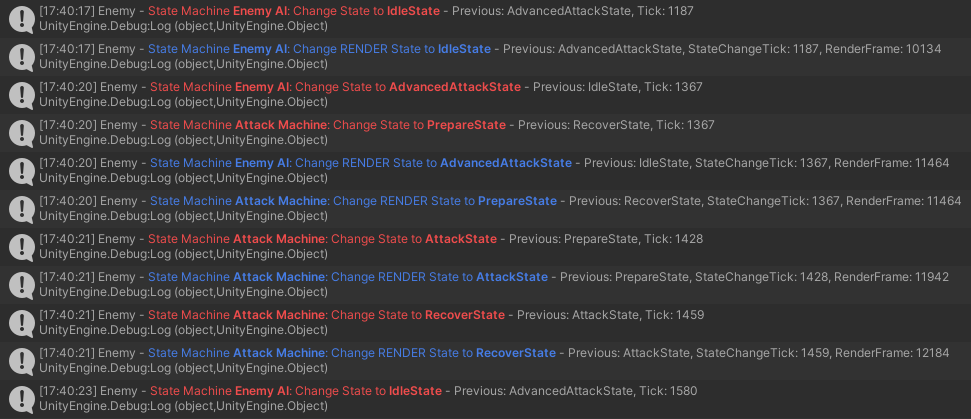
Notice the structured format. You can immediately see the flow from IdleState to ChaseState and so on. This is far more useful than random print("I'm here!") messages scattered through your code.
2. Implementing Structured Logging
Let's upgrade the turnstile FSM from our last lesson with a more professional logging system. We will create a simple helper function to format our messages and then integrate it into our FSM's key functions.
Step 1: Create a Logger Function
To keep our log messages consistent, we can create a small helper function. This also makes it easy to disable all FSM-related logs later by simply commenting out the print line inside this one function.
-- Add this at the top of your script
local FSM_NAME = "Turnstile"

function log(message)
    -- Using string.format for a clean, consistent prefix
    print(string.format("[%s FSM] %s", FSM_NAME, message))
end
Step 2: Integrate Logging into the FSM
Now, let's replace the print statements in our FSM logic with calls to our new log function. This will give us standardized output.
Here is the complete, updated script. The core logic is the same as last lesson's; the only changes are the addition of the log function and replacing print with log.
-- The complete, debug-ready Turnstile FSM script

-- Logger setup
local FSM_NAME = "Turnstile"
function log(message)
    print(string.format("[%s FSM] %s", FSM_NAME, message))
end


-- FSM Definition
local states = {
    Locked = {
        transitions = {
            Coin = "Unlocked"
        },
        OnEnter = function()
            log("▶️ ENTER: Locked. The turnstile is now locked.")
        end,
        OnExit = function()
            log("◀️ EXIT: Locked. Leaving the locked state.")
        end,
    },
    Unlocked = {
        transitions = {
            Push = "Locked"
        },
        OnEnter = function()
            log("▶️ ENTER: Unlocked. You may now push the turnstile.")
        end,
        OnExit = function()
            log("◀️ EXIT: Unlocked. Leaving the unlocked state.")
        end,
    }
}

local currentStateName = "Locked"

function transitionTo(newStateName)
    -- 1. VALIDATION
    local isAllowed = false
    local currentStateData = states[currentStateName]
    if currentStateData and currentStateData.transitions then
        for event, targetState in pairs(currentStateData.transitions) do
            if targetState == newStateName then
                isAllowed = true
                break
            end
        end
    end

    if not isAllowed then
        -- Log invalid attempts
        log("❌ INVALID TRANSITION: From '" .. currentStateName .. "' to '" .. newStateName .. "'. Denied.")
        return
    end

    -- 2. TRANSITION LOGIC
    -- Log the successful transition
    log("TRANSITIONING: " .. currentStateName .. " -> " .. newStateName)

    if currentStateData and currentStateData.OnExit then
        currentStateData.OnExit()
    end

    currentStateName = newStateName
    local newStateData = states[currentStateName]

    if newStateData and newStateData.OnEnter then
        newStateData.OnEnter()
    end
end

function handleEvent(event)
    log("-------------------------")
    log("EVENT received: " .. event)

    local currentStateData = states[currentStateName]
    local nextStateName = currentStateData.transitions[event]

    if nextStateName then
        transitionTo(nextStateName)
    else
        log("No transition found for event '" .. event .. "' in state '" .. currentStateName .. "'.")
    end
end

-- FSM Initialization
log("Initializing...")
local initialStateData = states[currentStateName]
if initialStateData.OnEnter then
    initialStateData.OnEnter()
end

-- Test sequence
wait(2)
log("Attempting an illegal direct transition...")
transitionTo("Locked") -- Should be denied and logged
wait(2)
handleEvent("Coin") -- Should succeed
wait(2)
handleEvent("Push") -- Should succeed
When you run this in Roblox Studio, your output window will now show a clean, prefixed log that is much easier to read and filter.
3. Using Callbacks as Debugging Hooks
The OnEnter, OnExit, and OnUpdate callbacks are the perfect places to insert debugging logs. They allow you to see exactly when a state becomes active, when it ceases to be active, and what it's doing on every frame or tick. This pattern is widely used in practice.
Is this a correct way to implement a basic FSM in Lua?
This Stack Overflow post shows a common way to structure an FSM in Luau. Notice how the developer uses print statements inside every single callback function as a built-in debugging tool.
Review the three Lua code blocks in the question. In the State Module, see how Enter, Exit, and Update functions have default print statements. In the StateMachine Module, observe how the SetState function orchestrates the calls to Exit and Enter. In the Example usage, note how every state (idleState, chaseState, attackState) overrides these functions with specific print calls, like print("idle state updating!"). This provides a detailed trace of the NPC's AI logic.
This strategy of embedding log messages directly into the state definitions is incredibly effective. It turns your state configuration table into a self-documenting and self-debugging tool.
The same pattern appears in another example from the Roblox developer forum.
My state machine code is messy and doesn't have much functions to it
In this forum post, a developer shares an FSM configuration. Again, notice the use of print within the enter and exit callbacks.
Scroll down to the 'Config Example' code block. You'll see print("Entering sprint state") and print("Exiting sprint state") right inside the state definitions. This is a clear and direct way to trace state changes.
4. Beyond the Console: Visual Debugging
Printing to the console is essential, but sometimes you need a more immediate, in-game way to see what state your FSM is in. This is especially true for NPCs or interactive objects. Visual debugging provides this at-a-glance feedback.
Simple techniques for visual debugging include:
- Changing a Part's
BrickColororMaterial. - Displaying the current state name in a
BillboardGuiorTextLabelabove the object. - Playing a small sound or particle effect on state entry.
This is not just for debugging; changing an object's color or appearance can be part of the actual game mechanic, and the FSM is the perfect tool to drive it.
State Machines Can Make Your Roblox Game Better!
The video 'State Machines Can Make Your Roblox Game Better!' includes a simple but effective example of visual debugging.
Watch the section from 05:19 to 06:49. The creator implements a click cooldown FSM. Notice how when the FSM enters the 'cooldown' state, the part's color changes. This provides immediate visual feedback that the state has changed, which is a powerful debugging tool.
You can also use the Roblox Studio debugger to pause execution and inspect the FSM object directly to see the value of currentStateName, as shown in the image below.

Conclusion
You have now learned how to properly instrument your FSM for testing and debugging. While it may seem simple, establishing good logging practices early on will save you countless hours of troubleshooting as your projects grow in complexity.
Key Takeaways:
- Structured Logging is Key: Use a consistent format (e.g.,
[FSM Name] Message) for your log output to make it easy to read and filter. - Leverage Callbacks: The
OnEnter,OnExit, andOnUpdatecallbacks are the ideal places to put log statements to trace the lifecycle of your states. - Log What Matters: Focus on logging state transitions, the events that cause them, and any invalid attempts that were blocked.
- Think Visually: Don't forget about visual debugging. Changing colors or displaying text in-game can provide immediate insight into your FSM's behavior.
This lesson concludes our module on implementing a basic FSM. You've gone from simple if/else logic to a robust, table-driven, and debuggable FSM.
In the next module, we will take a significant step forward. We'll encapsulate all this logic into a reusable ModuleScript. This will allow you to create multiple, independent FSM instances from a single, clean, object-oriented module, preparing you for managing many NPCs, UI systems, or game states at once.