Hello! Welcome back to our course on Finite State Machines.
In the previous module, you built a complete, table-driven FSM from the ground up. You learned how to define states, handle transitions, use callbacks, and even implement a structured logging system for debugging. Your turnstile FSM works perfectly, but it has one major limitation: it's a one-off. If you wanted to create a second turnstile, you would have to copy and paste the entire script, which is inefficient and difficult to maintain.
Today, we begin a new module focused on turning that one-off script into a powerful, reusable tool. This is where your background in Object-Oriented Programming (OOP) will be very helpful. Our goal is to create a single, centralized ModuleScript that can act as a "factory" for creating as many independent FSMs as we need.
The learning outcome for this lesson is to create a reusable FSM ModuleScript with a constructor that initializes the machine's state and configuration. By the end of this lesson, you'll have the foundational "class" for our FSM, ready to be expanded with methods in the lessons to come.
1. The Need for Reusability: Introducing ModuleScript
In any game of reasonable complexity, you'll need multiple instances of the same logic. Imagine an army of NPCs, each with its own AI brain, or a lobby with dozens of interactive elements. Each of these needs its own state machine, running independently.
This is precisely the problem ModuleScripts in Roblox are designed to solve. A ModuleScript is a special type of script that runs only once when another script require()s it. It returns a single value—typically a table containing functions and data—that can then be used by the calling script. This allows you to define a set of behaviors once and reuse them anywhere.
To start, you need to create a ModuleScript. In Roblox Studio, you can do this by right-clicking a service like ServerScriptService, selecting 'Insert Object', and then choosing 'ModuleScript'.
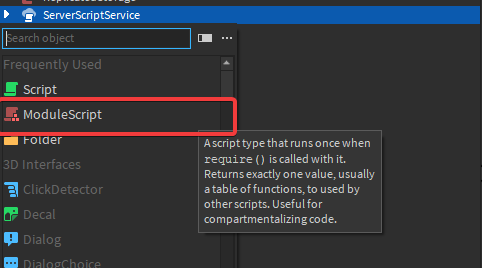
2. Structuring the FSM Module
A new ModuleScript starts with a simple template:
local module = {}

return module
We will build upon this template to create our FSM "class". In Luau, a common way to implement OOP patterns is to use a table as a class definition and another table for each object instance, linked by a metatable.
Here is the basic structure we will use for our FSM module. Let's name the ModuleScript "FSM".
-- In a ModuleScript named 'FSM' in ServerScriptService
local FSM = {}
FSM.__index = FSM -- This is key for our OOP structure

-- Our methods will go here later

return FSM
The line FSM.__index = FSM is a standard Lua trick. It tells Luau that if a method is called on an instance of our FSM and isn't found in that instance's table, it should look for it in the main FSM table instead. This allows all our FSM objects to share the same functions.
3. The Constructor: FSM.new()
The most important part of any class is its constructor. This is a function that creates, configures, and returns a new instance of the object. By convention, this function is often named new().
What information does a brand new FSM instance need to exist?
- A configuration: A table defining all possible states, their transitions, and their callbacks (
OnEnter,OnExit, etc.). This is the "blueprint" for the FSM. - An initial state: The name of the state the FSM should start in.
Let's define our constructor, FSM.new(), which will accept these two pieces of information as arguments.
-- Add this function inside your FSM ModuleScript, before the 'return' statement

function FSM.new(initialStateName, statesConfig)
    -- 1. Create a new table to represent our FSM instance
    local newFsm = {}

    -- 2. Store the configuration and initial state in the new instance
    newFsm.states = statesConfig
    newFsm.currentStateName = initialStateName

    -- 3. Link the new instance to the FSM class using a metatable
    setmetatable(newFsm, FSM)

    -- 4. Return the fully initialized FSM object
    return newFsm
end
This function does four simple but crucial things:
- It creates an empty table,
newFsm, which will be our new object. - It populates this object with the specific data for this instance: the complete rulebook (
statesConfig) and its starting point (initialStateName). - It uses
setmetatableto link this new object to our mainFSM"class", so it can use shared methods later. - It returns the new object to whatever script called
FSM.new().
This approach of passing in the initial configuration is a common pattern. To see how others structure their FSM modules, let's look at a couple of resources.
Finite State Machines in Roblox
The article 'Finite State Machines in Roblox' on Medium provides a great text-based example of building an FSM module. Pay close attention to the section about the FSM class constructor.
Read the section titled 'In order to use these states we need the actual Finite State Machine'. Notice how their constructor also creates a new instance and initializes it with properties for all of the states and the current state.
The video below also discusses the requirements for an FSM module, which directly informs how a constructor should be designed.
Roblox Studio - Finite State Machine EXPLAINED!
This video from CoodSlayer explains the design considerations for a reusable FSM module in Roblox.
Watch from 00:42 to 01:45. The author outlines the requirements, such as the ability to create many instances easily. Then, they show the constructor being fed a list of states and initializing the currentState variable, which is very similar to what we are building.
4. Putting It to Use: Creating Your First FSM Instance
Now that we have our FSM module with its constructor, let's see how to use it from a separate script.
- Create a regular
ScriptinServerScriptService. - In this new script, you will
require()yourFSMmodule, define a state configuration, and then call the constructor.
-- In a regular 'Script' in ServerScriptService

-- 1. Get the FSM "class" from our ModuleScript
local FSM = require(script.Parent.FSM) -- Assumes FSM module is in the same place

-- 2. Define the states for a turnstile (same as our previous lessons)
local turnstileStates = {
    Locked = {
        transitions = { Coin = "Unlocked" }
    },
    Unlocked = {
        transitions = { Push = "Locked" }
    }
}

-- 3. Create a new FSM instance using the constructor
print("Creating a new turnstile FSM...")
local myTurnstile = FSM.new("Locked", turnstileStates)

-- 4. Verify that the object was created correctly
wait(1)
print("FSM instance created:", myTurnstile)
print("The current state is:", myTurnstile.currentStateName)
print("The state 'Locked' has transitions for:", myTurnstile.states.Locked.transitions)
When you run this, you will see in the output that myTurnstile is a table containing the properties we assigned in the constructor. We have successfully created a self-contained FSM object. We could now call FSM.new() again with different configurations to create FSMs for NPCs, doors, or anything else, and they would not interfere with each other.
This structure is highly scalable. For a more advanced example, look at the "Example usage" in this open-source FSM library on GitHub. You can see how they call StateQ.new() with an initial state and a large table defining all the states and events.
The StateQ library on GitHub is a powerful, real-world example of an FSM module. Look at how it's instantiated.
Scroll to the 'Example usage' code block. The first few lines show the setup: local light = StateQ.new(LightState.On, ...). This is exactly the pattern we're implementing: calling a .new() function with an initial state and a configuration table.
Conclusion
Congratulations! You've taken the most important step in building a flexible and powerful FSM system. By moving the logic into a ModuleScript and creating a constructor, you've shifted from a single-use script to a reusable, object-oriented tool.
Key Takeaways:
ModuleScriptsare for Reusability: They allow you to define code once and use it many times viarequire().- OOP in Luau: We use a main table as our "class" and
setmetatableto link new instances to it. - The Constructor's Role: A constructor (
.new()) is a factory function that creates and initializes a new object instance. - FSM Initialization: Our FSM constructor requires an initial state name and a state configuration table to create a new, ready-to-use FSM object.
Our FSM object currently just holds data. It doesn't do anything yet. In the next lesson, we will begin adding methods to our FSM module. You'll implement a method that allows you to cleanly define the states and their callbacks, making the FSM's configuration even more robust and readable.