Introduction
Hello! In our last lesson, we explored std::vector, your first container from the C++ Standard Template Library (STL). We saw how it provides a dynamic array and how to iterate over its elements using a traditional for loop with an index, like this:
for (size_t i = 0; i < my_vector.size(); ++i) {
    std::cout << my_vector[i] << std::endl;
}
This works, but it's verbose and can sometimes lead to "off-by-one" errors. Modern C++ (since the C++11 standard) offers a much cleaner, safer, and more readable way to iterate over containers.
Today, your goal is to learn how to use range-based for loops to iterate over containers. This is a fundamental and widely used feature in modern C++ that will simplify your code, whether you're working with vectors, strings, or other data structures we'll cover soon.
1. From Indexed Loops to Range-Based Loops
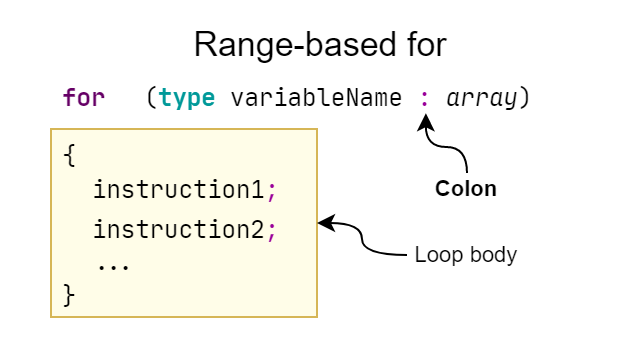
The range-based for loop, sometimes called a "for-each" loop, abstracts away the details of indices, iterators, and loop conditions. Its purpose is simple: execute a block of code for each element in a collection.
Let's watch a short video that compares the traditional for loop with the new range-based syntax using a std::vector.
Learn Range Based For Loops in C++ in 6 minutes - Easy Tutorial
The video "Learn Range Based For Loops in C++ in 6 minutes" by Programming With Nick provides a clear and direct comparison between the old and new loop styles.
Watch from the beginning to 2:46. The video will show you a standard indexed for loop and then refactor it into a range-based for loop, explaining the more concise syntax.
As you saw, the syntax for (int element : numbers) is much more direct. It clearly states the intent: "for each integer element in the numbers collection." This reduces boilerplate code and eliminates common mistakes related to loop counters and boundary conditions.
2. Efficiency and Modification: Iterating by Value vs. by Reference
The simple syntax for (int element : numbers) is great, but there's a crucial detail happening "under the hood" that your background in systems will appreciate. By default, the loop variable (element in this case) is a copy of the element from the container.
-
By Value (Copy):
for (auto element : container)- This is fine for simple types like
int,char, ordoublewhere copying is cheap. - For complex objects like
std::stringor largestructs, creating a copy for every single element in the loop can be very inefficient.
- This is fine for simple types like
-
By Reference: To avoid this performance cost, you can iterate by reference. This is analogous to passing arguments by reference to functions.
constReference (Read-Only):for (const auto& element : container)- This is the most common and recommended pattern. It provides read-only access to the original elements without any copying. It's both fast and safe (the
constprevents you from accidentally modifying the container's contents).
- This is the most common and recommended pattern. It provides read-only access to the original elements without any copying. It's both fast and safe (the
- Non-
constReference (Modification):for (auto& element : container)- Use this when you intend to modify the elements within the container. Since
elementis a reference to the original, any changes you make to it will be reflected in the container.
- Use this when you intend to modify the elements within the container. Since
The keyword auto is also extremely useful here. It tells the compiler to automatically deduce the correct type for the loop variable, which makes the code more generic and easier to maintain.
Let's see these different patterns in action.
Learn Range Based For Loops in C++ in 6 minutes - Easy Tutorial
Let's continue with the same video, which now explains how to use auto, references (&), and const to write efficient and safe loops.
Watch from 2:46 to 5:34. Pay close attention to the distinction between making a copy, using a reference for efficiency, and using a reference to modify the original elements.
Here is a quick summary in code:
#include <iostream>
#include <vector>
#include <string>

int main() {
    std::vector<std::string> technologies = {"Java", "Python", "TypeScript"};

    // Pattern 1: Read-only access with const reference (most common)
    // Efficient and safe. No copies are made.
    std::cout << "Original technologies: ";
    for (const auto& tech : technologies) {
        // tech = "C++"; // This would cause a compiler error because tech is const
        std::cout << tech << " ";
    }
    std::cout << std::endl;


    // Pattern 2: Modifying elements with a non-const reference
    // Changes to 'tech' will affect the vector.
    for (auto& tech : technologies) {
        tech += " (Proficient)";
    }


    // Print the modified vector to see the changes
    std::cout << "Modified technologies: ";
    for (const auto& tech : technologies) {
        std::cout << "\"" << tech << "\" ";
    }
    std::cout << std::endl;

    return 0;
}
Expected Output:
Original technologies: Java Python TypeScript
Modified technologies: "Java (Proficient)" "Python (Proficient)" "TypeScript (Proficient)"
3. How Does It Work Internally?
Given your interest in how things work "under the hood," you might be wondering what magic allows this simplified loop to function. It's actually clever syntactic sugar.
The compiler transforms a range-based for loop into a more traditional loop that uses iterators. An iterator is an object that can "point" to an element in a container. The loop works on any object that provides two functions:
begin(): Returns an iterator pointing to the first element.end(): Returns an iterator pointing to one position past the last element.
So, for (auto& element : container) is roughly translated by the compiler into something like this:
// Conceptual compiler translation
{
    auto&& __range = container;
    auto __begin = __range.begin();
    auto __end = __range.end();
    for ( ; __begin != __end; ++__begin) {
        auto& element = *__begin; // Dereference the iterator to get the element
        // ... your loop body ...
    }
}
You don't need to write this code, but understanding it explains why range-based loops work on all STL containers (std::vector, std::map, etc.) and even C-style arrays—they all have a defined beginning and end that the compiler can use.
Range-based for loop (since C++11)
For an authoritative look at this translation, the cppreference.com documentation is the best source. This is for your curiosity; you don't need to memorize it.
Quickly scan the "Explanation" section. You'll see the formal breakdown of the loop into its iterator-based equivalent. This confirms the 'syntactic sugar' concept.
4. Practical Exercise
Let's apply these concepts. In the previous lesson, you wrote a program to read numbers into a std::vector and then print them.
- Start with a simple
mainfunction that initializes astd::vector<int>with some values.#include <iostream> #include <vector> int main() { std::vector<int> numbers = {10, 20, 30, 40, 50}; // Your code will go here return 0; } - Task 1: Write a range-based
forloop that iterates overnumbersand prints each element to the console. Use theconst auto&pattern for this read-only operation. - Task 2: Write a second range-based
forloop that modifies the vector. Iterate throughnumbersand multiply each element by 2. Use theauto&pattern. - Task 3: Write a third range-based
forloop to print the elements again to verify that they have been modified.
Your final output should look like this:
Original numbers: 10 20 30 40 50
Modified numbers: 20 40 60 80 100
This exercise will give you hands-on practice with the two most important forms of the range-based for loop.
Conclusion
In this lesson, you've added a powerful and expressive tool to your C++ arsenal. The range-based for loop is the default and preferred way to iterate over collections in modern C++.
Key Takeaways:
- Range-based
forloops (for (declaration : range)) provide a cleaner, safer, and more readable way to iterate over containers compared to traditional indexed loops. for (const auto& element : container)is the go-to pattern for efficient, read-only iteration. It avoids unnecessary copies.for (auto& element : container)is used when you need to modify the elements of the container.for (auto element : container)makes a copy of each element and should generally be reserved for simple, cheap-to-copy types likeint.- Under the hood, these loops work by using iterators provided by the container's
begin()andend()methods.
Next Up
So far, we've focused on sequential data in a std::vector. But what if you need to store data based on a unique key, like you might in a Python dictionary or a Java HashMap? In the next lesson, we will explore another fundamental STL container designed for exactly this purpose: std::map. You'll see that the range-based for loop is just as essential for working with key-value pairs.