Introduction
Welcome to the first lesson of our new module! In the previous module, we covered the core improvements C++ offers over C, such as std::string, references, and function overloading. These features provide more safety, convenience, and expressive power.
Today, we transition to one of the most significant parts of the C++ ecosystem: the Standard Template Library (STL). The STL is a collection of powerful and efficient generic data structures and algorithms. We'll begin with the most fundamental and widely used container in the STL: std::vector.
Your goal in this lesson is to learn how to use std::vector to manage a dynamic array of elements. Since you have experience with Python's lists and JavaScript's arrays, the concept of a container that grows automatically will be familiar. We'll focus on the C++ specifics, including basic operations and, to satisfy your interest in "under the hood" details, how std::vector manages memory to achieve its dynamic behavior.
1. From Fixed Arrays to Dynamic Vectors
In C, and in our early C++ lessons, we've used C-style arrays. Their biggest limitation is their fixed size, which must be known at compile time. This is often impractical. For example, in your data analysis work, you rarely know in advance how many data points you'll need to process.
std::vector solves this problem by providing a "dynamic array" that can grow or shrink as needed during your program's execution. It handles all the complex memory management for you, making your code safer and simpler.
Let's watch a video that introduces this concept, contrasting the limitations of traditional arrays with the flexibility of std::vector.
Understanding C++ Dynamic Arrays (std::vector)
The video "Understanding C++ Dynamic Arrays (std::vector)" by pikuma provides an excellent starting point. It explains what vectors are and why they are necessary for modern C++ development.
Please watch from the beginning up to 7:50. This segment covers: The analogy to dynamic containers in languages like Python and JavaScript. A review of fixed-size C++ arrays and their memory layout (on the stack). The motivation for needing a dynamic array that can grow and shrink at runtime.
2. Basic std::vector Operations
Using a std::vector is straightforward. You first need to include the <vector> header. Then, you can declare a vector of a specific type.
Here are the essential operations you'll use most often:
- Declaration:
std::vector<int> my_numbers; - Adding elements:
my_numbers.push_back(10);(adds an element to the end) - Getting the size:
my_numbers.size();(returns the number of elements) - Accessing elements:
my_numbers[0];ormy_numbers.at(0);
A key difference between [] and .at() is that .at() performs bounds checking. If you try to access an index that doesn't exist, .at() will throw an exception, which can help you catch bugs. The [] operator does not perform this check, so accessing an invalid index leads to undefined behavior, which is much harder to debug.
This next segment of the video demonstrates these core operations in a live-coding example.
Understanding C++ Dynamic Arrays (std::vector)
Let's continue with the same pikuma video to see how to put these concepts into practice.
Watch the segment from 8:05 to 14:54. The presenter demonstrates: Including the <vector> header. Declaring and initializing a vector. Using push_back() to add elements and pop_back() to remove the last element. Using .size() in a standard for loop to iterate through the elements.
To provide a quick reference for these common operations, you can review the following article.
Vector in C++ STL - GeeksforGeeks
The article "Vector in C++ STL" from GeeksforGeeks serves as a great cheat sheet for common vector operations. I recommend scanning it now and keeping it handy for future reference.
Quickly read through the sections on "Declaration and Initialization", "Insert Elements" (focus on push_back), "Access elements", "Find Vector Size", and "Delete Elements" (focus on pop_back). The code examples are very clear.
3. Under the Hood: Size vs. Capacity
Now for the part that I think you'll find particularly interesting: how does a std::vector actually work? The magic lies in how it manages memory on the heap.
A std::vector object itself is small and lives on the stack. It contains a few pieces of information, most importantly:
- A pointer to a large block of contiguous memory on the heap, where the elements are actually stored.
- The size: the number of elements currently in the vector.
- The capacity: the number of elements the allocated heap memory can hold before it needs to be resized.
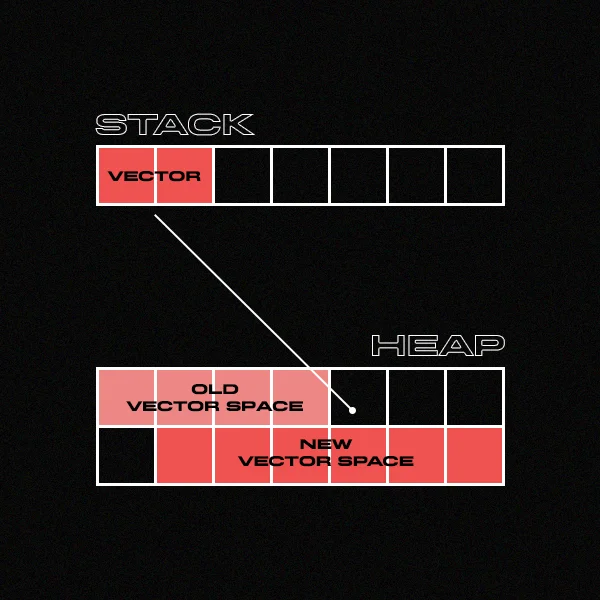
When you push_back an element and the size equals the capacity, the vector performs a reallocation:
- It allocates a new, larger block of memory on the heap (typically doubling the capacity).
- It copies or moves all the elements from the old memory block to the new one.
- It deallocates the old memory block.
- Finally, it adds the new element.
This is why size() can be different from capacity().
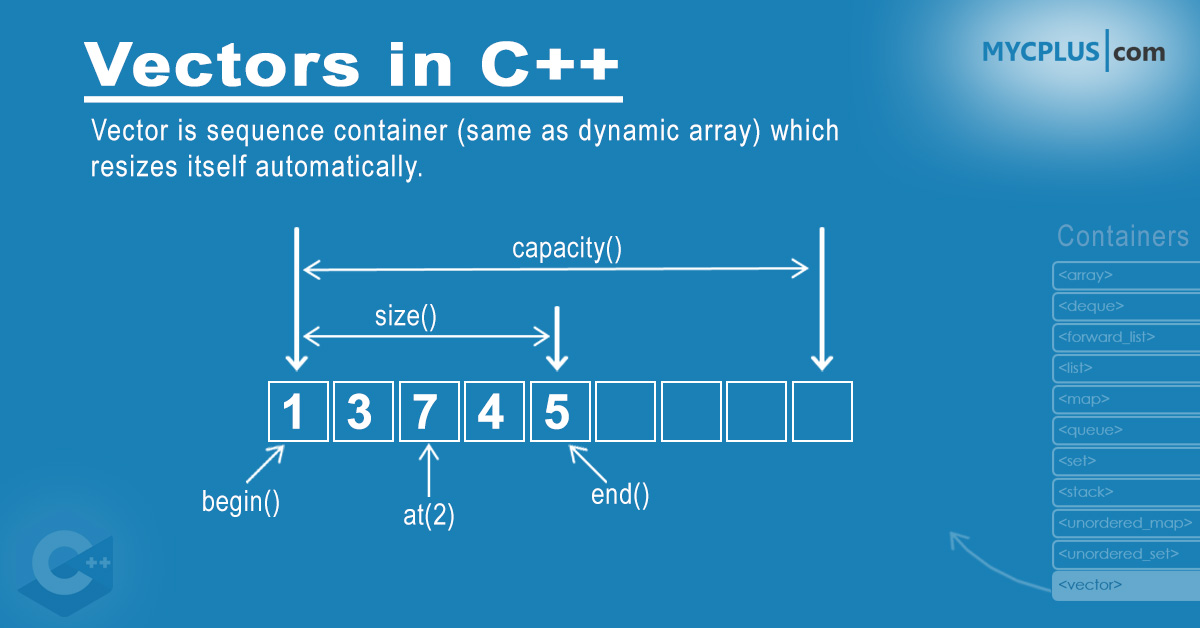
Understanding this process is crucial for writing efficient C++ code. Let's return to our video, which provides an excellent deep dive into this mechanism.
Understanding C++ Dynamic Arrays (std::vector)
This final segment from the pikuma video explains the internal members of a vector and demonstrates the reallocation process in detail.
Please watch from 28:27 to 32:33, and then from 51:42 to 59:02. These parts cover: The internal size, capacity, and pointer-to-elements members. The logic inside push_back that checks capacity and triggers reallocation. A live demonstration showing how size and capacity change as elements are added, clearly showing the capacity doubling.
4. Optimizing Performance with reserve()
While automatic reallocation is convenient, it can be a performance bottleneck if it happens frequently, as each reallocation involves memory allocation and copying all elements.
If you have a reasonable estimate of how many elements you will store, you can give the vector a hint using the reserve() method. This tells the vector to allocate enough capacity upfront, preventing reallocations as you add elements up to that capacity.
std::vector<int> numbers;
numbers.reserve(1000); // Allocates capacity for 1000 ints right away

for (int i = 0; i < 1000; ++i) {
    numbers.push_back(i); // No reallocations will occur in this loop
}
Let's watch a short video that explains this important optimization.
STL std::vector | Modern Cpp Series Ep. 116
Mike Shah's video on std::vector provides a clear demonstration of reserve() and also discusses another important performance topic: passing vectors to functions.
Watch from 20:57 to 27:46. Pay attention to: How reserve() is used to pre-allocate memory and improve performance. The discussion on why you should pass large objects like vectors by const reference (const std::vector<T>&) to functions to avoid making expensive copies.
The advice on passing vectors by const reference is a critical C++ idiom. It directly builds on what we've learned about references and efficiency. Copying a vector with thousands of elements just to pass it to a function is very wasteful.
5. Practical Exercise
Time to apply what you've learned.
- Create a new C++ file.
- Write a program that prompts the user to enter a series of integers.
- Use a
whileloop andstd::cinto read integers into astd::vector<int>. The loop should terminate when the user enters a non-integer value (e.g., the letter 'q'). - Inside the loop, print the vector's current
size()andcapacity()after each number is added. This will let you see the reallocation in action. - After the loop terminates, print all the numbers stored in the vector.
Example Interaction:
Enter numbers (q to quit):
10
Size: 1, Capacity: 1
20
Size: 2, Capacity: 2
30
Size: 3, Capacity: 4
40
Size: 4, Capacity: 4
50
Size: 5, Capacity: 8
q

You entered: 10 20 30 40 50
(Note: Your exact capacity values may differ depending on your compiler's STL implementation, but you should see them grow exponentially.)
Bonus Challenge: Modify your program to reserve(10) on the vector before the loop starts. Run it again and see how the capacity changes (or doesn't change) as you enter the first 10 numbers.
Conclusion
In this lesson, you've taken your first step into the C++ Standard Template Library by mastering std::vector. It is a powerful and essential tool that you will use constantly in your C++ journey.
Key Takeaways:
std::vectoris a dynamic array that automatically manages its memory on the heap.- The most common operations are
push_back(),size(),at(), and the[]operator. - A vector's
sizeis the number of elements it contains, while itscapacityis the total space it has allocated. Whensizeexceedscapacity, a reallocation occurs. - Reallocation can be costly. You can use
reserve()to pre-allocate capacity and improve performance if you know the approximate number of elements you'll need. - To avoid expensive copies, pass vectors to functions by
constreference (const std::vector<T>&) when you only need to read their contents.
Next Up
We used a traditional for loop with an index to iterate over our vector today. In the next lesson, we'll explore a more modern, safer, and often more readable way to iterate over containers like std::vector: the range-based for loop.