In our last lesson, we created a functional map of your body's major muscle systems, identifying the primary movers for pushing, pulling, and squatting. Today, we'll build on that by learning how to control and stabilize the centerpiece of that system: your core. Think of it this way: your limbs are the engine and wheels, but your core is the chassis. A flimsy, unstable chassis means power is lost and the structure is at risk. A rigid, braced chassis ensures that all the force you generate is transferred efficiently and safely into movement.
This lesson is dedicated to mastering the skill of core bracing and maintaining proper body alignment. By the end, you'll be able to consciously create the full-body tension necessary to perform exercises correctly, maximize your strength output, and minimize the risk of injury. This is the crucial bridge between knowing what muscles to use and knowing how to use them as a single, powerful unit.
Why Bracing is Non-Negotiable: The Physics of Stability
From an engineering perspective, the human torso is a complex structure that must resist unwanted flexion, extension, and rotation under load. When you perform an exercise like a push-up, your goal is to move your body as a single, rigid plank. If your lower back sags or your hips pike up, you create "energy leaks." The force generated by your chest and arms isn't efficiently used to lift your body; instead, it's wasted on controlling these unwanted movements.
The key to creating this rigidity is Intra-Abdominal Pressure (IAP). To understand this, let's explore a foundational article on the science of bracing.
The Science of Bracing When Lifting: How to Generate More ...
This article from Verro Training explains the science behind creating a stable core, which is perfect for understanding the 'why' behind the technique.
First, read the section The Soda Can Analogy. This provides a powerful mental model for IAP. Next, read the section Bracing vs. Hollowing. It's critical to understand that we are aiming to brace (pushing out 360 degrees) rather than hollow (sucking the stomach in).
As the article explains, proper bracing turns your torso into a pressurized, uncrushable cylinder. This internal pressure supports the spine from the inside, acting like a natural weight belt. The two most common errors are "hollowing" the stomach, which only activates a single deep muscle, and breathing from the chest instead of the diaphragm. Our goal is to create 360-degree tension around the midsection.
The Control Switch: Mastering Pelvic Tilt
The foundation of a neutral, stable spine starts at the pelvis. Your ability to consciously control its position is the first mechanical step to a proper brace. Most people, especially those who sit a lot, tend to rest in an anterior pelvic tilt, where the lower back is arched. For exercise, we need to correct this.

To achieve a strong, braced position, you need to perform a posterior pelvic tilt. Think of it as "tucking your tailbone under" or trying to flatten the curve of your lower back by tilting your belt buckle up toward your chin. This simple action engages your lower abdominals and glutes, locking your pelvis and lumbar spine into a much stronger, safer position.
Activating the System: A Step-by-Step Guide
Now that you understand the concepts of IAP and pelvic tilt, let's walk through the physical process of turning these muscles on. The following video provides a clear, practical guide to activating the deep core musculature.
You're Engaging Your CORE Wrong! - Exercise FIX 🙌🏾🙌🏾🙌🏾
This video, "You're Engaging Your CORE Wrong!" by Michelle West, breaks down core engagement into simple, actionable steps. Follow along with the presenter.
Watch the video from this section. It will guide you through: The reasons for core engagement. Transverse Abdominis (TVA) contractions: Learning to draw your belly button in. Pelvic floor contractions (Kegels): Activating the base of your core. Combining both TVA and pelvic floor activation for a complete brace. Breathing while braced: This is crucial. You'll be practicing a version of the Valsalva maneuver, where you brace your core against a held breath to maximize IAP during the hardest part of a lift.
Practice these drills until you can consciously create that feeling of a tight, pressurized cylinder around your midsection while still being able to breathe. This sensation is the foundation of every exercise you will perform.
The Gold Standard: The Hollow Body Hold
With the ability to activate your core, we can now train it to resist movement under tension. The single best exercise for this is the hollow body hold. This is an anti-extension exercise, meaning it specifically trains your core to prevent your lower back from arching. Its mastery is a direct indicator of true core stability.
Let's learn the proper progression.
Hollow Body Hold Progression - Gymnastic Core Stability Exercise
This video from GMB Fitness, "Hollow Body Hold Progression," is an excellent tutorial that emphasizes the most critical element of the exercise: maintaining contact between your lower back and the floor.
Watch the entire video from the beginning. Pay close attention to these key points: The instructor's emphasis on keeping the lower back "married into the floor". This is non-negotiable. The progression: start with knees bent (tuck position), then slowly extend your legs (leg extension) and arms (arm extension) only as far as you can without your back arching.
If you find even the initial tuck position challenging, it's wise to build the foundational skill first. The "dead bug" exercise is an excellent precursor.
Skip the sit-ups and learn the hollow body hold — it's the core ...
This article reinforces the value of stability exercises and provides a great prerequisite drill.
Read the section on the Dead Bug. Practice this exercise, focusing on moving your opposite arm and leg slowly while keeping your core braced and lower back completely flat on the floor. Once you can do this with perfect control, return to the hollow body hold.
Application: A Straight Line of Force
Finally, let's see how this all applies to a compound movement you'll be starting soon: the push-up. A push-up is essentially a moving plank. The stability you train in the hollow body hold is the exact quality needed to maintain a rigid body during a push-up.
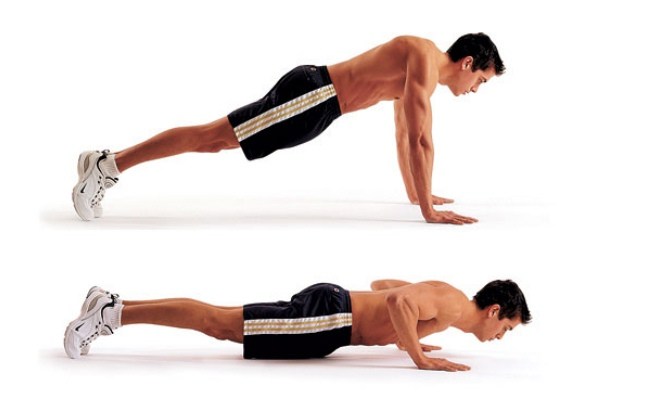
To get into a proper push-up position:
- Assume a plank position on your hands.
- Engage your core using the technique you just practiced: brace your abs as if you're about to be punched.
- Perform a posterior pelvic tilt: tuck your tailbone and squeeze your glutes. Your hips should not sag toward the floor.
- Maintain this rigid line throughout the entire movement, both on the way down and on the way up.
Conclusion
You have now learned the theory and practice of creating a stable, rigid core—the most fundamental safety and performance skill in strength training.
Key Takeaways:
- Bracing creates Intra-Abdominal Pressure (IAP), turning your torso into a stable cylinder that protects the spine.
- A posterior pelvic tilt (tucking the tailbone) is the key to setting a neutral spine and engaging the lower abs and glutes.
- True core engagement involves a 360-degree brace, not just "sucking in" your stomach.
- The hollow body hold is the foundational exercise for training your core to resist spinal extension under load.
- Proper alignment in exercises like the push-up requires maintaining a straight line from head to heels, which is a direct application of core bracing.
In our next lesson, we will begin Module 2 and put this skill to immediate use. You'll learn to perform negative push-ups, bodyweight rows, and squats, applying the bracing and alignment techniques you've just mastered to start building real strength.