Recommended resources
The freely available resources this lesson will direct you to.
- LAYERS FOR TOTAL BEGINNERS (Alpha lock, Clipping, Selection Layer, etc) 〚ibisPaint X tutorial〗www.youtube.com
- How To Use Folders - Ibis Paint X Tutorialwww.youtube.com
- 47. Layer: Layer Folders - How to use ibisPaintibispaint.com
- 45. Layer: Naming your layers to manage them - How to use ibisPaintibispaint.com
Welcome back. You’ve been practising deliberate marks and repeated shapes. Today, instead of improving a stroke, you’ll improve the file that holds your strokes. In about 40 minutes, you’ll set up a small character-art project in Ibis Paint so you can find the part you want to change, keep related layers together, and preserve an editable backup.
Organize for the changes you expect to make
A layer is useful because you can change one part of an image without disturbing another. If your sketch and clean lines occupy different layers, erasing a line need not erase the sketch beneath it. If the character’s colours sit below the line art, you can adjust a colour without painting over the outlines.
Watch these short portions of Artful Escape’s Layers for Total Beginners for a visual picture of stacking and separation. Stop before the tutorial moves into more specialised layer tools; you’ll use those in later lessons.
LAYERS FOR TOTAL BEGINNERS (Alpha lock, Clipping, Selection Layer, etc) 〚ibisPaint X tutorial〗
Artful Escape’s Ibis Paint tutorial shows why a drawing becomes easier to revise when its parts occupy separate layers.
Watch stack order to see how moving a layer changes what appears in front. Then watch separate line art for the benefit of keeping clean lines off the rough sketch, and colour placement to see colour placed beneath the lines. Focus on what remains editable, rather than on the drawing technique.
Separation does not mean making a new layer for every stroke. Make a separate layer when you have a plausible reason to change that part independently: the rough sketch, clean line art, hair colour, skin colour, or clothing colour. That gives you enough control without creating a stack you must search every time you draw.
Give layers names you can act on
An unnamed stack may look manageable while you are drawing, but thumbnails become harder to distinguish once several layers contain small or overlapping marks. A useful name answers, “What can I safely edit here?” Hair base is more informative than Layer 7; Rough sketch is more informative than Old.
Read ibisPaint’s short tutorial Layer: Naming your layers to manage them. Follow its screenshots as well as the text so you can locate the command in your own layer panel.
45. Layer: Naming your layers to manage them - How to use ibisPaint
This official ibisPaint tutorial gives the exact route for renaming a selected layer.
In tutorial 45, begin at the sentence “You can name layers to make your work easier.” Read the naming steps through the final paragraph. In the screenshots between those sentences, follow the sequence: open the Layer window, select the intended layer, open its three-dot menu, choose Rename Layer, enter a name, and confirm with OK.
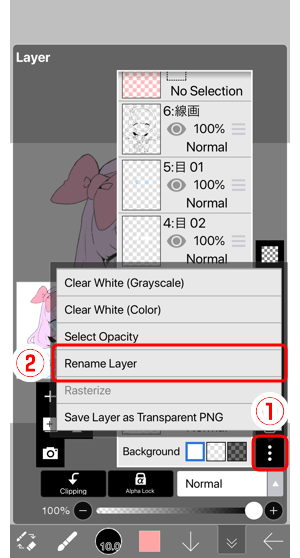
Try to name a layer when you create it, not after you have forgotten what it contains. Before renaming or drawing, glance at the highlighted layer row and its thumbnail. That small check helps prevent the familiar mistake of adding clean lines to the rough-sketch layer.
Use folders to make the stack navigable
Layer names tell you what individual layers contain. Folders answer a different question: which layers belong together? For a character image, a Character folder can hold the line art, colour bases, and sketch. A Background folder can hold a backdrop and any background details. Collapsing a folder lets you see the main parts of the project without scrolling through every component.
Read the official ibisPaint tutorial Layer: Layer Folders. Its placement rule matters: adding a folder does not automatically put every nearby layer inside it.
47. Layer: Layer Folders - How to use ibisPaint
This ibisPaint tutorial explains when folders help and shows how to create, populate, collapse, and rename them.
In tutorial 47, read why folders help in the opening paragraph. Continue from the paragraph beginning “When adding a folder” through the placement instructions, using the screenshots to find Add Special Layer, Add Folder, and the Reorder handle. Pay particular attention to the rule that a layer must be immediately below the folder to enter it by swiping its reorder handle right. Finally, read the final instructions on tapping a folder thumbnail to collapse or reopen it and using Rename Folder in its menu.
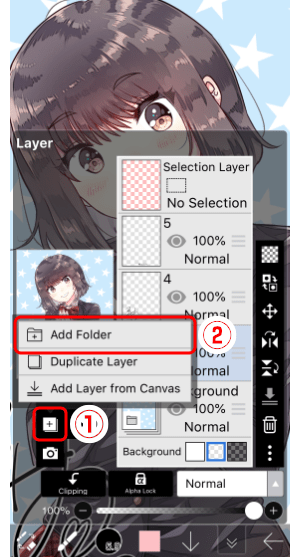
Here is a modest structure to aim for. The indentation shows which layers belong inside each folder, not a command you must type:
Character [folder]
    Line art
    Hair base
    Skin base
    Clothing base
    Rough sketch
Background [folder]
    Background colour
    Background details
Keep Line art above the colour bases so the outlines remain visible. You can hide Rough sketch when you no longer need to see it without deleting it. If your background has only one layer, you can leave that layer outside a folder for now; create the Background folder when there is something to group. Folders should remove clutter, not add empty structure.
To place an existing layer in a folder, use the official tutorial’s method: bring the layer immediately below the folder, then swipe its Reorder handle right. Look for the layer’s indentation in the panel to confirm that it entered the folder. If a swipe does not work, check the layer’s position before repeatedly trying the gesture. Tapping the folder thumbnail collapses its contents; it does not replace checking which layer is selected before you draw.
Back up the editable project
Organization helps only while the file is available. A simple backup routine protects the work you would otherwise have to rebuild: not merely the visible picture, but the separations that let you revise it.
There are two different things worth keeping:
- An editable project copy retains layers and, ideally, their names and folders. In the export or sharing options available in your version of Ibis Paint, look for an editable ibisPaint artwork or project format, often labelled IPV. If you use another layered format, check that it actually preserves the structure you need.
- A viewing copy, such as a PNG or JPEG, lets you see or share the image. It is useful, but it is not a substitute for an editable backup: a flattened image cannot give you the original separate sketch, line art, and colour layers.
Use this short routine at the end of a session and after a major change:
- Confirm that the current project is saved and that its important layers are present.
- Make a dated or numbered editable copy and store it somewhere independent of the working copy—for example, another device or a cloud-storage location you can access separately. A duplicate kept only beside the original on the same device is convenient, but is not your entire backup plan.
- Check the copy. Open a copied project when possible and confirm that you can still select individual layers and find your named folders. Keep the previous good version until the new one passes that check.
If you cannot find an editable export in your version, investigate whether your device or account backup includes the app’s project data, and verify that it can be restored. Save a viewing copy as an additional precaution, but do not mistake it for proof that the layered project is recoverable. A clear filename such as character-study_v02 also makes it easier to tell a newer backup from an older one.
Build a small working file
Spend about 10 minutes applying the structure rather than making a polished illustration. A simple character bust or even rough head, hair, and clothing shapes is enough. The point is to test whether you can locate and change a part without damaging its neighbours.
Start with a Rough sketch layer. Add a layer above it named Line art and put a few clean contours there. Make separate layers for two or three broad colour areas beneath the line art, naming each for its contents. Add a Character folder, place those layers inside it, and collapse and reopen it once. If you add more than one background layer, group those in a Background folder too. Finally, make and check an editable backup using the options available to you.
Before moving on, glance through the layer panel. Each name should tell you what you can edit there, the visible order should make sense, and the backup should be more than a second flattened picture.
What to carry forward
A workable character-art file uses separate layers for independently editable parts, names that identify those parts, and folders that keep the stack readable. A backup completes the system only when it is stored independently and you have checked that its editable structure survives.
Next, you’ll use clipping layers and alpha lock to paint within established shapes. The named colour-base layers you set up today will give those tools clear targets.