Recommended resources
The freely available resources this lesson will direct you to.
- Drawabox Lesson 1, Exercise 4: Tables of Ellipseswww.youtube.com
- Drawabox Lesson 1, Exercise 3: Ghosted Planeswww.youtube.com
- How To Draw Circles And Ellipses (Freehand!)www.thepencilroomonline.com
- How to Draw Ellipses Freehand: 8 Tips to Master the Most Essential Shape in Sketching – ✏️THE DESIGN SKETCHBOOKwww.thedesignsketchbook.com
Welcome back. Last lesson, you practised planning a line, rehearsing its movement, and making it without steering anxiously halfway through. An ellipse asks for the same commitment, but its direction changes continuously and must return to where it began. Today you’ll build that circular rhythm, then use it to draw consistent ellipses and repeated shapes in Ibis Paint without turning Undo into part of every attempt. Allow about 40 minutes, with most of that time spent drawing.
What makes an ellipse consistent?
An ellipse is a smooth, closed curve. Its major axis runs through its longest dimension; its minor axis runs through its shortest. If you imagine folding it across either axis, the two sides should roughly match. This gives you three things to decide before drawing: its size, its long direction, and how wide or narrow it will be.
A common mistake is to concentrate on closing the shape so intensely that the last section becomes flat, pointy, or wobbly. Another is to repair the edge with little strokes until it looks furry. The image below contrasts those attempts with a useful practice stage: going around the ellipse two or three times in one continuous movement. The eventual goal is a clean ellipse in one round, but you need not force that result today.
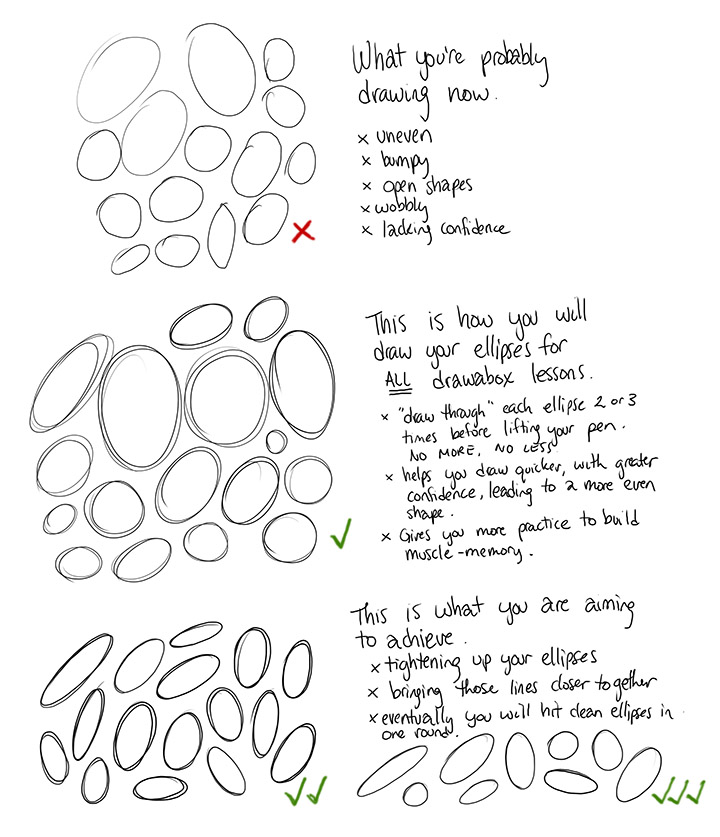
Notice the distinction between drawing through and correcting. Drawing through means deciding in advance to make two complete loops without lifting the stylus. Correcting means stopping, spotting a flaw, and adding short strokes to conceal it. The first develops a repeatable movement; the second makes it harder to see what that movement actually produced.
Find a circular rhythm
The Pencil Room’s How To Draw Circles And Ellipses (Freehand!) compares constructing an outline from short arcs with keeping the hand moving around the whole shape. Read these sections for the trade-off between careful local adjustments and a fluid overall edge.
How To Draw Circles And Ellipses (Freehand!)
Read The Pencil Room’s comparison to see why a method that helps you adjust a circle can also make its edge heavy, and why rhythmic loops are useful for this lesson’s goal.
In “Why Is It Hard To Draw Circles And Ellispes?”, read the paragraph beginning “The main problem people have with drawing ellipses freehand is consistency.” Then, in “Short Arcs,” read the method and trade-off, including its pros and cons. Skip “Plotting Points.” In “Rhythmic Circles (Hula Hoops),” read the rhythmic method, then its pros and cons. Focus on the movement rather than trying to make several dark rotations.
For your digital practice, ghost the entire loop a few times with the stylus just above the screen. Once the motion feels comfortable, touch down lightly and go around twice at a steady pace before lifting. Aim for the second loop to stay close to the first. You are not tracing a stationary outline: your hand is continuing a movement it has already rehearsed.
Let the elbow and shoulder contribute to medium and large ellipses, with the wrist moving naturally rather than locked in place. A tiny ellipse will need more finger and wrist movement. Rotate the canvas if an angle cramps your arm; keep the intended shape in mind as the canvas turns. Neither extreme of speed helps: drawing painstakingly slowly often introduces wobble, while rushing can make the ellipse fly outside its planned space.
Give repeated ellipses a target
A free page of ellipses builds rhythm, but repetition becomes more informative when each shape has limits. In Drawabox Lesson 1, Exercise 4: Tables of Ellipses, Uncomfortable demonstrates filling spaces with neighboring ellipses. Watch the drawing portion rather than the longer paper-and-ruler setup; you can make a simple table on your digital canvas.
Drawabox Lesson 1, Exercise 4: Tables of Ellipses
Watch Uncomfortable’s “Drawabox Lesson 1, Exercise 4: Tables of Ellipses” to see how a repeated-shape drill combines fluid movement with a clear target.
Begin with the purpose. Then watch the table exercise, paying attention to how each ellipse fits against its neighbors and how the artist draws through each one. The optional variation shows how changing the available spaces prevents the drill from becoming mechanical; use it only if you have time today.
In the first row of your own table, keep the ellipses approximately the same height, width, and angle. In a second row, choose a narrower ellipse; in a third, rotate their long direction. The boundaries give you a target, not permission to brake sharply at the edge. If an ellipse crosses a border, leave it. On the next attempt, adjust the size of your ghosted path.
This is the same decision you’ll make when sketching rounded parts of a character illustration: a row of repeated costume details should feel related, even when none is mathematically identical. Later lessons will use ellipses to describe three-dimensional forms. Here, the task is more basic: can you choose a shape and make several recognizable versions of it?
A drawing session in Ibis Paint
Use a plain practice canvas and the brush setup you used last lesson. Keep brush size and stabilization unchanged during the session, and avoid the ellipse tool, copy-and-paste, or a symmetry ruler: those can make a finished image precise, but they conceal the hand movement you are practising. Keep the canvas at a comfortable zoom for each group of shapes.
- Warm up for about 4 minutes. Draw loose, medium-sized ellipses at different angles. Ghost each path first, then draw through it twice without lifting. Make some broad and some narrow. Do not judge them while the stylus is moving.
- Use a table for about 9 minutes. Draw a few horizontal and vertical guide lines to create spaces. Fill one area with a row of similarly sized ellipses that nearly touch the upper and lower guides and their neighbors. Fill other areas with narrower, wider, or tilted versions. Take a moment to plan each ellipse; repetition is not a race.
- Repeat another shape for about 7 minutes. Choose a simple rounded shape that could appear in character art, such as a row of rounded rectangular buttons or oval costume decorations. Sketch one intended size, then make five or six more freehand versions beside it. For a rounded rectangle, plan its overall width and height first and make each edge deliberately; don’t scribble around the entire outline to find it.
- Review for about 4 minutes. Look at groups, not just the worst single mark. Are neighboring shapes similar in size and tilt? Are the ellipse ends rounded rather than pointed? Do the two loops stay near each other, or drift apart? Pick one recurring issue and change one thing—such as pace, arm position, canvas rotation, or how carefully you ghost—on your next group.
For this practice session, leave ordinary misses on the canvas. Reserve Undo for an accidental tap or other unintended input, not for an ellipse that fell short or a button that came out uneven. A flawed mark gives you evidence; a fresh attempt beside it gives you a useful comparison.
What to carry forward
A consistent ellipse begins with a planned size and orientation, but it depends on a steady, continuous loop to become smooth. Ghost first, draw through twice as one movement, and let the result stand. Repeating shapes within guides helps you separate two skills: making a fluid mark and placing it accurately. Both improve when you can see your attempts rather than undoing them.
Next, you’ll turn to organizing a character-art file with named layers, folders, and a backup routine, so these practice marks can grow into artwork you can manage and preserve.