Recommended resources
The freely available resources this lesson will direct you to.
Welcome to the next step in our journey to transform your web app into a native mobile application. In our previous lesson, you established your app's unique visual identity by generating and applying custom icons and splash screens. Now, we'll turn our attention from aesthetics to a fundamental aspect of native platform integration: user privacy and permissions on iOS.
This lesson focuses on the Info.plist file, the central nervous system for your iOS app's configuration. You will learn why Apple mandates explicit, human-readable justifications for accessing sensitive hardware or data, and how to add these required "usage descriptions." This is a critical prerequisite for integrating the native features you're aiming for, such as biometrics and push notifications, and a non-negotiable step for App Store approval.
Understanding the Info.plist File
Every iOS application has an Information Property List file, or Info.plist. At its core, this is a structured file containing essential metadata and configuration settings that the iOS operating system uses to interact with your app. Coming from a web development background, you can think of it as a supercharged package.json or manifest.json specifically for the iOS environment. It tells the system everything from your app's public name (CFBundleDisplayName) and unique identifier (CFBundleIdentifier) to which device orientations it supports.
For a concise and technical overview of what the Info.plist file is and why it's important, the following video provides an excellent breakdown. While its context is reverse engineering, the fundamental explanation of the file's structure and purpose is highly relevant.
Exploring Info.plist: Essential Knowledge for iOS Reverse Engineering
Watch the "Exploring Info.plist" video by LaurieWired to get a solid grasp of the file's role.
Pay close attention to these segments: The introduction, which defines Info.plist as a metadata and configuration file. The explanation of its key-value pair structure. The segment on usage descriptions, which directly ties into our main topic. This section clearly explains that the value you provide for a usage description key is the string shown to the user in the permission dialog.
Apple's Privacy Mandate: The "Why" Behind Usage Descriptions
As the video highlighted, one of the most critical roles of the Info.plist file today is managing privacy. Apple's ecosystem places a strong emphasis on user consent and transparency. An app cannot simply access the camera, microphone, user's location, or photo library without explicit permission.
Furthermore, your app must declare in advance what permissions it might request and provide a clear, human-readable reason for needing that access. This reason is called a "Usage Description." If your code attempts to access a protected resource without a corresponding usage description in your Info.plist, your app will immediately crash. This is not a suggestion; it's a strict platform rule.
The Capacitor documentation summarizes this requirement clearly.
Configuring iOS | Capacitor Documentation
This section of the official documentation explains how iOS permissions are handled within the context of Capacitor.
Read the section under the heading Managing Permissions. Focus on the key takeaway: iOS requires "Usage Descriptions" that are presented to the end user when permission is requested.
The process is as follows:
- You declare your intent: You add a specific key-value pair to
Info.plist. The key identifies the permission (e.g.,NSCameraUsageDescription), and the value is the string of text you want the user to see (e.g., "This app needs camera access to scan QR codes."). - Your app requests access: A Capacitor plugin (or native code) triggers the permission request.
- iOS presents the dialog: The system shows a standard alert to the user, incorporating the justification text you provided.
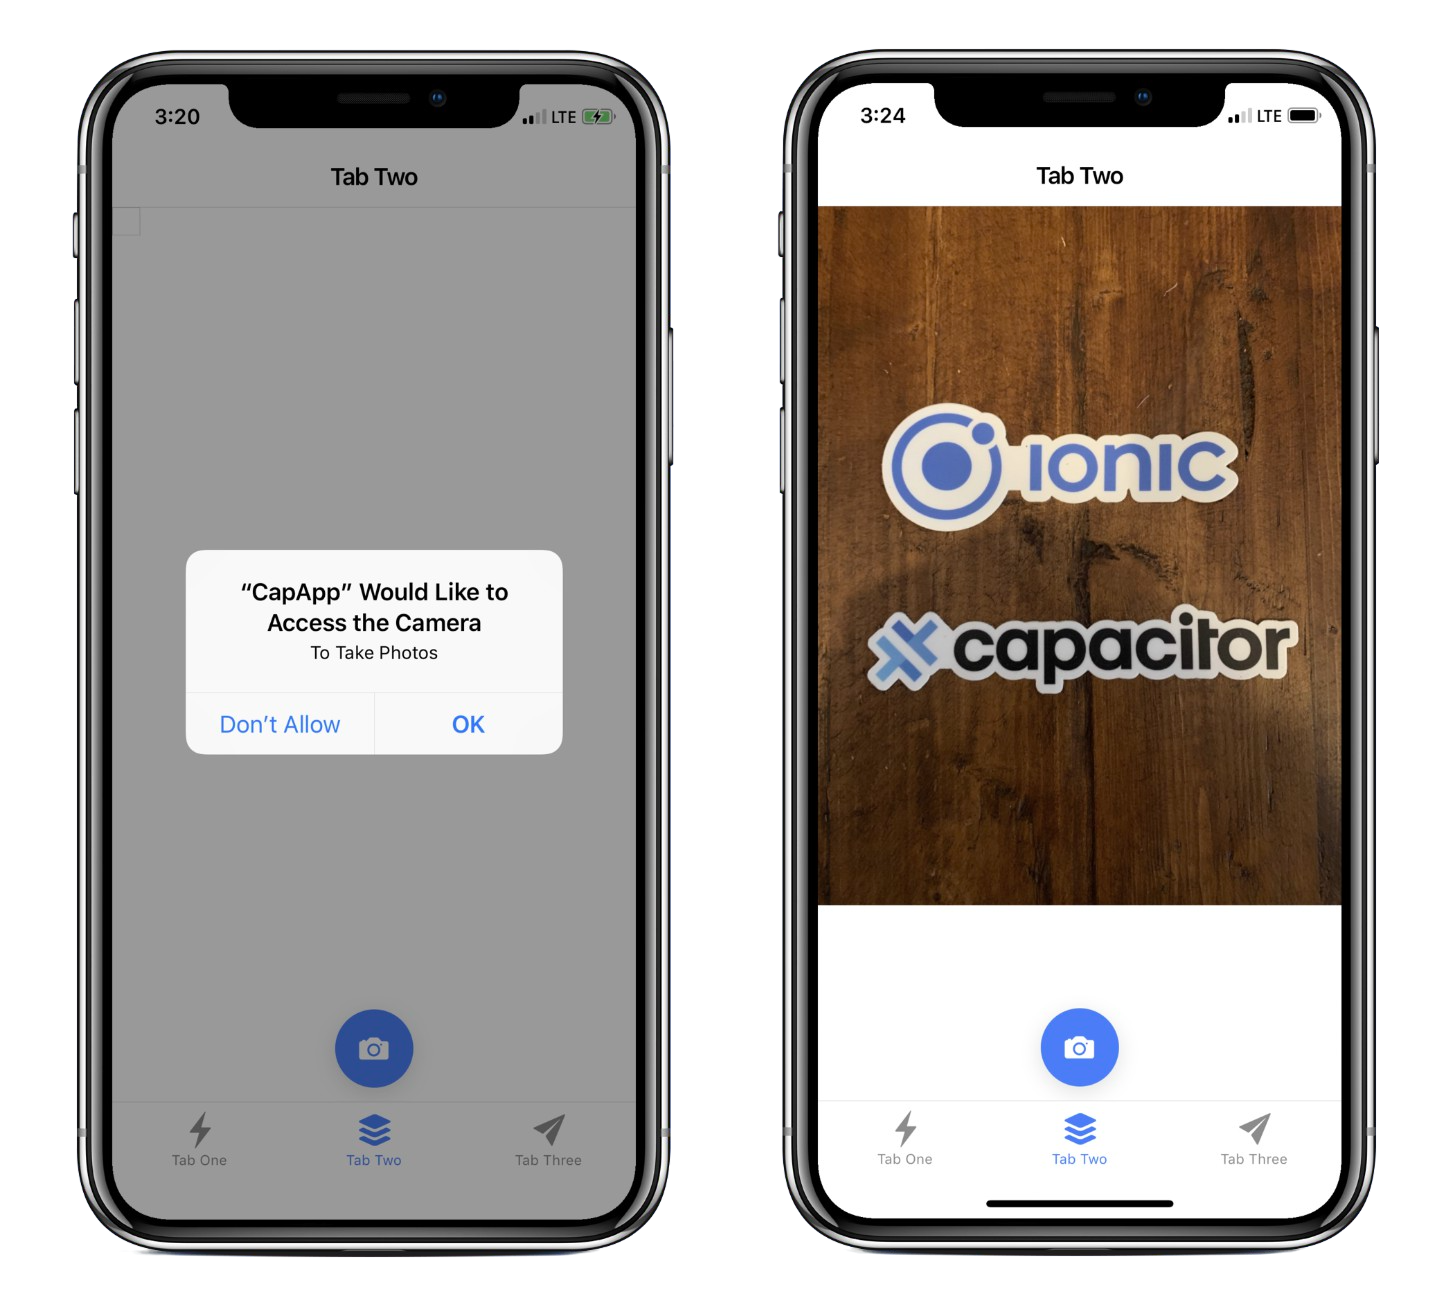
This mechanism ensures users can make an informed decision, which is central to Apple's privacy philosophy and a key checkpoint during App Store review.
Adding Usage Descriptions in Xcode
Now, let's put this theory into practice. Your goal is to integrate features like biometrics and potentially filesystem or camera access later on. We will proactively add the necessary usage descriptions for these features now.
-
Open your project in Xcode if it isn't already:
bunx cap open ios -
Navigate to the
Info.plistsettings. In the Xcode Project Navigator on the left, click the top-level project file (the one with the blue icon), then select the App target, and finally click the Info tab.
This screen provides a user-friendly editor for the Info.plist file. Each row represents a key-value pair.
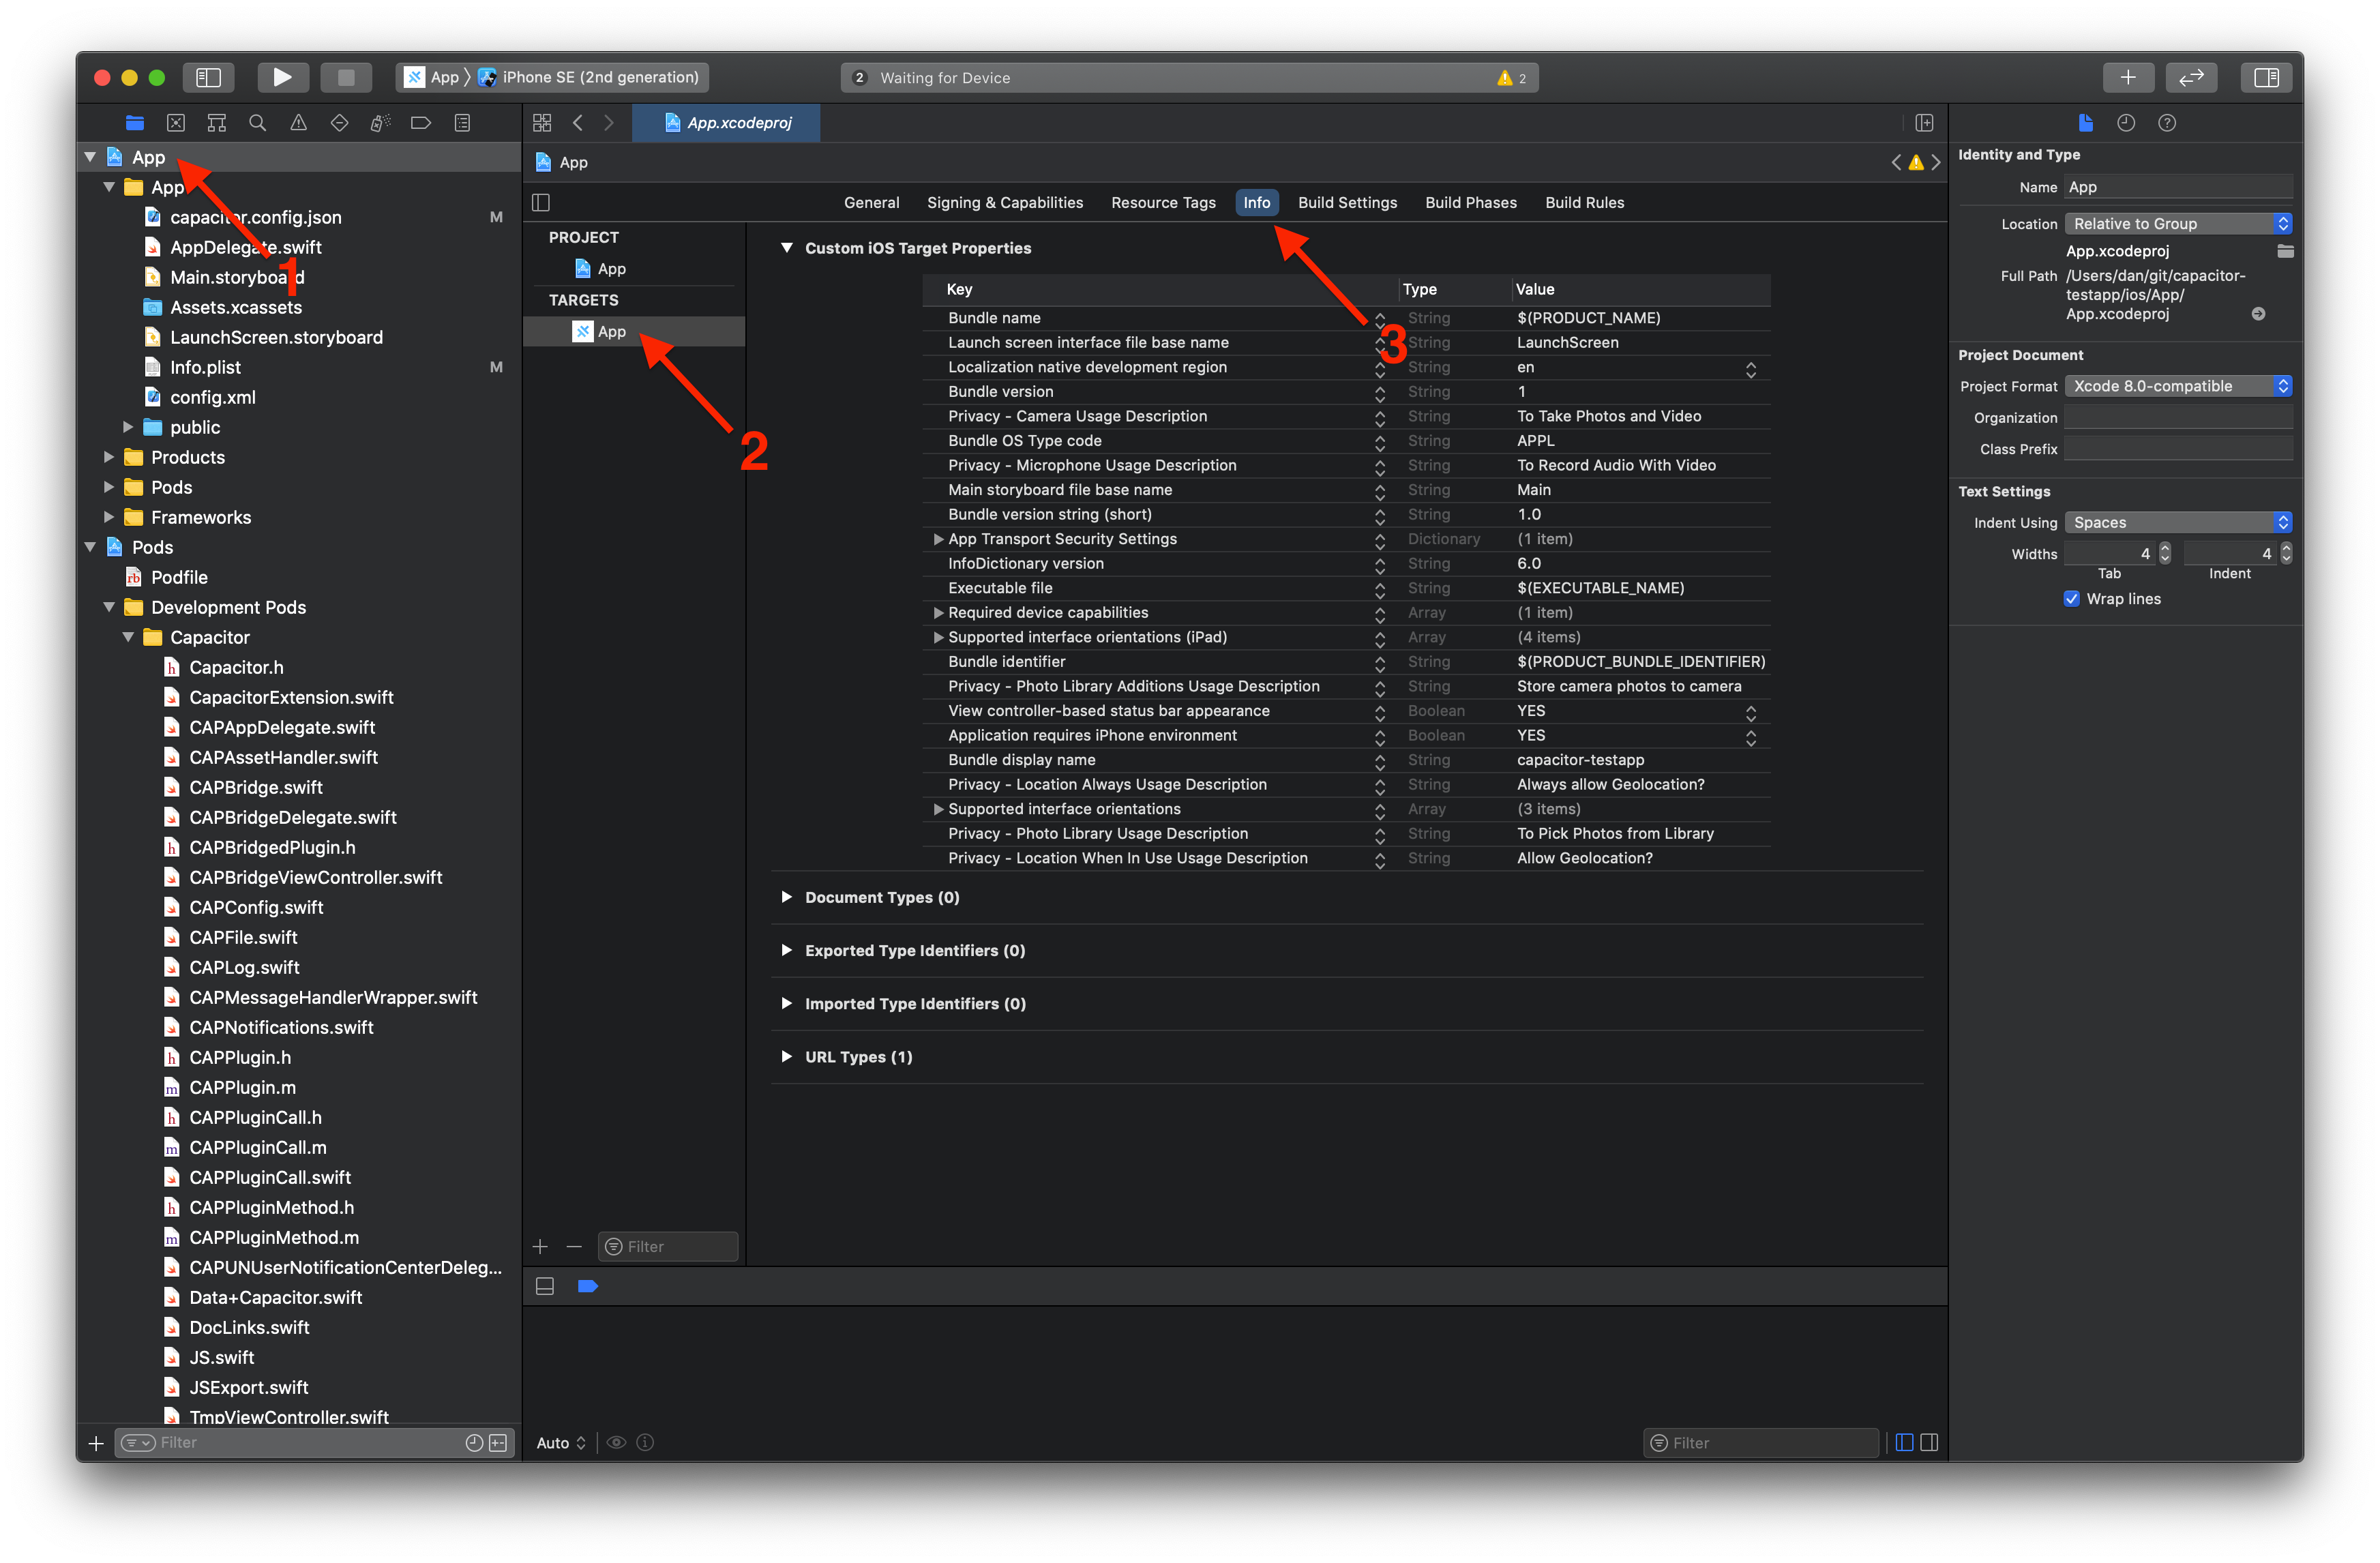
- Add the necessary keys. We'll add descriptions for three common permissions that align with your future goals: Camera, Photo Library, and Biometrics (Face ID).
- Click the
+button on any existing row to add a new one. - Scroll through the list of keys or start typing
Privacy -to filter them. - Add the following keys, one by one, and provide a clear, concise value for each.
- Click the
| Xcode Key Name | Raw Key Name | Example Value (String) |
|---|---|---|
Privacy - Camera Usage Description |
NSCameraUsageDescription |
To take photos. |
Privacy - Photo Library Usage Description |
NSPhotoLibraryUsageDescription |
To save and select photos. |
Privacy - Face ID Usage Description |
NSFaceIDUsageDescription |
To secure access with Face ID. |
Note: The user-friendly names in Xcode's dropdown (like "Privacy - Camera Usage Description") correspond to the raw, underlying keys (like NSCameraUsageDescription). You can right-click anywhere in the property list and select "Show Raw Keys/Values" to see the direct mapping.
After adding these keys, your Info tab should contain the new entries. Xcode automatically saves the changes to the ios/App/App/Info.plist file. You can commit this file to your version control system to ensure these settings are preserved.
Looking Ahead: Connecting to Capacitor Plugins
You don't need to memorize all possible usage description keys. When you install a Capacitor plugin that requires a specific permission—such as @capacitor/camera, @capacitor/filesystem, or @capacitor-community/biometric-auth—the plugin's official documentation will always specify which Info.plist keys you must add. This lesson has prepared you for that process, which you will encounter directly in modules 4 and 5.
Conclusion
You have now configured one of the most important files in your iOS project and taken a crucial step towards both App Store compliance and successful native feature integration.
Here are the key takeaways from this lesson:
- The
Info.plistfile is a core configuration file for iOS apps, containing essential metadata. - For privacy reasons, Apple requires apps to provide a human-readable Usage Description for any permission they request to access sensitive data or hardware.
- These descriptions are added as key-value pairs in the
Info.plistfile, typically via the Info tab in Xcode. - Failing to provide a required usage description will cause your app to crash when the permission is requested.
In our next lesson, we will broaden our focus to troubleshooting. As projects grow in complexity, encountering build errors or runtime issues is inevitable. We will explore how to diagnose and resolve common iOS build failures, including problems with dependencies, code signing, and device deployment.