Recommended resources
The freely available resources this lesson will direct you to.
Hello! Last lesson, you ran PostgreSQL programs from PowerShell and saw that psql --version identifies a client program but does not connect to a database. This time you’ll make a real connection with pgAdmin, then check which server connection, database, user, and port your query is actually using.
Allow about 35–45 minutes. Have the port and administrator password you chose during installation nearby. You will read information from the server, but you will not change its settings or create a database.
Connect to the server
pgAdmin is a client; the PostgreSQL Windows service is the server. In pgAdmin’s left-hand Object Explorer, an entry under Servers is a saved connection definition. Its displayed name is a label you choose, not necessarily the server’s network name.
Watch how Database Star registers a connection in pgAdmin Tutorial - How to Use pgAdmin. Stop before the demonstration starts creating a database.
pgAdmin Tutorial - How to Use pgAdmin
Database Star demonstrates both registering a server connection and finding a database beneath it.
Watch registering a server, paying particular attention to the difference between its descriptive name and its hostname. Then watch choosing a database. The presenter elects to save a password; that is optional, not a required step.
Open pgAdmin 4 from the Windows Start menu and expand Servers. Your installer may already have placed a connection there. If so, use that entry rather than registering a duplicate: right-click its name and choose Connect Server…, or expand it to initiate the connection. Enter the PostgreSQL password you set during installation if prompted.
If Servers is empty, right-click Servers, choose Register, then Server…. On the General tab, give the entry a recognizable name, such as Local PostgreSQL (port 5432)—substituting your actual port. On the Connection tab, enter:
| Field | For the local installation in this course |
|---|---|
| Host name/address | localhost |
| Port | The port you chose during installation; 5432 is only the usual default |
| Maintenance database | postgres |
| Username | postgres, if you installed using that administrator account |
| Password | The PostgreSQL administrator password you set during installation |
Leave Role, Service, and Kerberos authentication at their defaults for this connection. Choose whether to save the password according to who can access this computer; on a shared computer, leave it unsaved. Click Save. With Connect now? enabled, pgAdmin attempts the connection immediately.
The pgAdmin documentation explains what these fields mean. In particular, the maintenance database is the database pgAdmin initially connects to; the Name on the General tab is merely how the connection appears in Object Explorer.
Server Dialog — pgAdmin 4 9.17 documentation
Read pgAdmin’s Server Dialog guide to distinguish the connection’s display name from the address, port, database, and credentials it uses.
In “Server Dialog,” read the General tab bullets from Name through Connect now. Then, under Connection, read Host through Save password. Focus on what each field identifies, rather than copying the documentation’s default port without checking your own.
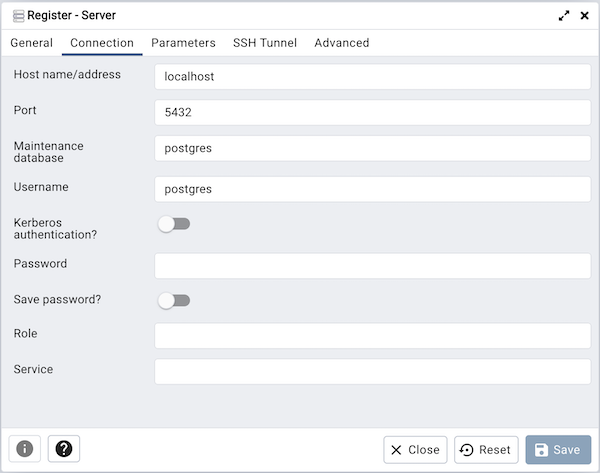
Confirm that the connection opened
A successful connection should let you expand the server entry and see Databases beneath it. Expand Databases, then locate postgres. Do not create a new database if it is missing; first check that you connected to the intended server.
If your saved entry was disconnected, pgAdmin’s Connect Server… command prompts for its password. The documentation also describes its connection-success message and where to review the saved connection settings.
Connect to Server — pgAdmin 4 9.18 documentation
Read pgAdmin’s connection guide for the reconnect action, its success indicator, and the Properties command.
In “Connect to Server,” read the opening paragraphs explaining Connect Server… and its password prompt. Near the end, read success and Properties. Use Properties… to inspect a connection’s configured host, port, maintenance database, and username if you did not register it yourself.
Seeing Databases establishes that pgAdmin can communicate with the server. It does not yet establish which database a query will use. A server can contain several databases, and each Query Tool window is attached to one of them.
Verify the active connection with a query
Under the connected server’s Databases node, right-click postgres and choose Query Tool. Check that you opened it from postgres beneath the intended server entry, not from a similarly named database under another entry.
Paste this read-only query into the editor and execute it with the Execute button (the lightning-bolt icon) or F5:
SELECT
    current_database() AS database_name,
    session_user AS connected_user,
    current_user AS active_role,
    inet_server_addr() AS server_address,
    inet_server_port() AS server_port;
The Data Output grid should contain one row. Interpret the columns together:
database_nameshould bepostgres, because that is the database from which you opened Query Tool.connected_useris the login account that authenticated this session—typicallypostgresfor this setup.active_roleis the role currently in effect; with the default connection settings, it should also bepostgres.server_addressis the address at which this connection reached PostgreSQL. Forlocalhost, it may look like127.0.0.1or::1; both can represent your own computer.server_portshould equal the port you recorded during installation and the port shown on this server entry’s Properties → Connection tab.
Finally, read the server entry’s name in Object Explorer and compare its Properties → Connection host and port with the query result. This is the important distinction: the entry’s name tells you which saved connection you selected; the query reports details of the live session. A label such as “Local PostgreSQL” alone cannot prove where a query ran.
The port and address functions report TCP connection details. If either returns a blank value because a different connection method was used, inspect the connection’s Properties and confirm that its Host name/address is localhost, then reconnect through that definition.
If the results are not what you expected
A password prompt appears: That is normal if the password was not saved. Enter the PostgreSQL account password from installation, not a possible pgAdmin master password used to unlock stored credentials.
The connection is refused or times out: Compare the saved Host name/address and Port with your installation notes. For this local setup, also check that the PostgreSQL Windows service you identified earlier is running. Do not change configuration files just to resolve an unverified port mismatch.
Authentication fails: Check the connection’s Username and re-enter the password for that PostgreSQL account. A working server can still reject incorrect credentials.
The query reports an unexpected database or port: Look at the Query Tool window’s database context and the server entry it belongs to. Close that window if necessary, then open Query Tool by right-clicking postgres under the intended server. Do not assume that two entries with similar names point to the same place.
You have now made a pgAdmin connection and checked it from both sides: the saved connection’s host, port, and username, and a live query’s database, login user, server address, and port. Keep those results with your installation notes. Next, you’ll make the same kind of connection using psql and learn its commands for inspecting databases, schemas, and tables.