Recommended resources
The freely available resources this lesson will direct you to.
- Mastering the Top 10 PSQL Commands | PostgreSQL Commands | Learnomate Technologieswww.youtube.com
- PostgreSQL (1) Installation and Create Your First Database ( SQL shell / PgAdmin4 )www.youtube.com
- PostgreSQL: Documentation: 18: psqlwww.postgresql.org
- PostgreSQL: Basic psql Commands — CommandPrompt Inc.www.commandprompt.com
Hello! Last lesson, you connected with pgAdmin and checked the database, user, and port of a live session. Now you’ll do the same from psql, PostgreSQL’s command-line client, and use its built-in commands to inspect databases, schemas, and tables.
Set aside about 40 minutes. You’ll need the port and PostgreSQL password you used with pgAdmin. This lesson only inspects what is already there; you won’t create or change database objects.
Open a psql connection
In PowerShell, psql --version told you which client program was installed. To connect, that program also needs a server address, port, database, and user. The PostgreSQL documentation explains why spelling these out is useful: if you omit them, psql applies defaults that might not match the connection you verified in pgAdmin.
PostgreSQL: Documentation: 18: psql
Read the official PostgreSQL documentation to see what psql needs to establish a connection and which defaults it uses.
Under Usage → Connecting to a Database, read connection parameters. Focus on what -h, -p, -U, and -d specify, and on why an omitted user or database name could be surprising.
Open PowerShell. If psql --version worked there in the earlier lesson, run the following command, replacing 5432 with your installed server’s port if it differs:
psql -h localhost -p 5432 -U postgres -d postgres
If PowerShell does not recognize psql, use the executable path you located earlier instead. In this example, replace 18 with your installed major version and, again, replace the port if necessary:
& 'C:\Program Files\PostgreSQL\18\bin\psql.exe' -h localhost -p 5432 -U postgres -d postgres
The & tells PowerShell to run the program at the quoted path. If you connected in pgAdmin with a user other than postgres, substitute that username after -U. Do not put your password in the command. Enter it when psql prompts; it may appear that nothing is being typed, which is normal for a password prompt.
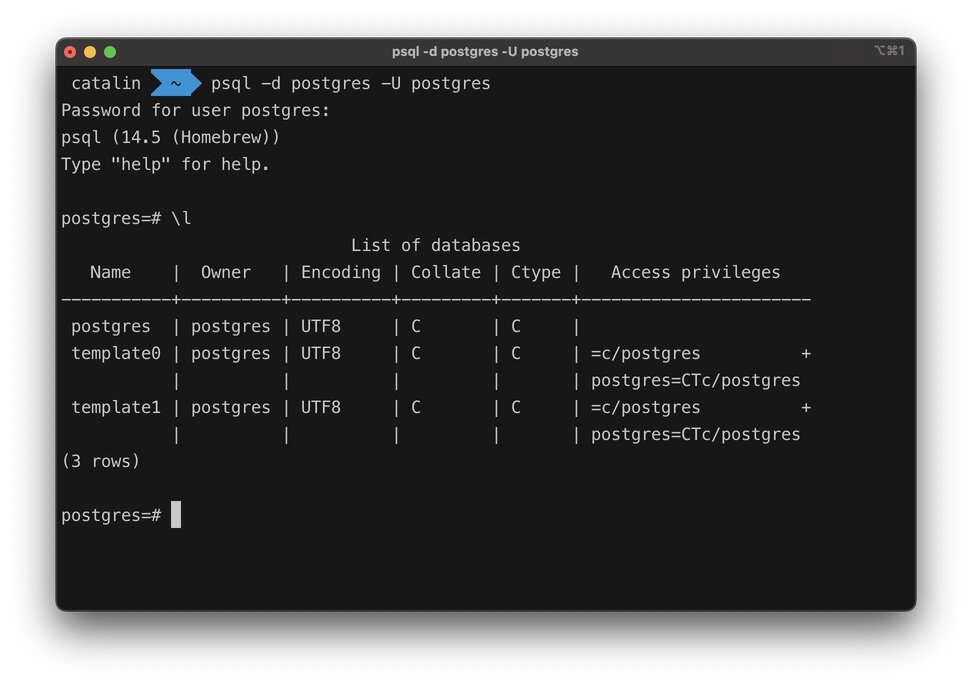
A successful connection ends at a prompt resembling postgres=# or postgres=>. The word postgres indicates the current database; the last symbol depends on your role. The prompt is your cue that you are inside psql, not at the PowerShell prompt.
This image shows that transition and the database-listing command you’ll use shortly. It was captured on macOS, so its opening terminal prompt and program version may differ from yours on Windows.
For a short visual walkthrough, watch the Windows SQL Shell demonstration below. It opens psql through the Start menu rather than PowerShell; once connected, the backslash commands work the same way. Use your own port and password, not the presenter’s example values.
Mastering the Top 10 PSQL Commands | PostgreSQL Commands | Learnomate Technologies
Watch “Mastering the Top 10 PSQL Commands” by Learnomate Technologies for a visual introduction to the psql prompt and the inspection commands used in this lesson.
Watch the connection, then databases and switching, and finally tables and columns. Notice that these are backslash commands: type \l, not /l, even if the narration sounds like “slash.”
Check where you connected
At the psql prompt, type:
\conninfo
This reports the live connection’s database, user, host, and port. Compare them with the results you recorded in pgAdmin. If the host appears as a local network address rather than the word localhost, that can still represent a connection to your own computer; the database, user, and port should match what you intended.
Next, list databases:
\l
You should see postgres and usually template0 and template1, among any databases already created on your server. This list answers “Which databases exist on this server?” It does not change which one you are connected to. Leave the template databases alone; they are not training databases.
To see the command for switching databases without needing another database yet, reconnect to postgres:
\c postgres
\conninfo
The first line establishes a connection to the named database; the second confirms your resulting connection. If you already have another ordinary database you are permitted to use, \c followed by its name would switch to it. Otherwise, stay in postgres. A failed interactive switch does not make a nonexistent database appear.
Backslash commands such as \l and \c are psql meta-commands. Type each at the psql prompt and press Enter; they do not need a trailing semicolon. SQL statements use a different syntax, which you’ll learn in the querying module.
PostgreSQL: Documentation: 18: psql
Return to the official psql documentation to connect the two commands you just ran with their precise meanings.
In Meta-Commands, find the \c or \connect entry. Starting at “Establishes a new connection,” read switching connections. Then find \conninfo and read connection information. Focus on the distinction between changing the connection and reporting it.
Look inside the current database
A server contains databases; within a database, schemas organize objects such as tables. Your connection is to one database at a time, so the next commands inspect that database rather than every database shown by \l.
First list its schemas:
\dn
You will commonly see public. PostgreSQL also has system schemas, but the default listing does not show every system object. Next, ask for tables visible through the current schema search path:
\dt
On a fresh installation, “Did not find any relations” is a valid result. It does not mean your connection failed: there may simply be no user-created tables to list. To check the public schema explicitly, run:
\dt public.*
If a table appears, note its Schema and Name columns. To inspect that table’s columns and data types, replace actual_table_name below with the name you saw:
\d public.actual_table_name
If you have no user-created table yet, you can still see what a table description looks like by inspecting a built-in PostgreSQL catalog table:
\d pg_catalog.pg_namespace
For now, look only at the Column and Type headings; you do not need to understand the catalog’s contents. The contrast matters: \dt lists tables, whereas \d followed by a table name describes one object’s structure. Using public. or pg_catalog. makes the schema explicit.
The official reference is useful when these commands return something unexpected. Its command list is long, so read only the entries named below rather than the whole page.
PostgreSQL: Documentation: 18: psql
Use the official psql reference to clarify what each inspection command includes and why a default listing can omit objects.
In Meta-Commands, locate \d using the command name. Read object descriptions. Find the grouped \dt entry and read table listings. Then find \dn and read schema listings. Finally, find \? and read psql help. Pay particular attention to the difference between listing visible tables and naming a particular schema or table.
Find help and leave safely
You do not need to memorize every backslash command. At the psql prompt, \? displays help for psql meta-commands. If a long result stops at a screen marked (END), press q to leave the output viewer and return to the psql prompt. When you are finished with the session, use:
\q
That exits psql and returns you to PowerShell. The two uses of q are different: plain q closes a paged display; \q exits psql itself.
If you could not connect, check the command’s host and port against the pgAdmin connection you verified last lesson, then confirm the PostgreSQL Windows service is running. If authentication failed, check the username and re-enter that account’s PostgreSQL password. If \dt found no tables but \conninfo showed the intended connection, you can continue—there are no tables you need to create for this lesson.
You can now connect from PowerShell, verify the live session with \conninfo, list databases with \l, list schemas with \dn, and list or describe tables with \dt and \d. Keep the server-wide database list distinct from the objects inside your current database. Next lesson, you’ll create a dedicated training database and load a supplied SQL script, giving these inspection commands a fuller set of tables to explore.