Recommended resources
The freely available resources this lesson will direct you to.
Hello! Last lesson, you followed a SQL request from a client to the PostgreSQL server and back. Now you’ll put both sides on your Windows computer: PostgreSQL Server will run the databases, and pgAdmin 4 will give you a graphical client. You’ll also install the command-line tools needed later in the course.
This is a hands-on lesson. Allow about 35–45 minutes, including download and installation time. By the end, you should have completed the installer and recorded three deliberate choices: your data directory, port, and administrator password.
Before you start: know what you’re choosing
You’ll need a Windows computer on which you can approve an installer’s administrator prompt. Download the Windows installer by following the route through postgresql.org → Download → Windows → EDB installer. Choose a current Windows release offered there; the version shown in a video may be older than the one available today.
Watch How to install PostgreSQL and pgAdmin 4 and Setup on Windows 11 (step by step guide for Beginners) by ProgrammingKnowledge2 for a visual tour of the download and wizard. Do not copy the demonstrator’s simple password or assume their directory and locale are the right choices for your computer.
How to install PostgreSQL and pgAdmin 4 and Setup on Windows 11 (step by step guide for Beginners)
ProgrammingKnowledge2 shows where to obtain the Windows installer and what its setup screens look like. Use the video to recognize the screens, then use the guidance below to make your own choices.
Watch the download route from postgresql.org through the Windows installer link. Then watch the setup wizard, paying particular attention to component selection, the data directory, password, port, and final review. The video's simple password is a demonstration, not a recommendation.
Before opening the installer, decide on the following. You can change the example values, but write down what you actually choose.
| Choice | Sensible choice for this course | Why it matters |
|---|---|---|
| Port | 5432, if it is available |
Clients will use this number to reach your server. If another PostgreSQL installation already uses it, choose an available alternative such as 5433. |
| Data directory | The installer’s suggested directory, deliberately accepted, or a local path such as C:\PostgresData\GraspCourse |
This is where PostgreSQL stores its database files—not where pgAdmin is installed. |
| Administrator password | A unique, strong password saved in a password manager | You will need it when connecting as PostgreSQL’s postgres administrator. |
If you choose a custom data directory, use a persistent local drive with adequate free space. Choose a directory that does not yet exist or is empty, and avoid a synced folder such as OneDrive. You do not need to create or edit PostgreSQL’s data files yourself.
Work through the installation wizard
EDB’s Installing PostgreSQL on Windows is the written reference for the installer. Keep it open while you work; its screenshots and your installer may differ slightly by version.
EDB Docs - Installing PostgreSQL on Windows
Read EDB’s installation-wizard guide to check what each screen controls, particularly the components, data directory, password, and port.
In “Installing PostgreSQL,” read steps 1 through 11, from starting the wizard through selecting Finish. Focus on steps 4–7 for this lesson’s choices, step 9 for the pre-installation review, and step 11 for skipping the optional Stack Builder launch.
Run the downloaded installer and approve the Windows administrator prompt if asked. At Installation Directory, you can usually keep the suggested location. This location holds the installed programs; the Data Directory screen that follows is a separate choice.
At Select Components, make sure these three are selected:
- PostgreSQL Server — the database server.
- pgAdmin 4 — the graphical client you’ll use soon.
- Command Line Tools — includes
psql, which you’ll use in later lessons.
Stack Builder supplies optional extras. You do not need it for this course’s initial setup; you may deselect it.
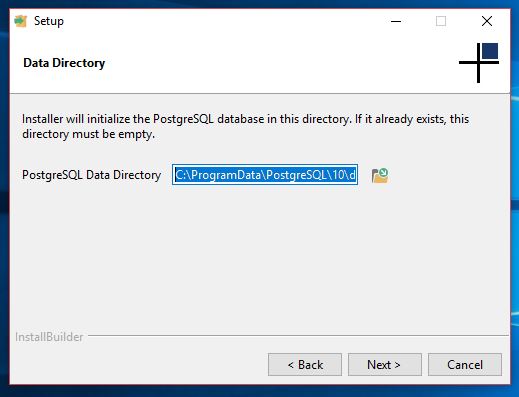
At Data Directory, enter your chosen path or inspect and deliberately accept the suggested one. Record the exact path shown on your screen. The older installer screenshot below illustrates which field you’re choosing; its version-specific path is not a path to copy.
Set the password and port, then review
At Password, create and confirm a strong password. This is for PostgreSQL’s postgres database administrator—not your everyday Windows sign-in. EDB’s installer documentation also notes that its wizard uses this password for the PostgreSQL service account. Save it securely now; do not put the password in your course notes, a screenshot, or a message to someone helping you.
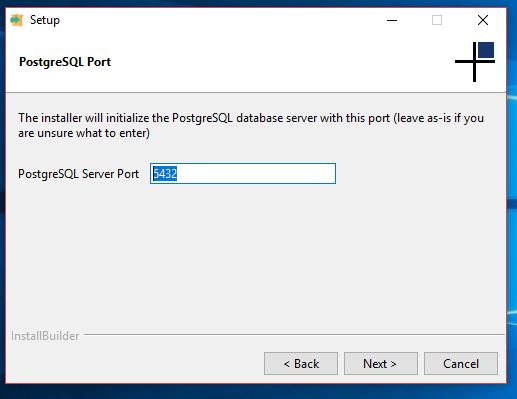
At Port, type or explicitly confirm the number you chose. The common default is 5432; keeping it is a valid decision if nothing else is using it. The port must later match the value entered by clients such as pgAdmin. Choosing a different port does not, by itself, secure the server.
You can usually leave Locale at the operating-system default for this introductory installation. At the Pre Installation Summary, pause and check the components, data directory, and port against your decisions. Use Back to correct anything before starting the installation. The password may not be displayed in this summary; its confirmation occurred on the Password screen.
Let the wizard finish. If it offers to launch Stack Builder at exit, clear that checkbox and select Finish. Completing the wizard installs the software; it does not yet establish that you’ve successfully connected to a database. We’ll check the installation and make that connection in the following lessons.
Keep a short installation record
Record the details you will need again, without recording the password itself:
PostgreSQL version installed:
Installation directory:
Data directory:
Port:
Password stored in: [name of your password manager; not the password]
Components selected: PostgreSQL Server, pgAdmin 4, Command Line Tools
If the installer reports that the port is in use, do not proceed assuming 5432 worked: return to the port choice if the wizard permits it, select an available port such as 5433, and update your record. If it cannot use your custom data directory, check that the path is on a suitable local drive and is empty; the installer’s suggested directory is also a reasonable deliberate choice. Avoid changing directory permissions broadly just to make an error disappear.
Key takeaways
You’ve installed a server and a graphical client, plus the command-line tools for later work. The installation directory holds programs; the data directory holds PostgreSQL’s database files. The port identifies the server endpoint, and the postgres password protects an administrator account. What matters now is that you chose and recorded these settings rather than relying on a screenshot’s defaults.
Next, you’ll verify the PostgreSQL Windows service and locate the installed programs, data directory, and configuration files.