Recommended resources
The freely available resources this lesson will direct you to.
- Introduction to SVGs: A Beginner's Guide to Scalable Vector Graphicswww.youtube.com
- Make Awesome SVG Animations with CSS // 7 Useful Techniqueswww.youtube.com
- Easy SVG Customization And Animation: A Practical Guidewww.smashingmagazine.com
- SVG Tutorial: Scale, Size and Style for Beginnerswww.fullstackfoundations.com
Hello! Welcome back.
In our last lesson, we focused on the dynamics of motion, learning how to control timing and easing with CSS properties like animation-duration and animation-timing-function. We established the vocabulary to describe how an animation should feel.
Today, we shift our focus from the motion to the object being moved. Our goal is to describe the structure of an SVG file, focusing on paths, groups, and the viewBox, and understand its importance for creating scalable animations.
As a designer, you're used to working with vector graphics in tools like Figma. You intuitively understand their scalability. This lesson will peel back the curtain and show you how that scalability is achieved through code. Understanding this structure is the key to targeting specific parts of your illustrations for animation, which is a critical step in your goal of bringing your Figma designs to life.
What Makes an SVG Special?
First, let's clarify why SVGs are the go-to format for web animation. Unlike raster images (like JPEGs or PNGs) which are made of a fixed grid of pixels, Scalable Vector Graphics (SVGs) are described using mathematical formulas. This is why you can scale a vector logo to any size in Figma without losing quality.
Crucially, an SVG isn't a black box; it's a text file containing code that looks a lot like HTML. This means we can read it, edit it, and use CSS or JavaScript to manipulate its individual parts.
The following short clip gives a great overview of this core difference.
Make Awesome SVG Animations with CSS // 7 Useful Techniques
This clip from the Fireship channel's video 'Make Awesome SVG Animations with CSS' quickly contrasts raster and vector images and introduces the core idea of an SVG's code structure.
Watch from 00:41 to 01:47. Pay attention to how it explains the viewBox as a grid and introduces basic shape elements and the powerful path element.
The Anatomy of an SVG File
Now, let's dissect the code you just saw. An SVG file has a few key components you need to understand to effectively prepare and animate your graphics.
1. The Canvas: <svg> and viewBox
Every SVG starts with an <svg> tag. Think of this as the main container for your artwork. It often has width and height attributes, which define the final size of the image in your browser—this is called the viewport.
The magic of scalability, however, comes from the viewBox attribute.
The viewBox attribute defines the internal coordinate system of the SVG. It takes four numbers: min-x, min-y, width, and height. These numbers specify a rectangular area of your graphic that will be scaled up or down to fit the viewport.
min-xandmin-ydefine the top-left corner of the box.widthandheightdefine the dimensions of the box.
This might feel abstract, so let's watch a clear visual explanation.
Introduction to SVGs: A Beginner's Guide to Scalable Vector Graphics
The video 'Introduction to SVGs' provides an excellent demonstration of how the viewBox works in practice to create scalable graphics.
Watch from 02:26 to 04:14. Notice how two circles with the exact same code appear at different sizes simply because the parent <svg> element has a different width and height, while the viewBox remains consistent. This is the core principle of SVG scalability.
By changing the viewBox values, you can effectively pan and zoom around your artwork without changing the artwork itself.
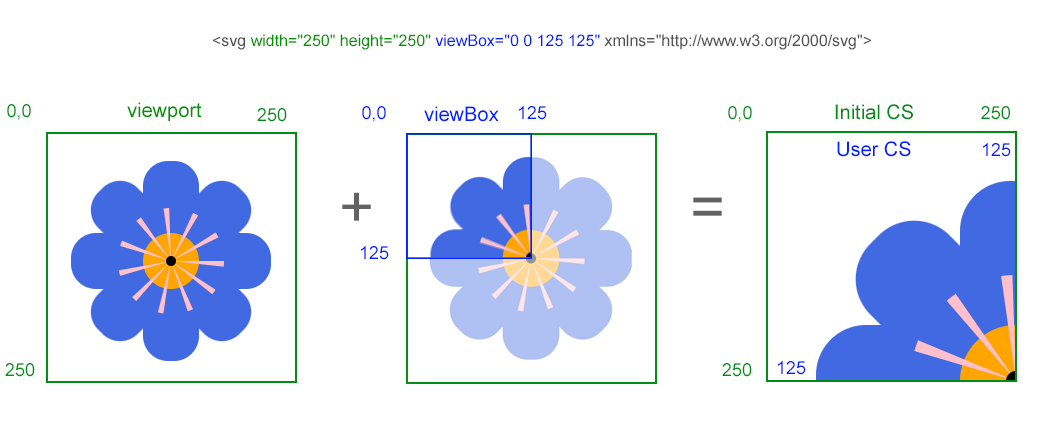
For a deeper dive into the relationship between the viewport and the viewBox, the following reading is very helpful.
SVG Tutorial: Scale, Size and Style for Beginners
The article 'SVG Tutorial: Scale, Size and Style for Beginners' offers a more mathematical but clear breakdown of how the viewBox works.
Read the section titled 'How SVG View Box works'. It provides a formula (viewport dimension / viewBox dimension = internal px / unit) that clarifies the mapping between the browser's pixels and the SVG's internal units.
2. The Drawing Tool: <path>
While SVGs have elements for simple shapes like <circle> and <rect>, almost any complex shape you create in a design tool will be exported as a <path> element. A path is the most powerful drawing element in SVG.
It has one crucial attribute: d. The d attribute contains a string of commands that tells the browser how to draw the shape, like a set of pen-plotter instructions.
M(Move To): Lifts the pen and moves to a new x,y coordinate.L(Line To): Draws a straight line from the current point to a new x,y coordinate.C,Q,A(Curve, Quadratic, Arc): Draw various types of curves.
You will rarely, if ever, write this path data by hand. Your design tool (Figma) does that for you. However, it's essential to recognize what it is and what it represents.
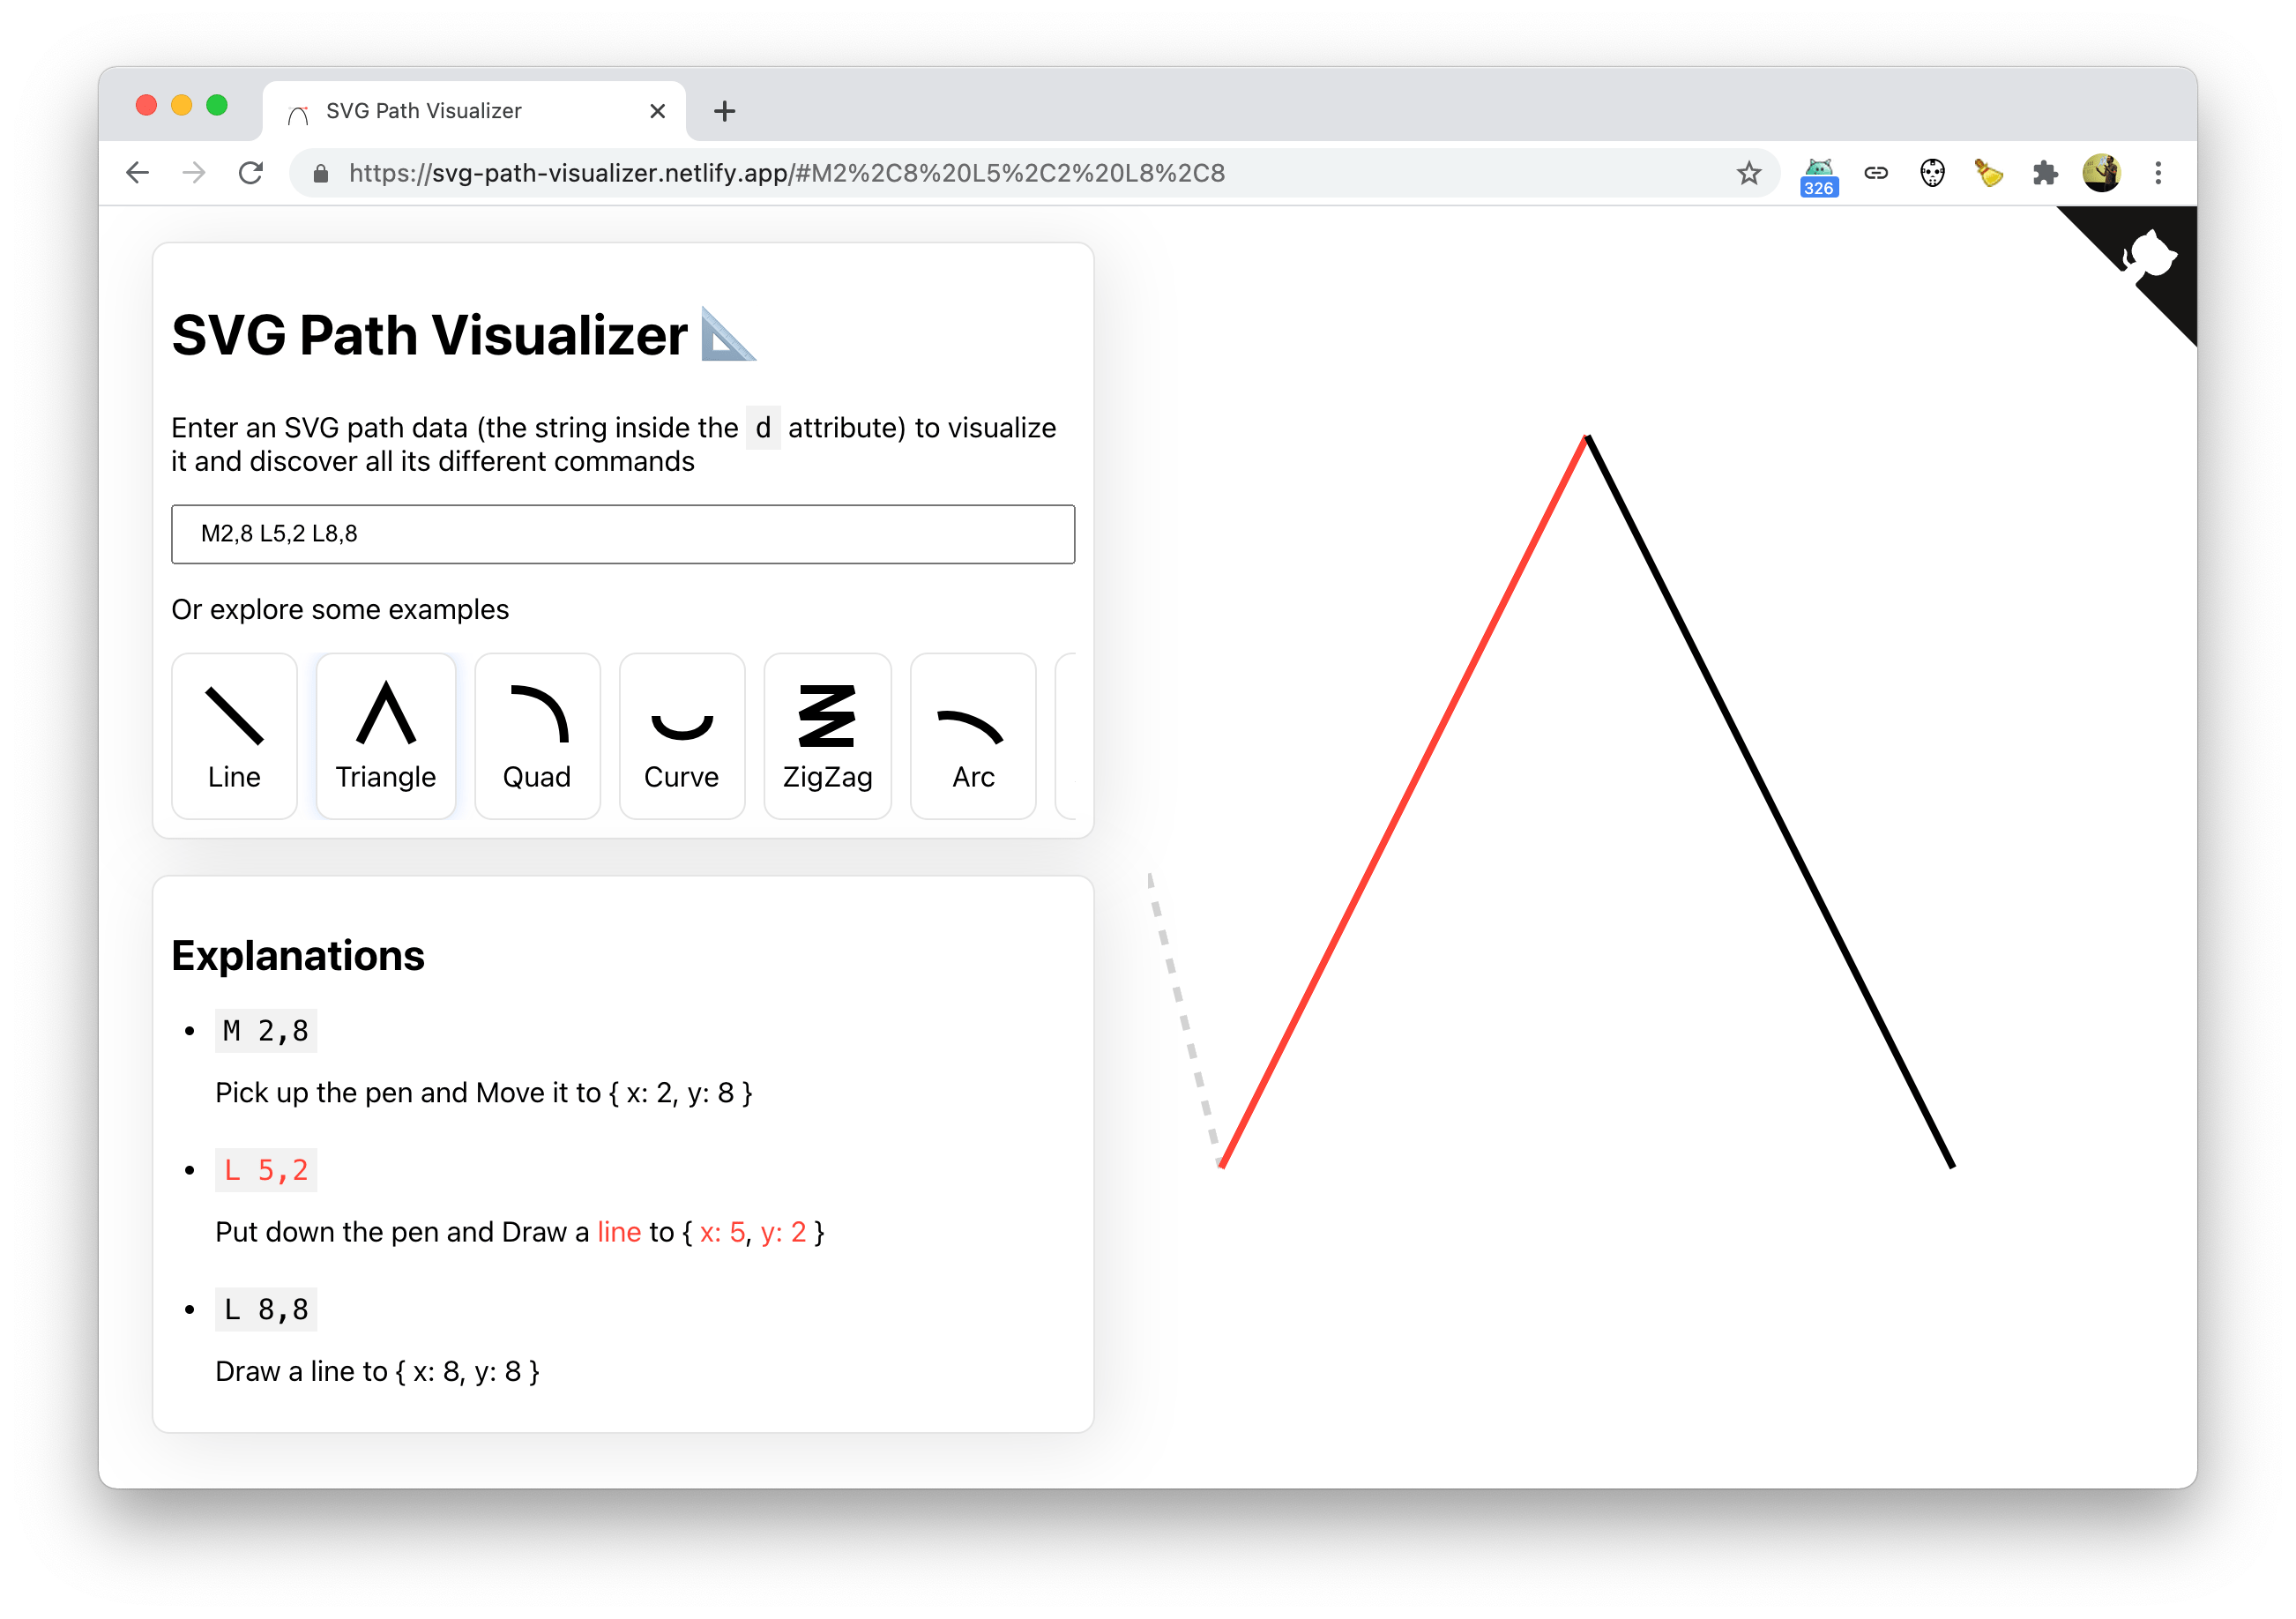
This next video segment breaks down the path data for a simple hamburger icon, making the concept very clear.
Introduction to SVGs: A Beginner's Guide to Scalable Vector Graphics
Let's return to the 'Introduction to SVGs' video to see how path data works in practice.
Watch from 07:00 to 08:15. The video does a great job of explaining how a series of 'move-to' and 'line-to' commands can create a complete, though non-continuous, shape like a menu icon.
3. The Organizer: <g> (Group)
This is perhaps the most important element for you as a motion designer. The <g> tag stands for "group." It functions like a folder for SVG elements, or a <div> in HTML. You can wrap multiple <path>, <circle>, or other elements inside a <g> tag.
Why is this so important?
- Organization: It keeps your SVG code clean and readable.
- Targeting for Animation: You can give a
<g>tag anidor aclass. This allows you to easily select the entire group with CSS and apply an animation to it.
Your workflow in Figma directly impacts this structure. When you group layers in Figma and give that group a name, exporting it as an SVG will create a <g> tag with that name as its id.
This next clip shows this exact workflow.
Make Awesome SVG Animations with CSS // 7 Useful Techniques
This final video segment from Fireship connects everything we've discussed directly to your Figma workflow. It's the bridge between design and code.
Watch from 03:10 to 05:30. This is a critical section. Notice how: Naming layers in Figma (e.g., 'dark-1', 'light-1') is the first step. Grouping those layers into 'dark-group' and 'light-group' creates <g> elements in the final code. These group names become id attributes that can be targeted with CSS for animation.
This workflow is the foundation for everything we'll do next. By thoughtfully naming and grouping the components of your illustration in Figma, you are essentially preparing your assets for animation before you ever see a line of code.
Key Takeaways
You've now looked under the hood of an SVG and seen that it's not magic, but structured code. This understanding is what elevates you from a designer to a creative technologist capable of directing complex animations.
- SVG is code: Unlike raster images, SVGs are XML markup, making them editable, stylable, and animatable.
viewBoxenables scalability: It defines an internal coordinate system for your graphic, which is then scaled to fit the final display area (widthandheight), ensuring sharpness at any size.<path>is the workhorse: It draws complex shapes using a series of commands and coordinates, which are generated for you by design tools like Figma.<g>is for animation: Grouping elements in your design tool creates<g>tags in the code. Giving these groups meaningful names is the most critical step in preparing an asset for animation.
Next Up
In our next lesson, we will explore the two primary methods for applying motion in CSS: transitions and keyframe animations. Now that you know how to prepare an SVG with distinct, targetable parts, you'll learn when to use a simple transition for a state change (like a hover effect) and when to use a more powerful keyframe animation for a multi-step sequence (like an explainer video scene).