Recommended resources
The freely available resources this lesson will direct you to.
Hello! Last lesson, you wrote conditions that decide what happens to one ticket. A queue has many tickets, so the next step is to apply a decision repeatedly without copying the same code. This lesson covers three ways to do that in JavaScript: for when you need a counter or position, for...of when you want each value in a collection, and while when you want to repeat until a condition changes.
Allow about 40 minutes to watch the short video segments, read the examples, and run them in Node.js. Throughout, ask two questions of every loop: What makes it run again? What guarantees it stops?
Count a known number of repetitions with for
Suppose you want to print three review slots. A for loop puts its starting value, continuation test, and update together:
for (let slot = 1; slot <= 3; slot += 1) {
  console.log(`Review slot ${slot}`);
}

console.log("Done");
This prints slots 1, 2, and 3, followed by Done. The let matters because slot changes. The test slot <= 3 is checked before each run of the body; after slot 3, the update makes slot equal to 4, so the next test fails. The variable declared in the loop header is not available after the loop.
Watch the for demonstration in JavaScript Loops Made Easy by codeSTACKr. Its array example will also help with the indexed loop below.
JavaScript Loops Made Easy by codeSTACKr shows how a counter, test, and update work together.
Watch the counter loop, focusing on why the upper boundary is not printed. Then watch array indexing for the case where the counter identifies a position in a list.
A useful way to check a for loop is to trace its first and last passes:
| Point in the loop | slot |
Does slot <= 3 pass? |
|---|---|---|
| First check | 1 | Yes |
| Last run of the body | 3 | Yes |
| Check after the last update | 4 | No |
You can also use a for counter to visit array positions. An array is an ordered list; its first position is index 0, and its length is the number of items.
const ticketIds = ["T-101", "T-102", "T-103"];

for (let index = 0; index < ticketIds.length; index += 1) {
  console.log(index, ticketIds[index]);
}
The valid indexes here are 0, 1, and 2. Using index < ticketIds.length stops before 3; using <= would also visit index 3 and read undefined. If the array is empty, its length is 0, the first test fails, and the body runs zero times. Those boundary checks matter more than memorizing a particular loop template.
Work directly with each value using for...of
Often you do not need a ticket’s numerical position—you just need its value. for...of expresses that directly:
const statuses = ["open", "closed", "open"];
let openCount = 0;

for (const status of statuses) {
  if (status === "open") {
    openCount += 1;
  }
}

console.log(openCount); // 2
On each pass, status holds the next value. The if is the decision you learned last lesson; the loop applies it to every status. openCount is declared outside the loop because its accumulated value is needed afterward. By contrast, status is local to a pass through the loop. Using const for it is fine: you do not reassign it within that pass.
Watch how the video changes from looking up an array item by index to receiving the item directly.
This segment of JavaScript Loops Made Easy replaces an indexed array loop with for...of.
Watch the for...of example. Focus on which variable represents the current item and which represents the collection. You can keep braces around the body even when it contains just one statement.
For a finite array that you are not extending during the loop, for...of finishes when it reaches the end. If statuses is empty, the body runs zero times and openCount remains 0. Prefer this form when you want every value and do not need its index. Use a standard for loop when the position itself matters or when you need to visit only part of an array.
Sometimes you can stop even sooner. This search remains bounded by the length of ticketIds, but break ends it as soon as a match is found:
for (const ticketId of ticketIds) {
  if (ticketId === "T-102") {
    console.log("Found", ticketId);
    break;
  }
}
break exits the loop, not just the if block. If no ID matches, the loop simply finishes after the last item.
Repeat while a condition holds
A while loop checks its condition before every pass. It is useful when continuing depends on changing state, rather than just visiting each item in a collection. In this example, we simulate checking whether work is ready, with a firm limit of three checks:
const maxChecks = 3;
let checks = 0;
let ready = false;

while (checks < maxChecks && !ready) {
  checks += 1;
  console.log(`Check ${checks}`);

  // Simulate work becoming ready on the second check.
  if (checks === 2) {
    ready = true;
  }
}

console.log(`Finished after ${checks} checks; ready: ${ready}`);
The body runs twice: after the second check, ready becomes true, so !ready fails at the next test. If work never became ready, checks would still reach maxChecks and stop the loop after three passes. This is a bounded loop even when its early stopping point varies.
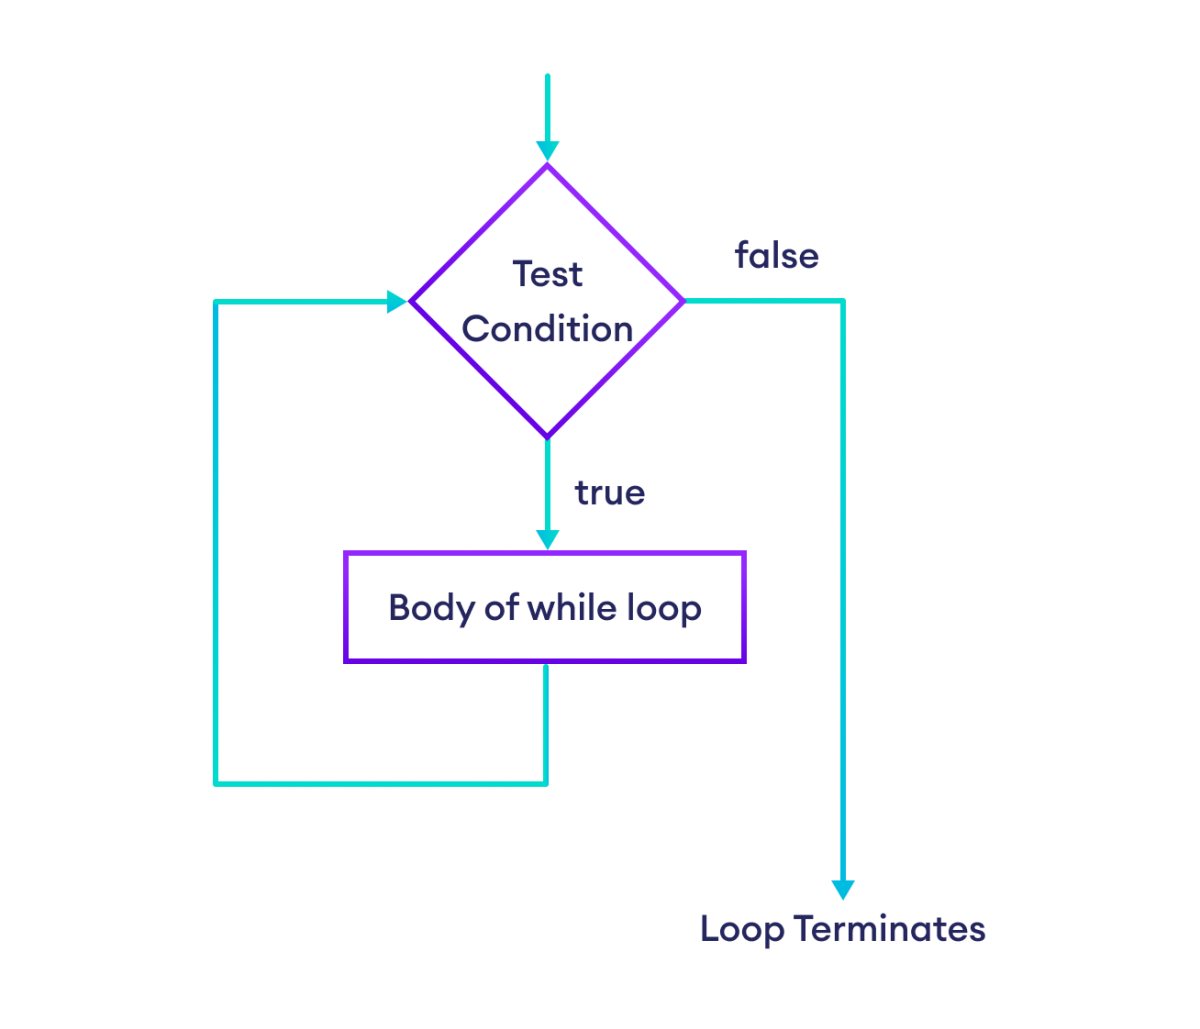
The flowchart makes the timing of that test visible: a false condition skips the body entirely, while a true condition permits one pass and then another test.
Watch the while demonstration, particularly where the counter is updated.
This segment of JavaScript Loops Made Easy shows where a while loop checks its condition and why its counter must change.
Watch the while loop. Compare its counter update inside the body with the update in a for loop’s header.
Unlike the for example, while does not give the update a dedicated place in its syntax. You must ensure the body can make the condition false. In the example, checks += 1 advances toward the maximum; ready = true can stop it earlier. If ready began as true, the body would run zero times.
An accidental infinite loop is particularly troublesome in Node.js: if the condition stays true and the body never changes anything relevant to it, the program can keep running instead of reaching the next statement. Before running a loop, identify its starting state, stopping condition, and progress toward stopping. A maximum count is a useful safeguard when the other stopping condition might never occur.
Choose the form that states your intent
All three loops can repeat code, but each makes a different part of the task easiest to see:
| Need | Natural choice | Visible stopping point |
|---|---|---|
| Count passes or use array positions | for |
Its condition and counter update |
| Visit each value in a finite collection | for...of |
The end of the collection |
| Continue while changing state permits it | while |
Its condition, supported by an update or limit |
Save the examples as loops.js and run node loops.js. Before running it, trace the first pass and the point at which each loop stops. In particular, change ticketIds to an empty array, and change maxChecks to 1: the resulting output will show whether your mental model includes the boundary, not just the usual case.
Takeaways
A loop is safe and predictable when you can explain where it starts, why another pass is allowed, and why it must eventually stop. Use for for controlled counting or indexing, for...of for values in a collection, and while for a changing condition with an explicit bound when needed. Check zero-pass and last-pass behavior to catch off-by-one mistakes.
Next, you’ll put reusable behavior into functions, so ticket rules and loop-based processing need not live only in one script.