Recommended resources
The freely available resources this lesson will direct you to.
Hello! Last lesson separated the image that packages an application from the runtime that starts it. Now you’ll make that distinction visible on your PC: pull an image, run a container, reach its web server, inspect its output, and stop and restart it. This is a hands-on lesson; allow about 40 minutes. The commands assume Docker is running locally and that you have a shell with curl available.
Pull an image, then run a container
We’ll use Docker’s small welcome application so that a successful run has an observable result in your browser. First, read the short Docker Docs walkthrough. Pay particular attention to which command obtains the image and which creates the container.
Build and share a containerized application | Docker Docs
Read Docker Docs’ “Run a container” example for the image, container, and port options we’ll use in the lab.
In the “Run a container” subsection, begin with the paragraph starting “Start with a small web application.” Read the run walkthrough, stopping just before “Remove the container before continuing.” Focus on what --detach, --name, and --publish configure.
Check that your Docker daemon is reachable, then obtain the image:
docker info
docker pull docker/welcome-to-docker
docker image ls docker/welcome-to-docker
The pull command downloads an image into Docker’s local image store; it does not start an application. If docker info cannot connect to the daemon, start Docker before continuing. The image name has no explicit tag here, so Docker uses latest. As you saw last lesson, a tag can change over time; for a deployment requiring exact image content, use an appropriate pinned reference.
Now create and start one container:
docker run --detach \
  --name welcome \
  --publish 127.0.0.1:8080:80 \
  docker/welcome-to-docker
docker ps
docker run takes an image reference and creates a new container. --detach leaves it running without occupying your terminal; --name welcome gives that particular container a convenient identifier. The published-port argument binds port 8080 on your PC’s loopback interface to port 80 in the container. Binding to 127.0.0.1 keeps this lab’s service local rather than publishing it on all host network interfaces.
Visit http://127.0.0.1:8080 or check the HTTP response:
curl -I http://127.0.0.1:8080/
You should see the welcome page or an HTTP success response. If host port 8080 is already occupied, remove the unsuccessful container if Docker created one (docker rm welcome), then rerun with another free host port—for example, 127.0.0.1:8081:80—and use that port in the URL and subsequent checks.
Understand what the port listing tells you
The two numbers in 8080:80 serve different purposes. The application listens on 80 inside the container; a client on your PC connects to 8080 on the host. Another container could also listen internally on port 80, provided you publish it on a different available host port. Conversely, seeing 80/tcp in a container listing does not, by itself, mean the service is reachable through a host port: it may indicate an image-declared port without a published mapping.
Watch this brief explanation of host-to-container port binding before inspecting your own mapping.
8 Basic Docker Commands || Docker Tutorial 4
In 8 Basic Docker Commands, TechWorld with Nana illustrates why containers can use the same internal port while their host-facing ports must differ.
Watch port binding. Focus on which port the application listens on, which port a host client uses, and why two containers cannot claim the same host address and port at once. The lab’s 127.0.0.1 prefix additionally restricts the binding to loopback.
Confirm the actual mapping Docker established:
docker port welcome
docker ps
In docker ps, read IMAGE as the package used to create the container, STATUS as the current container state, and PORTS as its published mappings. The container name or ID identifies the instance; the image name does not. That matters when several containers are created from the same image.
Inspect output and the running environment
A detached container can run without printing into your current terminal. Start troubleshooting with its output rather than assuming that a blank terminal means nothing happened:
docker logs --tail 20 welcome
docker inspect --format '{{.State.Status}} {{.Config.Image}}' welcome
The first command reads available container logs, typically output written by its processes to standard output or standard error. The second queries two fields of Docker’s detailed container record: its state and its image reference. You should see running as the state. To follow new log entries, run docker logs --follow welcome, make another browser or curl request, then press Ctrl+C to stop following the logs. That keypress does not stop this detached container.
For a direct look inside, try:
docker exec welcome sh -c 'pwd; ls /'
docker exec starts an additional command in an already-running container; it does not create another container. Here, sh runs two familiar Linux inspection commands. This depends on the image containing a shell—some minimal images do not. You can also inspect interactively with docker exec -it welcome sh and leave the shell with exit. Exiting that additional shell does not stop the web server.
Watch the relevant debugging demonstration, noting the difference between reading process output and executing a new inspection command.
Debugging Docker Containers with docker exec and docker logs || Docker Tutorial 5
In Debugging Docker Containers with docker exec and docker logs, TechWorld with Nana demonstrates two practical ways to investigate a running container.
Watch container logs for the use of a container name or ID, then exec inspection for an interactive shell. Her example image is different from ours; focus on what each Docker command does rather than on the files shown inside her container.
Your Linux command-line skills apply inside a shell that the image provides, but do not assume it contains your host’s tools. Containers often have deliberately small filesystems. Also distinguish exec from run: the former operates inside an existing running container, while the latter creates a new one from an image.
Stop, restart, and remove the container
A container need not disappear when its main process stops. The lifecycle diagram places running, exited, and removing among several possible states. For this lab, concentrate on the transitions you can observe with ps; you need not memorize the diagram’s less common states.
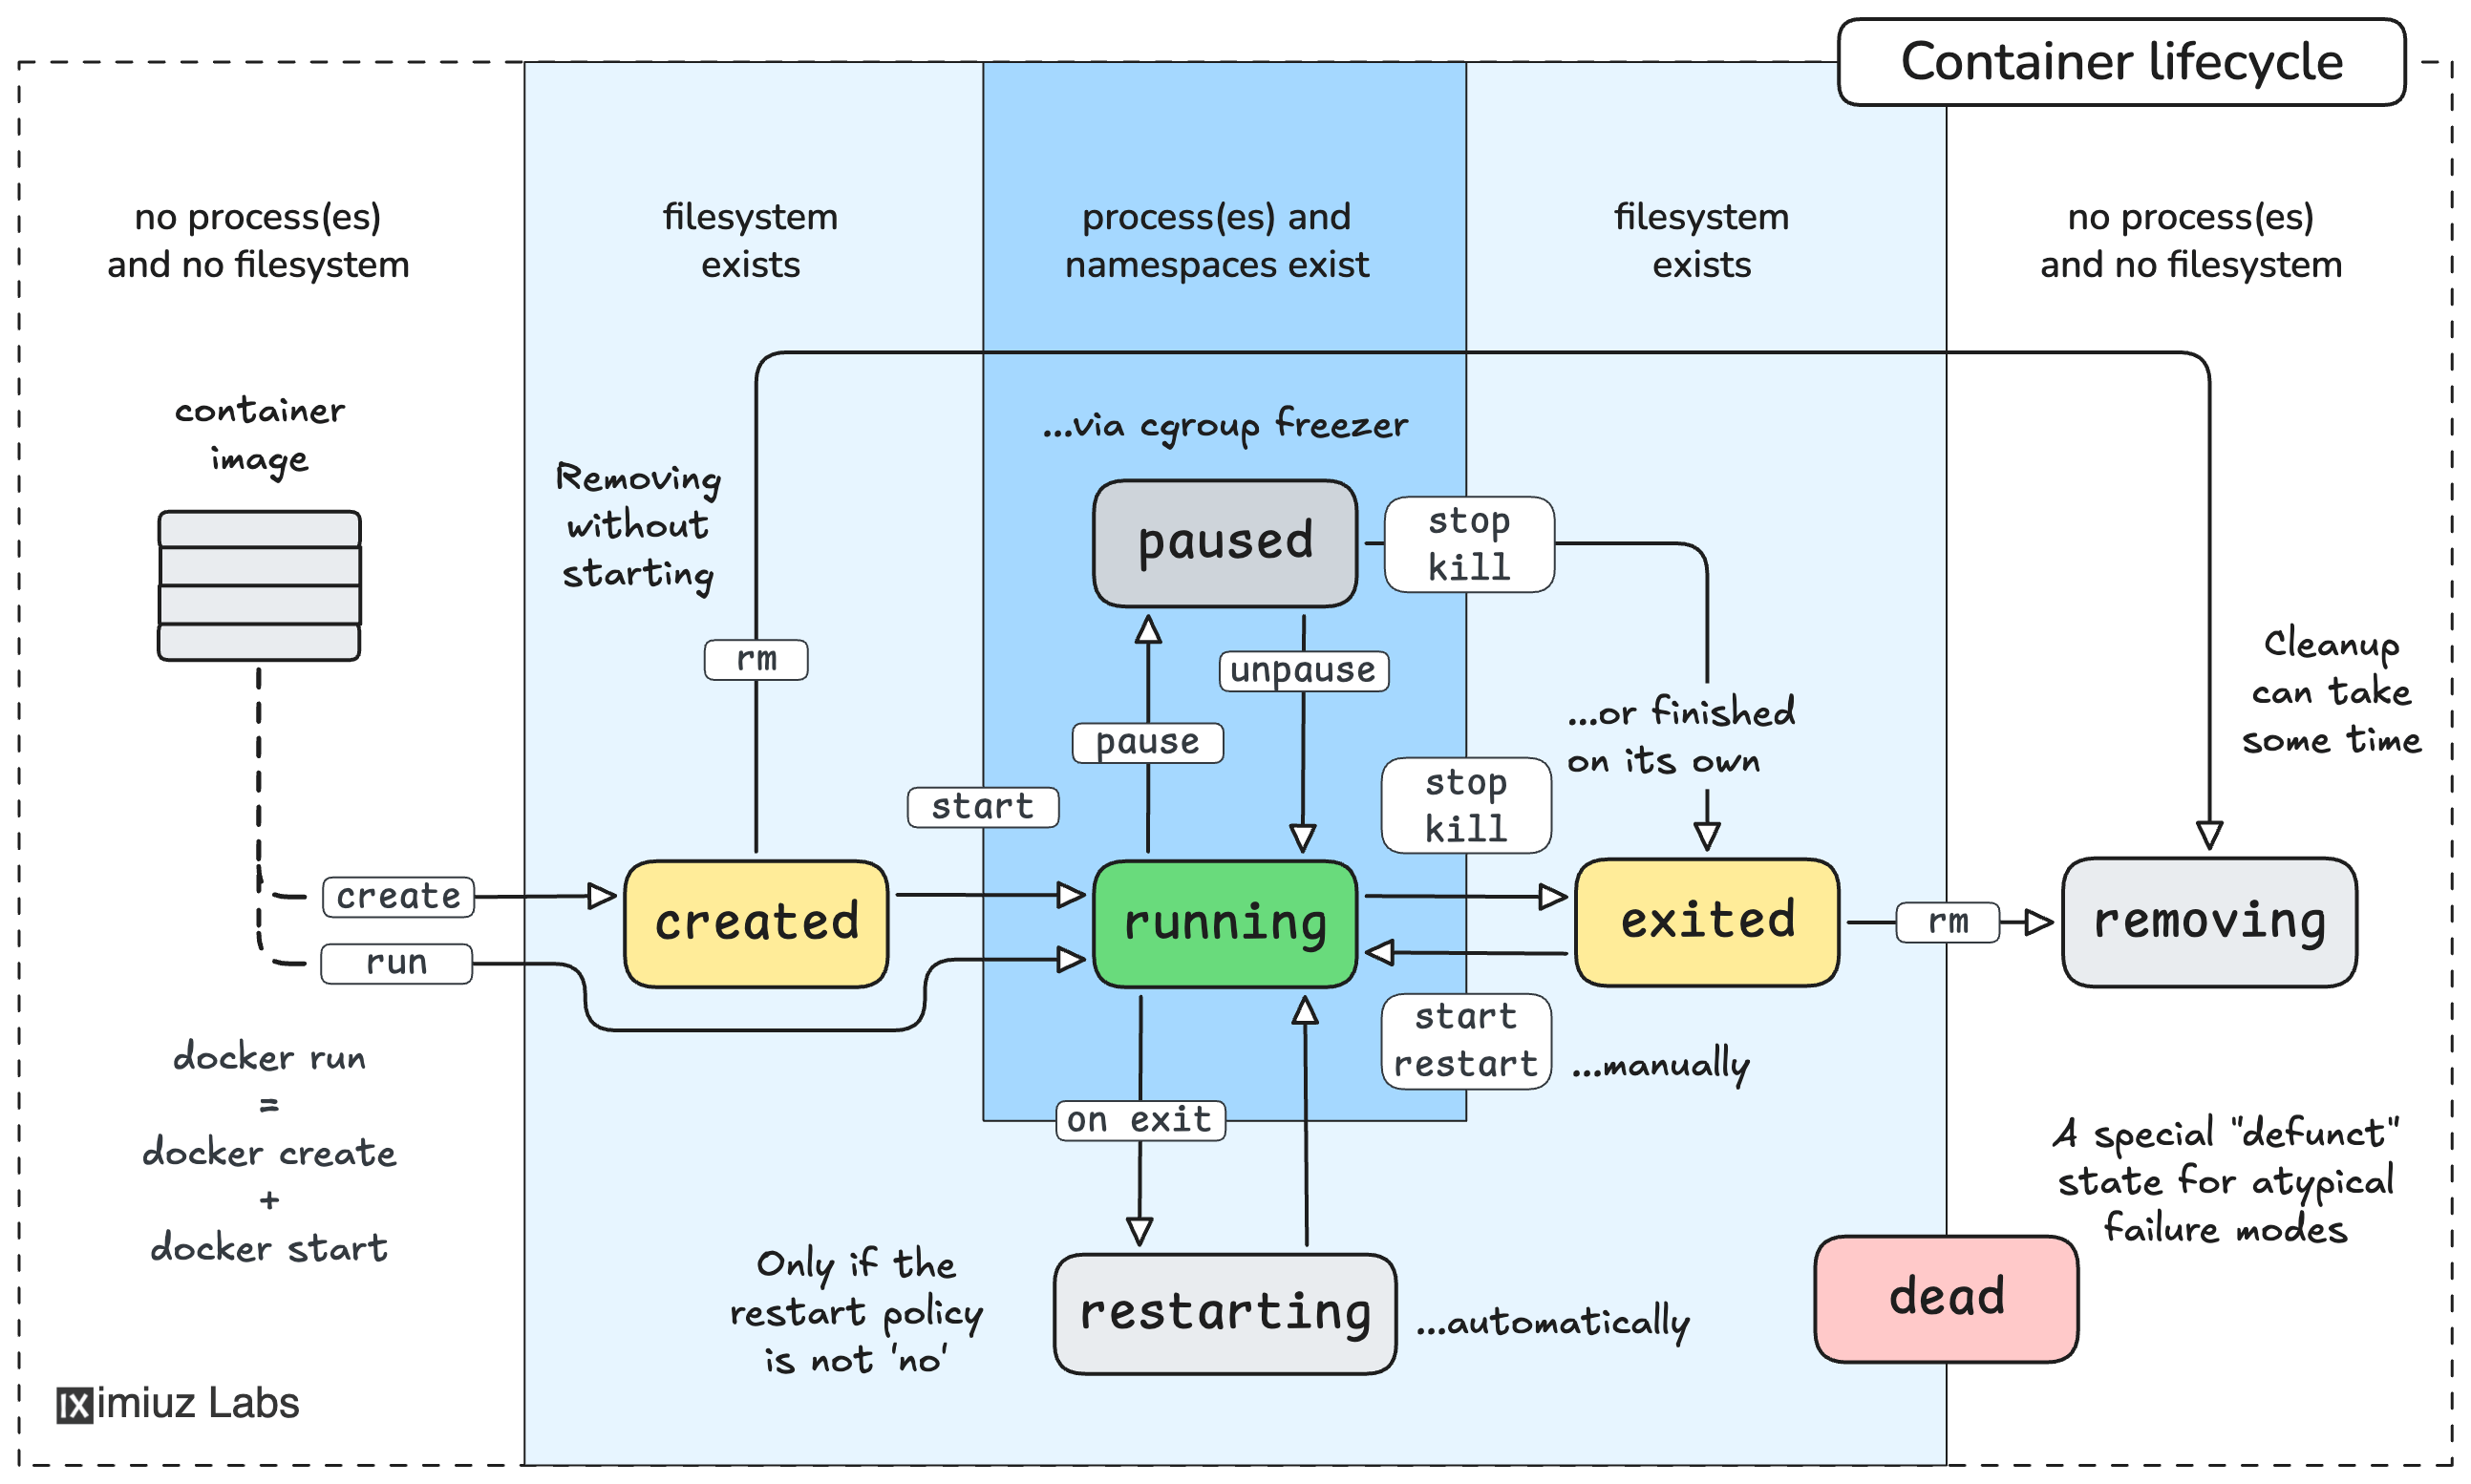
Record the container’s ID, stop it, and look for it in both listings:
docker inspect --format '{{.Id}}' welcome
docker stop welcome
docker ps
docker ps -a
The container should disappear from docker ps, which lists running containers, but remain in docker ps -a, which includes stopped ones. Its status should show that it exited. Try the URL again: the previously published port will no longer serve this application while it is stopped.
Restart it and compare its ID with the one you recorded:
docker start welcome
docker inspect --format '{{.Id}}' welcome
docker ps
The ID is unchanged: docker start starts the existing container, retaining its name and port configuration. By contrast, another docker run would try to create a new container. Reusing --name welcome while this one still exists would cause a name conflict, not restart it.
The video makes that distinction explicit:
Debugging Docker Containers with docker exec and docker logs || Docker Tutorial 5
Return to TechWorld with Nana’s Debugging Docker Containers with docker exec and docker logs for its closing comparison of run and start.
Watch run versus start. Track which command accepts an image reference and which accepts an existing container’s name or ID.
Finally, clean up the container and verify what remains:
docker stop welcome
docker rm welcome
docker ps -a
docker image ls docker/welcome-to-docker
docker rm removes this stopped container, not its image. The image should still appear in the last listing, ready to create a future container. Docker Docs’ “Run a container” subsection also shows docker rm --force welcome as a way to remove a running container directly; the explicit stop-then-remove sequence here makes the two lifecycle changes easier to see.
What to retain
You’ve now seen the boundary between an image and a container in Docker’s output: pull obtains the package, run creates a new instance, and start resumes an existing stopped instance. ps, logs, inspect, and exec answer different inspection questions; --publish determines how a host client reaches a service inside the container. Stopping and removing an instance does not remove its image.
Next, you’ll build an image yourself from a Dockerfile and inspect its metadata and layers. Today’s prebuilt image will then feel less like a black box.