Recommended resources
The freely available resources this lesson will direct you to.
Hello! Last time, you used shell commands to inspect a log and redirect output into a file. Now you will use that same terminal to prepare a Python project: create an isolated environment, describe its dependencies in a text file, and install those dependencies. This setup will become routine as you build data pipelines.
Allow about 40 minutes: 7 minutes for a video, 7 minutes for reading, and roughly 25 minutes for the terminal work. Use the WSL-connected VS Code terminal from earlier lessons. Although your computer runs Windows, the commands you enter in that terminal are Linux commands.
Why give a project its own Python environment?
A Python package is reusable code you install to give a project additional capabilities. Different projects may need different versions of the same package. Installing everything into one shared Python installation makes those versions harder to manage.
A virtual environment is a directory containing a project-specific Python interpreter and a place for its installed packages. Activating it makes commands such as python use that environment. It does not copy your project into the environment: your own files stay alongside the environment directory.
Watch the first seven minutes of Python Virtual Environments - Full Tutorial for Beginners from Tech With Tim. Focus on the purpose of isolation and on the relationship between a requirements file and a new environment. The presenter switches between operating systems; use the WSL commands in this lesson, not the Windows activation commands shown in the video.
Python Virtual Environments - Full Tutorial for Beginners
Python Virtual Environments - Full Tutorial for Beginners demonstrates creating and activating an environment, recording package versions, and installing them from a requirements file.
Watch isolation and setup for the reason to use an environment and the create/activate distinction. Continue through packages and versions, paying particular attention to what pip freeze writes. Finally, watch file-based installation to see how a fresh environment receives dependencies from requirements.txt. The demonstration uses different environment names from ours; follow the paths below for your own project.
The Python documentation confirms the Linux activation command and explains that .venv is a common directory name. Read its “Creating Virtual Environments” section from the explanation of venv through deactivation. Its examples may show a different directory name; the name is your choice.
12. Virtual Environments and Packages
Read the Python tutorial's explanation of what venv creates and what activation changes.
In Section 12.2, “Creating Virtual Environments,” begin with creation through deactivation. Read through the paragraph immediately following the deactivate command, stopping before Section 12.3. Notice that creating the directory and activating it are separate actions, and find the Unix activation example rather than the Windows one.
Create and activate an environment in WSL
Make a small project beside your existing shell-lab. First inspect the parent directory. If python-env-lab already exists, choose a different new directory name rather than mixing this lesson with existing files.
cd ~/projects/de-foundations
pwd
ls
mkdir python-env-lab
cd python-env-lab
pwd
python3 --version
The last pwd should end in /de-foundations/python-env-lab. In WSL, python3 names the installed Python interpreter; do not substitute a Windows python.exe path.
Create the environment, then activate it in your current Bash terminal:
python3 -m venv .venv
ls -a
source .venv/bin/activate
python -c 'import sys; print(sys.executable)'
python -m pip --version
The -m venv option asks Python to run its built-in environment-creation module. The name .venv is simply the destination directory. ls -a displays it even though names beginning with a dot are ordinarily hidden by ls.
After activation, your prompt usually begins with (.venv). More importantly, sys.executable should print a path ending in /python-env-lab/.venv/bin/python. That path is stronger evidence than the prompt: it shows which interpreter will run your commands. python -m pip then runs the package installer associated with that Python interpreter.
If python3 -m venv .venv reports that ensurepip is unavailable, your Ubuntu installation may need its environment package. In WSL, run sudo apt update followed by sudo apt install python3-venv, then retry the creation command. If python3 itself is missing, install it with sudo apt install python3 python3-venv after updating. Do not proceed to installation until activation and the interpreter-path check succeed.
A new terminal is a new shell. If you close this terminal or open another one, return to the project directory and run source .venv/bin/activate again before using the short python commands below.
Install from a pinned requirements file
For a later pipeline, you may need code that communicates with an HTTP API. We will install requests, a Python package commonly used for that purpose, without using its API yet.
A requirements.txt file is a plain-text installation specification. A line such as requests==2.32.5 pins the requested package to an exact version, rather than allowing pip to choose whichever release is newest on installation day. Read the Python tutorial's “Managing Packages with pip” section for the freeze and install -r workflow. Some package versions in its historical examples are old; use the version specified here, not those examples.
12. Virtual Environments and Packages
Read how pip handles specific versions, produces a requirements-style list with freeze, and installs a listed set of packages.
In Section 12.3, “Managing Packages with pip,” begin at pip and requirements. Continue through the install -r example, stopping at the paragraph that says pip has many more options. Focus on the difference between installing a named package and installing every entry in a requirements file; you need not memorize the old version numbers shown.
With (.venv) active and pwd showing your new project directory, create the file. As in the previous lesson, > writes output to a file and replaces existing contents. Use this command only if this is a new requirements.txt:
printf '%s\n' 'requests==2.32.5' > requirements.txt
cat requirements.txt
python -m pip install -r requirements.txt
The -r tells pip to read requirements from the file. Installation requires an internet connection. Pip will also install packages that requests needs; these are called transitive dependencies. You requested one package explicitly, but several may appear in the installation output.
Check both the installation and the interpreter using it:
python -m pip show requests
python -m pip check
python -c 'import requests; print(requests.__version__)'
Look for version 2.32.5 in the results. pip check should report no broken requirements. If python -m pip show requests says the package was not found, verify pwd, confirm that activation succeeded, and retry python -m pip install -r requirements.txt. Do not fix an environment problem by installing packages outside the project environment.
Pin the complete installed set
Your one-line file pinned requests, but it did not pin the versions pip selected for its transitive dependencies. Because this environment is new and you have installed only this project’s dependencies, you can capture the complete installed set:
python -m pip freeze
The output uses package==version lines. Once you have inspected it, deliberately replace the initial one-line file with that fuller snapshot:
python -m pip freeze > requirements.txt
cat requirements.txt
python -m pip install -r requirements.txt
python -m pip check
This is an intentional use of >: the file now records exact versions for requests and its installed dependencies. On the second installation, pip will probably report that the requirements are already satisfied. That still verifies it can read your pinned file. In a fresh environment, the same python -m pip install -r requirements.txt command would install the listed versions. A pinned file improves repeatability, though it does not by itself guarantee compatibility with every Python version or operating system.
Connect the terminal environment to VS Code
Your terminal’s active interpreter and VS Code’s selected interpreter are related but distinct settings. Activation determines what python means in that shell. VS Code’s interpreter selection determines which Python its editor features and Run command use for the workspace.
The image shows VS Code’s Select Interpreter menu on Windows. It distinguishes global Python installations from a workspace .venv. The pictured paths are Windows examples; in your WSL-connected VS Code window, the environment you want has a Linux path ending in .venv/bin/python, not Scripts/python.exe.
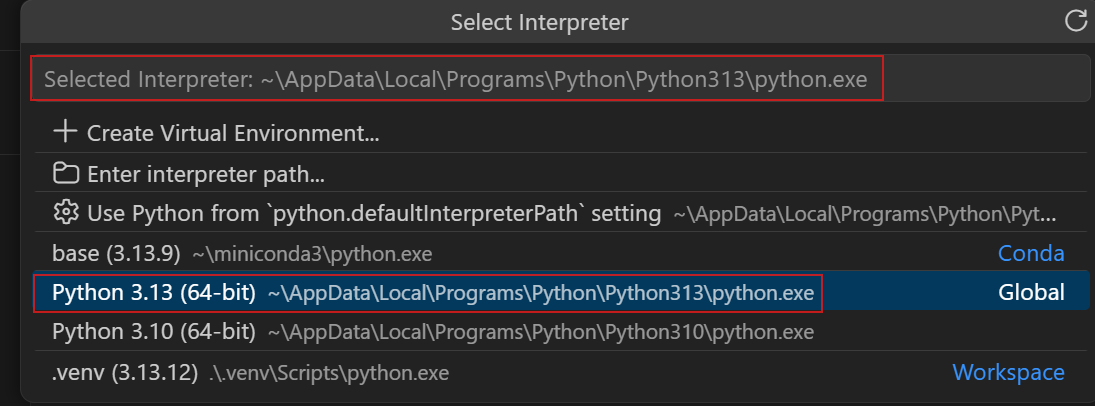
If VS Code has not selected your environment automatically, open the Command Palette, run Python: Select Interpreter, and select the interpreter inside this project’s .venv. If needed, use Enter interpreter path and point it to .venv/bin/python. Make this selection in the WSL-connected window. Selecting an interpreter does not retroactively activate an existing terminal, so keep using the path check when you are uncertain:
python -c 'import sys; print(sys.executable)'
Finally, prepare to keep the generated environment out of the project history you will create in the next lesson. This new text file tells Git, once you begin using it, not to include the .venv directory:
printf '%s\n' '.venv/' > .gitignore
cat .gitignore
Keep requirements.txt with the project; do not put your own scripts or data inside .venv. When you finish working in this terminal, deactivate returns it to the previously available Python commands.
Key takeaways
A virtual environment isolates a project’s interpreter and installed packages. In WSL, create one with python3 -m venv .venv, activate it with source .venv/bin/activate, and verify the interpreter path before installing. A pinned requirements.txt records exact package versions; python -m pip install -r requirements.txt installs from it, while python -m pip freeze can capture the complete set you installed.
Next, you will initialize a local Git repository and record your project files. Your requirements file belongs in that history; the generated .venv directory does not.