Recommended resources
The freely available resources this lesson will direct you to.
Hello! In the previous lesson, you created a Python project with a pinned requirements.txt and a .gitignore that excludes its generated .venv directory. Now you will give that project a local history. You will initialize Git, choose which files belong in a commit, and write messages that make the history useful when you return to the project later.
Allow about 40 minutes: roughly 15 minutes for the resources and 25 minutes in the terminal. Continue in your WSL-connected VS Code terminal. This lesson stays entirely on your computer; publishing to GitHub comes later.
What Git records
Git is a version-control tool: it records selected states of a project so you can inspect how the project changed. A commit is one recorded snapshot with a message explaining its purpose. Git does not record every edit automatically. You decide what to include by staging files first.
Watch these portions of Git Tutorial for Beginners: Learn Git in 1 Hour by Programming with Mosh. Focus on the distinction between the project files you edit and Git’s hidden .git directory. The presenter briefly demonstrates deleting .git to make a point; do not run that deletion command in your project.
Git Tutorial for Beginners: Learn Git in 1 Hour
Watch how a local folder becomes a repository and how the working directory, staging area, and repository differ.
In repository setup, notice that git init creates .git without changing your existing project files. Then watch the three areas: editing a file and recording a commit are separate actions, with the staging area controlling what the next commit will contain.
The same three areas appear in this diagram. The working directory contains files you can edit; the staging area holds the proposed contents of the next commit; the repository stores commits. The “Checkout” label refers to bringing a recorded version back into the working directory—you do not need that operation today.
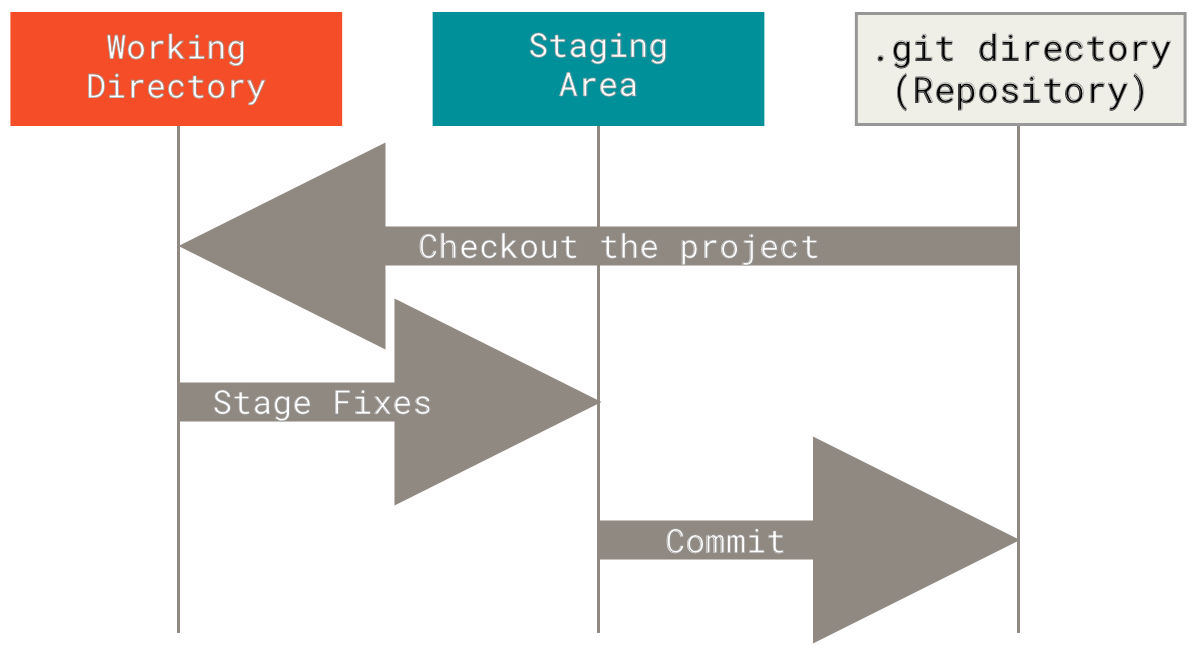
A useful distinction for your Python project is that .gitignore should be recorded, but .venv should not. The former documents a project rule. The latter contains generated, machine-specific files that can be recreated from your project setup and requirements.
Initialize the Python project
Return to the directory from the previous lesson and inspect it before initializing anything:
cd ~/projects/de-foundations/python-env-lab
pwd
ls -a
cat .gitignore
git --version
You should see requirements.txt, .gitignore, and .venv. Confirm that .gitignore contains .venv/. If it does not, add that line before proceeding. If git --version reports that Git is unavailable in WSL, install it there with sudo apt update and sudo apt install git; installing Git for Windows alone does not replace this WSL setup.
If ls -a already shows a .git directory, do not initialize this directory again. Check git status to see what work it already contains before continuing. Otherwise, run:
git init -b main
git status
ls -a
If your installed Git does not recognize -b, use git init instead; the branch name shown by git status may differ. The new .git directory holds Git’s local repository data. Leave its contents alone. git status should report that there are no commits yet and list your project files as untracked. “Untracked” means Git has not been asked to include those files in a snapshot; it does not mean the files are missing.
Git also needs an author identity to label commits. For this local practice repository, you can configure a non-personal example identity:
git config --local user.name "Project Author"
git config --local user.email "author@example.invalid"
--local limits these settings to this repository. The example address is deliberately not a working email address. Before publishing work later, choose appropriate author settings; changing the settings then will not rewrite earlier commits.
Stage the files you intend to keep
Before committing, add a short project note. From inside python-env-lab, create README.md:
printf '%s\n' \
  '# Python environment lab' \
  '' \
  'Create .venv with python3 -m venv .venv, then activate it.' \
  'Install packages with python -m pip install -r requirements.txt.' \
  > README.md
git status
Watch the next parts of the tutorial for the mechanics of staging, committing, and ignoring generated files. The video uses a different example project; keep working in your existing WSL project rather than recreating its files.
Git Tutorial for Beginners: Learn Git in 1 Hour
Continue Git Tutorial for Beginners: Learn Git in 1 Hour for a demonstration of selecting files, recording a snapshot, and excluding generated material.
Watch staging files, particularly what happens when a file changes after git add. See the commit command and message guidance for why a commit should describe one coherent change. Finally, ignoring files shows why the .gitignore file itself is worth tracking.
Stage only the three project files you have inspected. Explicit filenames are safer here than git add ., which selects files recursively:
git add .gitignore requirements.txt README.md
git status
git check-ignore .venv/
git diff --staged
Under “Changes to be committed,” git status should list .gitignore, requirements.txt, and README.md. git check-ignore .venv/ should report that .venv/ matches an ignore rule. It should not appear in the staged changes.
git diff --staged lets you inspect the contents proposed for the commit. For these new files, look for the lines beginning with +. Check that the requirements are the pinned versions you intended and that you have not included credentials or generated environment files. If the output opens in a pager, press q to return to the prompt.
The staging area holds the file contents as they were when you ran git add. It is not simply a list of filenames that Git will read afresh at commit time. That detail will matter in a moment.
Record a useful first commit
A clear commit message says what this snapshot establishes, rather than merely saying “changes” or “update.” Your staged files together describe how to set up the Python project, so use a message that reflects that purpose:
git commit -m "Document Python environment setup"
git status
git log --oneline
-m supplies the message directly, without opening an editor. git log --oneline should show one commit with a short identifier and your message. git status should report a clean working tree even though .venv remains on disk: it is ignored, not deleted.
For a precise explanation of why the staged version—not a later edit—is what Git commits, read the indicated passage of Recording Changes to the Repository from the official Git book. Its example filenames differ from yours.
Git - Recording Changes to the Repository
The official Git book explains the staged snapshot and what a commit records. Read it to connect the terminal output you have just seen to Git's behavior.
In “Staging Modified Files,” find the example where CONTRIBUTING.md appears under both staged and unstaged changes. Read the explanation that follows, ending just before the repeated git add CONTRIBUTING.md example. Then, in “Committing Your Changes,” read the commit discussion, stopping before “Skipping the Staging Area.” Focus on what happens to changes you leave unstaged.
See why staging a file twice can matter
Now make a small, separate documentation improvement. Append one line to README.md, stage it, and then append another line after staging:
printf '%s\n' 'Keep the generated .venv directory out of version control.' >> README.md
git add README.md
printf '%s\n' 'This project will serve as a starting point for data pipeline work.' >> README.md
git status
README.md should appear under both “Changes to be committed” and “Changes not staged for commit.” There is no contradiction: Git has one version of the file staged and a newer version in your working directory. You can inspect each comparison separately:
git diff --staged -- README.md
git diff -- README.md
The first command shows what is staged relative to the last commit. The second shows the later edit that is still unstaged. Since both new lines belong in this documentation update, stage the latest file contents and check again:
git add README.md
git status
git diff --staged -- README.md
git commit -m "Clarify project setup notes"
git status
git log --oneline -2
You should now have two commits with distinct, descriptive messages, and a clean working tree. If the second commit unexpectedly omits the final line, the likely cause is that the file was edited after its last git add; inspect git status and stage the remaining edit before making another commit.
Key takeaways
git init creates a local repository without automatically tracking your files. git status tells you what is untracked, staged, or modified; git add selects the current contents of files for the next snapshot; and git commit -m records that staged snapshot with a message explaining its purpose. Your pinned requirements, README, and .gitignore belong in the history, while the generated .venv does not.
In the next lesson, you will use local branches to keep a new piece of work separate before merging it back into the project’s main line.