Recommended resources
The freely available resources this lesson will direct you to.
Hello! In the last lesson, you recorded two commits in your local Python project and used git status to check exactly what belonged in each one. Now you will put a new piece of work on its own branch, switch between that branch and the project’s main line, and merge the work when it is ready.
Allow about 40–45 minutes: roughly 18 minutes for the resources and 20–25 minutes in your WSL-connected VS Code terminal. Everything stays local; sharing branches through GitHub comes later.
Why make a branch?
Suppose you are documenting a source of e-commerce order data, but the note is not ready to become part of the main project. A branch gives you a place to commit that work without moving the main branch. It is not a second copy of the whole project directory: think of it as a name pointing to a commit. When you commit on the new branch, that branch’s pointer advances while main stays where it was.
Watch the selected portions of Git Branching and Merging - Detailed Tutorial by SuperSimpleDev. The presenter works in a separate example repository and calls the primary branch master; your project likely calls it main. Watch for which branch is active before each commit or merge, rather than copying the presenter’s setup commands.
Git Branching and Merging - Detailed Tutorial
Git Branching and Merging - Detailed Tutorial by SuperSimpleDev shows why feature work belongs on a separate branch and how it returns to the main line.
Watch the motivation, then branch creation to see how the active branch determines where new commits go. Skip the intervening setup and patch demonstration; by the local merge, the presenter has commits on both branches. Focus on why they switch to the primary branch before merging the feature into it.
The video uses git checkout to change branches. You will use the more specific git switch command. Read the short git switch note at the end of Branches in a Nutshell from the official Git book; it gives both the create-and-switch form and the switch-to-existing-branch form.
Read the official Git book’s short command reference so the commands in your terminal make sense alongside the older git checkout commands in the video.
At the end of the chapter, find the Note box beginning “From Git version 2.23 onwards.” Read the switch note, including all three bullets. Focus on the difference between creating and switching in one command and switching to a branch that already exists.
Before switching, aim for a clean working tree. Git may refuse a switch if uncommitted changes would be overwritten; carrying unrelated edits across branches also makes it harder to tell which work belongs where. Check git status rather than assuming a switch saved your edits.
Isolate an orders-source note
Return to the repository from the previous lesson:
cd ~/projects/de-foundations/python-env-lab
git status
git branch --show-current
git log -1 --oneline
The commands below assume the current branch is main and git status reports a clean working tree. If your earlier git init created a branch with another name, use that name wherever this lesson says main. If you have uncommitted changes, inspect and finish that work before following the commands; do not blindly discard it.
First, create a branch without switching to it:
git branch feature/orders-source-note
git branch
The * in the branch list still marks main. Creating a branch alone has not changed your active branch. Now switch and verify:
git switch feature/orders-source-note
git status
git status should say you are on feature/orders-source-note. You could have combined creation and switching with git switch -c feature/orders-source-note, but the two commands make the distinction visible.
Add a small note that connects a source dataset to an analytics consumer. If notes/orders-source.md already exists in your project, choose a different filename and use it consistently below.
mkdir -p notes
printf '%s\n' \
  '# Orders source note' \
  '' \
  'Source: daily order records exported as CSV.' \
  'Consumer: an analytics report of order counts by day.' \
  > notes/orders-source.md

git status
git add notes/orders-source.md
git diff --staged
git commit -m "Document orders source and analytics consumer"
git log --oneline --decorate -3
In the log, HEAD marks your active branch. Its new commit sits at the tip of feature/orders-source-note; main still points to the earlier project commit. This is the isolation you wanted: the work is safely committed, but it has not yet entered main.
Switch back:
git switch main
git status
git ls-files notes/orders-source.md
The last command should print nothing: that file is not tracked in the current main snapshot. It has not been lost—switching back to the feature branch would restore its committed version in your working directory.
Bring the branches together
To make the two histories distinct, add a separate, small README improvement on main:
printf '%s\n' '' 'Run Git commands from the project directory.' >> README.md
git add README.md
git diff --staged
git commit -m "Clarify where to run project commands"
git log --oneline --decorate --graph --all -6
The graph should now show a commit unique to each branch. Your README change and the feature branch’s new file do not compete for the same lines, so Git should be able to combine them automatically.
Read the indicated parts of Basic Branching and Merging from the official Git book before running the merge. The book first explains a fast-forward: if main has not gained any separate commits, Git can simply move its pointer to the feature branch’s latest commit. In your project, both branches have advanced, so Git instead uses their shared starting commit to produce a three-way merge and a new merge commit.
Git - Basic Branching and Merging
Read the official Git book’s explanation of the two common merge outcomes and its account of what to do if Git cannot combine edits automatically.
In “Basic Branching,” find the paragraph immediately after the git merge hotfix example. Read the fast-forward explanation. Then, in “Basic Merging,” find the paragraph after git merge iss53 and read the three-way explanation. Finally, under “Basic Merge Conflicts,” start just after the sample CONFLICT message and read the conflict procedure, stopping before the graphical merge-tool discussion. Notice that a conflict pauses the merge rather than completing it.
The book’s diagram shows what a merge commit records. Here, C2 is the common ancestor, C4 and C5 are the branch tips before merging, and C6 is the new commit with both tips as parents. The picture uses master and iss53 where your project uses main and feature/orders-source-note.
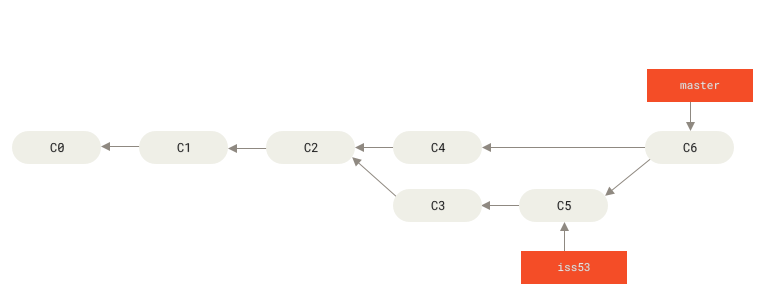
Your active branch receives the merge result. Confirm that you are still on main, then merge the feature branch into it:
git status
git branch --show-current
git merge --no-edit feature/orders-source-note
--no-edit accepts Git’s default merge-commit message instead of opening a terminal editor. Because you deliberately committed different work on both branches, you should see a merge commit rather than a fast-forward. Check the result, not just the success message:
git status
cat notes/orders-source.md
tail -n 4 README.md
git log --oneline --decorate --graph --all -6
You should have a clean working tree, the orders-source note, the README addition, and a log joining the two lines of work. The feature branch may still appear in the log: merging does not delete it. Once you have verified the result, you can remove its now-merged branch name safely:
git branch -d feature/orders-source-note
git branch
git status
This removes the branch pointer, not the merged file or its commits.
If a merge ever reports a conflict, stop rather than committing the conflict markers. Run git status to identify the unmerged file, open it in VS Code, and decide what its final contents should be. Remove the <<<<<<<, =======, and >>>>>>> marker lines; then stage the resolved file, inspect the staged change, and commit to finish the merge. If you are unsure how to resolve it, git merge --abort usually returns a clean pre-merge working tree to its earlier state so you can reconsider. Your two distinct-file changes should not require this procedure, but it is important to recognize when Git needs a human decision.
Key takeaways
A branch lets you commit work without advancing the project’s main line. git branch creates a branch, while git switch changes which branch is active; commits advance the active branch. To integrate feature work, switch to the destination branch and run git merge with the source branch’s name. A merge may fast-forward, create a merge commit, or pause for conflict resolution—so always inspect git status and the resulting files.
You now have a local project history that can support small, isolated changes. In the next module, you will begin writing Python transformations, giving you more substantial features to develop in branches.