Recommended resources
The freely available resources this lesson will direct you to.
Hello! In the previous lesson, you organized a practice workspace with Linux commands. The staging file you created was empty, so there was no text to inspect yet. This lesson adds a small text file and shows you how to search its lines, connect commands with pipes, and save command output with redirection. These are useful first steps when checking a batch pipeline’s logs or examining a data extract.
Allow about 40 minutes: roughly 6 minutes for a video, 7 minutes for reading, and the rest for working in your WSL-connected VS Code terminal.
Think of command output as text you can route
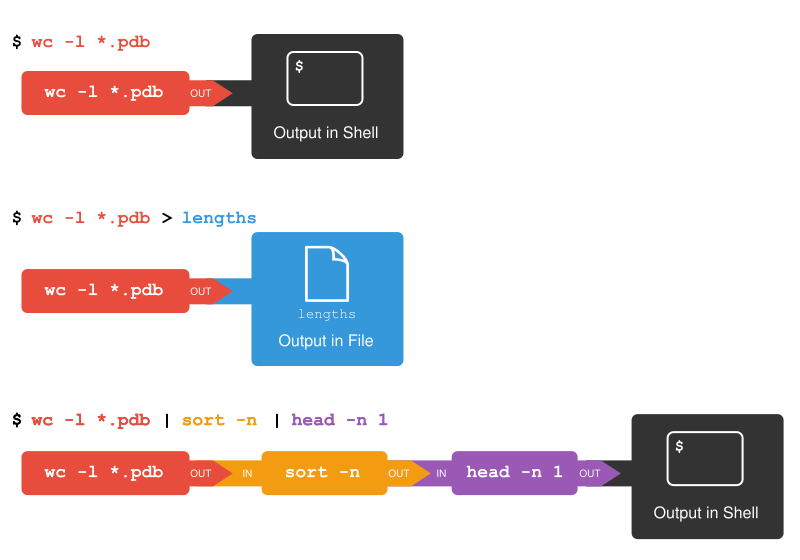
So far, most commands have printed their results in the terminal. Many Linux commands can instead receive text as input or send their output somewhere other than the screen. Three symbols give you control over that text:
>writes a command’s output to a file, replacing that file’s existing contents.>>writes output to the end of a file, preserving what is already there.|passes one command’s output to another command as input.
The image below contrasts output displayed in the shell, saved to a file, and passed through multiple commands. Its .pdb files are just the source material for that example; you will use a small log file instead.
Watch the selected parts of Linux Commands for Beginners 16 - Output Redirection from Learn Linux TV. The presenter uses directory listings, but concentrate on where each command’s output goes; the same operators work with text from a log file.
Linux Commands for Beginners 16 - Output Redirection
Watch the demonstrations of saving output, appending output, and connecting a command to grep.
Watch file output for > and its overwrite risk, then appending for >>. Skip ahead to a pipe, where grep receives another command’s output and displays only matching lines.
The text that a command normally prints as its result is called standard output. Error messages use a separate channel, standard error. For now, the practical distinction is that > saves ordinary results; a message about a misspelled or missing file can still appear in your terminal.
Give yourself a small log to inspect
Work inside the shell-lab directory from last lesson. These setup commands assume you have not already made a text-lab directory there. If it exists, inspect it first and choose a different new practice-directory name rather than overwriting files you want to keep.
cd ~/projects/de-foundations/shell-lab
pwd
mkdir text-lab
cd text-lab
pwd
Confirm that the last path ends in /shell-lab/text-lab. Now create a miniature order-processing log:
printf '%s\n' \
  '2027-01-01 INFO order=101 accepted' \
  '2027-01-01 ERROR order=102 missing_customer' \
  '2027-01-01 WARN order=103 delayed' \
  '2027-01-02 INFO order=104 accepted' \
  '2027-01-02 error order=105 missing_price' \
  '2027-01-02 ERROR order=106 duplicate_key' \
  '2027-01-02 INFO order=107 accepted' \
  '2027-01-02 WARNING order=108 delayed' > orders.log
printf '%s\n' prints each quoted item on its own line. The backslashes let you enter this one command across several terminal lines. At its end, > orders.log sends those lines into a file instead of displaying them. Run this creation command only for a new practice file: running it again will replace orders.log.
Check the result:
cat orders.log
head -n 3 orders.log
tail -n 2 orders.log
wc -l orders.log
cat displays this small file in full. head and tail show its beginning and end; wc -l reports 8 lines. For a large log, head and tail are more manageable than printing everything.
There is another way to give a command a file’s contents:
wc -l < orders.log
Here < supplies orders.log as standard input. The line count is still 8, but wc prints just the count, without a filename. You can usually give wc a filename directly; < is useful for recognizing how commands receive input.
Search lines with grep
A log often contains many routine messages and a few that need attention. grep selects whole lines containing a search pattern; it does not change the original file. Read the focused examples in The Unix Shell: All in One View from The Carpentries before trying it.
The Unix Shell: All in One View
Read the grep examples to see how a pattern selects lines and how options change which lines are selected.
Find the “Overview” whose Questions include “How can I find things in files?” After the introductory explanation of the name grep, read the grep examples. Stop after the explanation of searching through subdirectories; you do not need the later challenges or regular-expression material. Focus on case sensitivity, whole-word matching, line numbers, and inverted matches.
Start with the uppercase spelling:
grep 'ERROR' orders.log
You should see orders 102 and 106. Order 105 also has an error message, but its log level is lowercase error. grep is case-sensitive by default. Add -i to ignore case:
grep -i 'error' orders.log
This time you should see three lines. Quotes make the pattern easy to identify and are necessary when a pattern contains spaces. grep prints each matching line, not just the word it matched.
Options let you make the result more precise. For example:
grep -n -i 'error' orders.log
grep 'WARN' orders.log
grep -w 'WARN' orders.log
grep -v -i 'error' orders.log
In the first command, -n adds original file line numbers: 2, 5, and 6. Searching for WARN without -w finds both WARN and WARNING, because the letters appear in both. With -w, grep matches WARN as a whole word, so only order 103 appears. Finally, -v reverses the selection: combined with -i, it prints lines that do not contain error in any capitalization.
If a search prints nothing, there may simply be no matching lines. If you instead see a message that the file does not exist, check pwd, ls, and the filename before trusting your result.
Combine searches, counts, and saved results
You could inspect every matching line and count them yourself. A pipe lets wc count the lines selected by grep:
grep -i 'error' orders.log | wc -l
The result is 3. Read it as two jobs: grep selects error lines from the file; wc -l counts the lines it receives. Neither command edits orders.log. You can also supply grep through standard input and get the same count:
grep -i 'error' < orders.log | wc -l
Suppose you want to save a short preview for inspection. The final redirection applies to the output of the command at the end of the pipe:
grep -i 'error' orders.log | head -n 2 > error-preview.txt
cat error-preview.txt
The preview contains the first two matching lines in file order, for orders 102 and 105. It is not a count of all errors. To save all three matches, you could run the following—but notice that it replaces the two-line preview:
grep -i 'error' orders.log > error-preview.txt
wc -l error-preview.txt
Now the preview file has 3 lines. Never redirect a command’s output back into the same file it is reading; for example, do not try to filter orders.log with > orders.log. The shell may empty the destination before the command reads it.
Use >> when you intend to add a new line instead. This command appends a routine log entry to the original practice file:
printf '%s\n' '2027-01-03 INFO order=109 accepted' >> orders.log
tail -n 2 orders.log
wc -l < orders.log
The log now has 9 lines. The earlier lines remain, and a case-insensitive search for error still finds three matches. Repeating an append command would add the line again, however. Preserve existing contents with >>, but check whether a repeated entry is actually wanted.
Key takeaways
grep selects matching text lines; -i, -n, -w, and -v adjust how it searches. A pipe (|) lets another command process those selected lines without an intermediate file. Redirection saves output with > or appends it with >>, while < can supply a file as input. Before using >, check the destination: its previous contents will be replaced.
Next, you will set up a Python virtual environment and install pinned dependencies. The habit you practiced here—knowing where input comes from and where output goes—will remain useful when those commands begin producing files and diagnostic messages of their own.