Recommended resources
The freely available resources this lesson will direct you to.
Hello! Welcome back to our work on optimizing your sleep sanctuary.
In the last lesson, we implemented a strict protocol to achieve near-total darkness, eliminating light as a source of sleep disruption. Today, we address the second major environmental factor that can fragment your sleep: sound.
Your learning outcome for this lesson is to establish a quiet sleep environment using sound masking (e.g., white noise) or blocking (e.g., earplugs) techniques. We will cover two distinct, actionable protocols that you can use separately or together, depending on your environment.
Why Sound Disrupts Your Sleep
Your auditory system never fully shuts down during sleep. It remains vigilant for potential threats. It's not necessarily the volume of a noise that wakes you, but its sudden, intermittent, and unpredictable nature. A car horn, a door slamming, or a dog barking can cause a "micro-awakening," pulling you out of deep sleep stages even if you don't consciously remember it.
The goal is to create a consistent and predictable sound environment. This can be achieved in two ways: by physically blocking sound or by masking it.
Protocol 1: Sound Blocking
Sound blocking is the most direct approach: preventing noise from ever reaching your eardrums. The primary tool for this is earplugs.
However, their effectiveness is almost entirely dependent on correct insertion. Simply pushing them into your ears is ineffective.
The Earplug Insertion Protocol
Different types of earplugs exist, but the most common and effective for sleep are formable foam earplugs. The insertion technique is critical.
To see exactly how this is done correctly and incorrectly, watch this short, practical demonstration from an audiologist.
How to use FOAM Hearing Protection and Ear Plugs - Proper Insertion Technique
This video, 'How to use FOAM Hearing Protection and Ear Plugs,' provides a clear, no-nonsense guide to the proper insertion technique. The difference between correct and incorrect insertion is the difference between blocking noise and getting zero protection.
Watch from 00:44 to 02:16. Pay close attention to the four key steps demonstrated: 1) rolling the earplug into a thin cylinder, 2) pulling the ear up and back, 3) inserting it deep into the canal, and 4) holding it in place while it expands. Note the visual difference between a correctly and incorrectly inserted plug.
To summarize the protocol for foam earplugs:
- Roll: With clean hands, roll the earplug between your fingers into a tight, thin, crease-free cylinder.
- Pull: With your opposite hand, reach over your head and pull the top of your ear up and back. This straightens the ear canal.
- Insert: Gently slide the rolled-up earplug deep into your ear canal.
- Hold: Hold the earplug in place with your fingertip for 20-30 seconds, allowing it to expand and create a complete seal.
When inserted correctly, the end of the earplug should be barely visible when looking at yourself straight-on in a mirror.
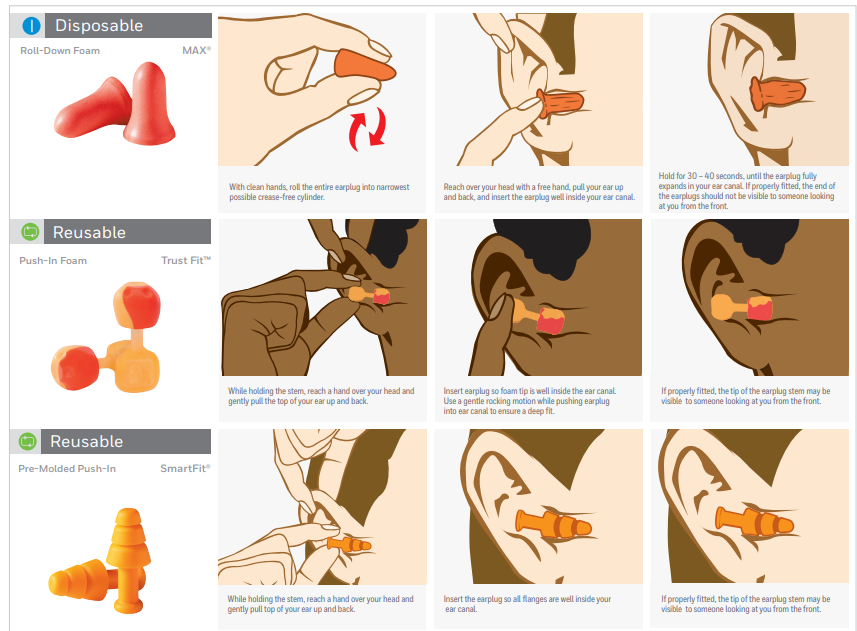
For more details on different types of earplugs, including pre-molded ones, the National Institute on Deafness and Other Communication Disorders (NIDCD) provides a simple guide. You can review the document "Hearing Protectors" (resource_id: [LINK](https://www.nidcd.nih.gov/sites/default/files/documents/health/hearingprotectors.pdf)) if you find foam earplugs aren't a good fit for you.
Protocol 2: Sound Masking
Sound masking works on a different principle. Instead of aiming for silence, you introduce a constant, steady, and unobtrusive sound into your environment. This raises the baseline level of ambient noise, making sudden, disruptive sounds (like traffic or a neighbor's TV) less jarring and noticeable.
Step 1: Choose Your Sound "Color"
Not all masking sounds are the same. They are often categorized by "color," which describes how sound energy is distributed across different frequencies.
Best Noise for Sleep: A Simple Guide You Can Use Tonight
To understand which sound to use, read this guide from BetterSleep. It explains the differences between the most common noise colors and provides specific use-cases for each.
Read the sections 'Noise Colors 101' and 'Choose the Best Noise for Sleep for Your Situation'. Focus on the descriptions of white, pink, and brown/red noise and the table that matches them to specific problems like city noise or talking.
Here is a quick-reference summary based on the article:
| Noise Color | What it Sounds Like | Best For Masking... |
|---|---|---|
| White | A steady "hiss" | Higher-frequency sounds like speech/TV |
| Pink | A deeper "shhh" | General use, less harsh than white |
| Brown | A low "rumble" | Low-frequency sounds like traffic/drones |
Your task is to match the sound color to the type of noise that disrupts your sleep.
Step 2: Choose Your Device
You have several options for generating these sounds. You don't necessarily need to buy a dedicated machine. To help you decide, let's look at a head-to-head comparison.
I Compare The Sound Masking Of White Noise Machines And Speakers
This video, 'I Compare The Sound Masking Of White Noise Machines And Speakers,' tests the effectiveness of various devices. It's a perfect example of comparing options to find the best tool for the job.
Watch the following segments to understand the pros and cons of each setup: Smartphone only (03:46 - 04:52) Smartphone + Bluetooth Speaker (04:52 - 06:11) Echo Dot (smart speaker) (08:32 - 09:36) Final Results & Conclusion (09:36 - 13:47) Focus on the conclusion about which setups are most effective, especially the surprising power of a phone paired with a decent Bluetooth speaker.
Key findings from the comparison:
- Smartphone Alone: Loud, but the sound is often directional and doesn't fill the room effectively.
- Dedicated White Noise Machine: Very effective and loud, but an added expense.
- Smartphone + Bluetooth/Smart Speaker: A highly effective and cost-efficient combination. A good speaker can fill the room with sound and even mask low-frequency bass noises that other devices miss.
Given your existing tech, starting with a phone app (like BetterSleep, myNoise, or a YouTube track) paired with a Bluetooth or smart speaker is the most practical first step.
Step 3: Safety & Implementation Protocol
Using sound masking is simple, but there are critical safety rules to follow to protect your hearing.
- Set Volume Low: The volume should be just high enough to mask the target noise. A good rule of thumb: you should be able to hold a conversation at a normal volume over the sound. Aim for under 50 decibels (dB), which is roughly the level of a quiet refrigerator hum.
- Place Device at a Distance: Do not place the sound source right next to your head. Position it at least 6-10 feet away.
- Use a Timer (Optional but Recommended): Some research suggests it might be better not to have masking sound playing all night. Start by setting a timer for 90-180 minutes to help you fall and stay asleep through the initial period. If you find you wake up when the sound turns off, you can set it to play all night, but keep the volume low.
- Avoid Earbuds: Playing masking sounds through earbuds all night is not recommended due to the risk of hearing damage. Use an external speaker.
Test your understanding!
You are staying in a hotel room facing a busy street. You are being disturbed by two main noises: the low-frequency rumble of buses and the higher-frequency chatter of people from the bar next door.
What two-part strategy, combining both blocking and masking protocols, would be most effective for this specific situation?
Show answer
- Masking for the Rumble: Use a sound app on your phone connected to a portable speaker to play Brown Noise. This low-frequency sound is ideal for masking the rumbling from traffic.
- Blocking for the Chatter: Correctly insert a pair of foam earplugs. This will physically block the higher-frequency sound of people talking, which the brown noise may not fully cover.
This combination strategy targets both types of disruptive noise with the appropriate tool for each.
Conclusion
You now have two distinct, protocol-driven methods to protect your sleep from noise. By creating a stable auditory environment, you prevent the micro-awakenings that fragment sleep and drain your energy.
Key Takeaways:
- Sleep is disrupted by intermittent, unpredictable sounds, not just volume.
- Sound Blocking (Protocol 1) uses earplugs to physically stop noise. Correct insertion is non-negotiable for effectiveness.
- Sound Masking (Protocol 2) uses a constant sound (like white, pink, or brown noise) to make disruptions less noticeable. Match the sound color to the problem noise.
- A phone paired with a good Bluetooth speaker is a powerful and practical sound masking tool.
- Always follow the safety protocol: low volume, device at a distance.
In the last lesson, we soundproofed your sleep sanctuary from light. Today, we've done the same for noise. In our next lesson, we will optimize the final critical environmental variable: temperature. You will learn the ideal temperature range for sleep and how to set up your bedroom to achieve it.