Recommended resources
The freely available resources this lesson will direct you to.
Hello! Last time, you prepared a stable page, a pencil, and a household object you could observe comfortably. Keep that setup: today the work is to draw the object’s visible edges, rather than shade it or draw the version of it you remember.
This lesson takes about 40 minutes, including time to make a drawing. By the end, you should have a contour drawing of one object, with its outer boundary and a few useful edges inside it.
What counts as a contour?
A contour line follows a visible boundary. The most obvious one is the outer contour: the edge where your object ends and the background begins. Some boundaries occur inside that outline. On a mug, for example, you might see the edge of its opening and the edges around the space inside its handle.
A contour is not a line around every patch of dark or light. A shadow on the side of a mug may change gradually without any definite edge to trace. For this study, use lines to record boundaries you can actually locate with your eyes, and leave shading for a later lesson.
In the image below, notice how the spoon’s outer edge distinguishes it from the white background. Lines inside the spoon and the other objects describe selected visible features; they are not instructions to fill every surface with marks.
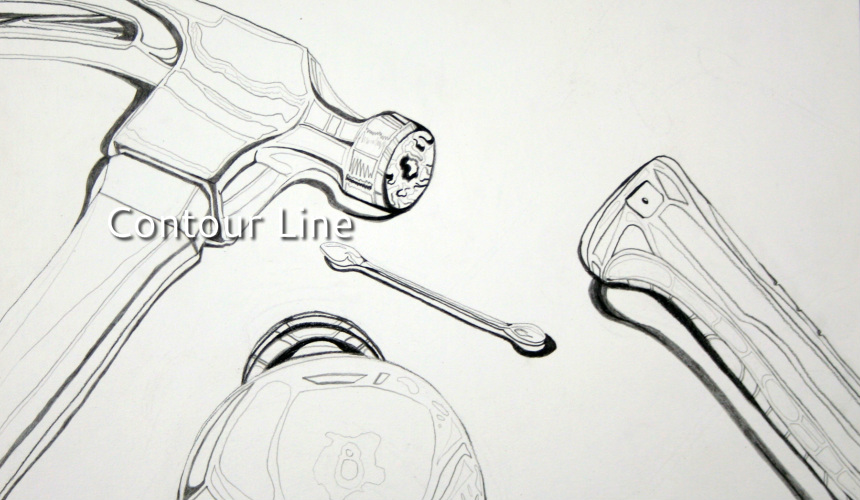
Mrs. Cook’s Art Class gives a useful name to the approach we will take: modified contour. Unlike a blind contour drawing, it lets you glance at your paper and lift your pencil to begin another line.
Contour Line - Mrs. Cook's Art Class
Read the opening definition and the “Modified Contour” subsection to see what makes this an observational drawing rather than a shading exercise.
Under “What is Contour LIne?”, read the definition in the first paragraph. Then find “Modified Contour,” after the “Blind Contour” and “Continuous Line Contour” examples. Read its two short paragraphs, beginning with the permission to look at the paper and pick up the pen; in the looking guidance, focus on why brief glances help you place a new line. Treat the suggested looking percentages as a reminder to attend mainly to the object, not as a rule you must time.
Let your eye lead your hand
Place your object where it was last lesson, or choose another simple one. A plain mug works well because it has both an outside edge and a few distinct inside edges. Turn it until you can clearly see the handle, and then leave both the mug and your viewing position unchanged.
Before touching the page, choose one point on the object’s boundary. Follow that edge slowly with your eyes for a short distance. Notice where it curves, where it becomes straighter, and where it changes direction. You are looking for the particular path of this edge, not the familiar symbol for “mug.”
Contour Drawing: What Is It? How Do You Do It?
Watch “Contour Drawing: What Is It? How Do You Do It?” from The Pencil Room Online for a demonstration of keeping eye and drawing hand together.
In the demonstration, watch how the pencil begins at one observed point and moves as the gaze travels along the edge. Notice the slow pace and the brief checks of the paper. The presenter keeps the pencil down for this exercise; for your drawing, you may lift it when a visible line ends or when you need to reposition your hand.
Move your pencil as slowly as you can follow the edge attentively. Look at the object much more often than the page, but glance down when you need to check where your line is going. A light pencil mark is enough. If it wanders, return your gaze to the object and continue from a point you can identify; you need not erase every uncertain mark.
Draw the outside first
Set aside about 10–12 minutes for the outer contour. The goal is a recognizable boundary, not a perfectly smooth one. On a mug, that boundary may run along the visible rim, down one side, around the base, and out around the handle. Its exact route depends on your viewpoint. Where the handle disappears behind the mug, stop the line at the point where it disappears; do not draw the part you believe continues behind it.
The following demonstration uses several keys, which are more complicated than the single object you are drawing. Watch for its useful organizing decision: the artist treats everything visible as one outside silhouette before adding inner edges.
Draw Anything with Contours: How to Draw #3
In “Draw Anything with Contours: How to Draw #3,” Danny Gregory of Sketchbook Skool demonstrates how to find and draw an outer boundary.
Watch the setup for the outside-first approach, then the outer contour as he follows the keys’ silhouette. Concentrate on how he responds to small turns in the visible edge rather than substituting a generic shape. You can work more slowly than he does.
Now draw your object’s outside edge. Begin at a point you can find easily on both the object and the page. Follow one short section with your eyes, draw that section, and continue. You may lift your pencil and start again after checking your position. If your line does not meet its starting point neatly, leave it for now: the purpose is to strengthen the connection between looking and marking.
Add only the inner edges you can see
Once the silhouette is in place, spend about 8–10 minutes on the most informative lines inside it. For a mug, these might be the near and far edges of the opening and the boundary around the open space in the handle. That open space is background, even though it sits inside the mug’s overall outline. Drawing its boundary helps the handle read clearly.
Look for where each inner line starts and stops. An edge that vanishes behind another part should end there. Resist completing it from memory. You also do not need to trace a soft highlight, a gradual change in tone, or a cast shadow merely because it is visible. Ask whether you can follow a definite boundary with your eye.
Draw Anything with Contours: How to Draw #3
Return to Danny Gregory’s demonstration to see how the outside shape provides a place for the inner edges.
In the inner contours, notice how he places the ring openings and the edges of overlapping keys within the silhouette. Watch in particular for lines that end when one part passes behind another. Apply that observation to your simpler object; its details need not be as numerous as the keys’.
When you finish, look from your object to your drawing once more. Can you identify its outside boundary? Can you point to each inner line on the actual object? If a mark represents a feature you know is there but cannot see from your seat, leave it out or gently erase it. Keep the drawing as a record of this view.
A contour drawing can be accurate and useful without shading or a polished finish. You have practiced three linked decisions: follow the observed outer edge, place a few visible inner edges, and stop lines where visibility stops. Keep your drawing and object if you can. In the next lesson, you will build on this close observation by checking an object’s overall proportions with basic geometric shapes.