Recommended resources
The freely available resources this lesson will direct you to.
Hello! In the previous lesson, you followed an object’s visible edges to make a contour drawing. Today you will make a different decision before drawing those edges: how tall and wide is the object, and what simple shapes account for its main parts?
This lesson takes about 40 minutes. You will build a light framework for one household object, check its proportions, and then use the framework to guide a more specific outline. Keep your pencil, eraser, paper, and an object you can leave in one position while you work.
See the structure before the details
A contour records the particular route of an edge. Construction begins with a simpler sketch that establishes where the major parts belong. A bottle, for instance, might begin as a broad rectangle for its body, sloping shapes for its shoulders, and a narrow rectangle for its neck. Those shapes need not match every curve. They give you something you can check and revise before committing to a detailed outline.
Read the short section below, paying particular attention to the chair and bottle examples.
The Elements of Art - Shape - The Virtual Instructor
Read The Virtual Instructor’s explanation of construction to see how simple shapes support a more accurate contour drawing.
Under “Drawing and Painting with Shapes,” begin at the paragraph “But the shape of this chair is complex.” Read the examples through the bird example, ending with the sentence about using shapes as a guide. Look at the accompanying chair, bottle, hand, and bird images. Notice that the first shapes establish the size and placement of parts; the observed contours come later.
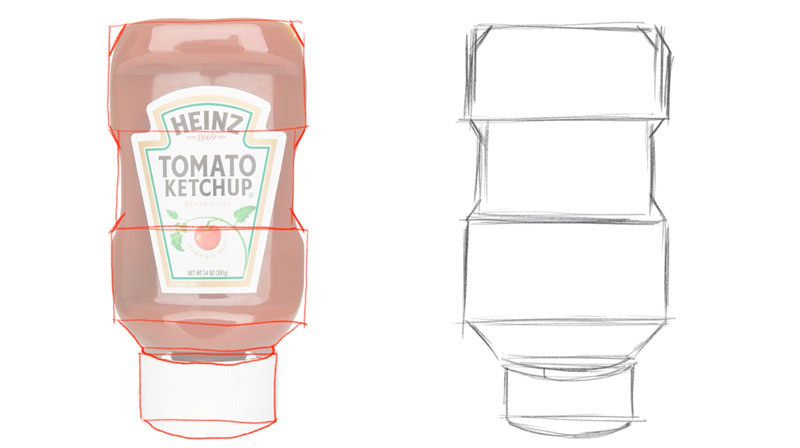
In the image below, the bottle is shown cap-down. The red lines divide it into broad sections, while the sketch on the right keeps those sections and leaves out the label and other surface details. It is a framework, not a finished drawing—and not a pattern you need to copy if your object is upright.
Make the large shape proportionate
A well-placed set of shapes can still produce an inaccurate drawing if the whole object is too wide, too short, or squeezed into one part of the page. Proportion means the size of one part relative to another. Start with the simplest comparison: the object’s full visible height against its full visible width.
Watch this demonstration of pencil measuring. You do not need to reproduce the instructor’s object; focus on keeping the measurement consistent when comparing height with width.
Learn How To Draw Pt 4: Get Your Proportions Right!
Watch “Learn How To Draw Pt 4: Get Your Proportions Right!” from The Pencil Room Online for a practical way to compare an object’s dimensions without relying on a ruler.
Watch the introduction for what proportion means, then pencil measuring for the height-to-width comparison and how to draw the same ratio at a different size. Notice that the drawing can be larger or smaller than the object while retaining its proportions.
To make the comparison yourself, hold your pencil at arm’s length, keep your viewing position steady, and use one eye consistently. Align the pencil with the object’s visible width; mark that distance along the pencil with your thumb. Keeping your arm extended, turn the pencil to compare that width with the object’s height. Is the height roughly twice the width, or closer to three times? An estimate is useful: if the object looks about two and a half widths tall, a sketch that is one width tall will look noticeably compressed.
Before drawing its parts, lightly mark the object’s top, bottom, leftmost, and rightmost limits on your page. These marks set the space it will occupy. Check the height-to-width relationship between them. If it seems wrong, moving four light marks is much easier than redrawing a carefully finished bottle.
Construct one object from a few shapes
Choose a fairly simple object, such as a bottle or a plain jar, and keep your eyes and the object in the same positions as you draw. The next demonstration shows a bottle assembled from larger forms before its distinctive curves are added. Its cylindrical forms are useful for thinking about volume, but you can begin your own page with the simpler flat shapes you see in the bottle image.
Learn How To Draw Pt 3: How To Use Simple Shapes To Draw Objects
Watch the bottle portion of “Learn How To Draw Pt 3: How To Use Simple Shapes To Draw Objects,” from The Pencil Room Online, to see a framework revised into a recognizable object.
Watch the bottle demonstration. Follow how the instructor places the main body, narrowing upper section, and small top section before adjusting the outline. Notice the light centerline used to check whether those sections sit together.
Now allow about 18 minutes to make your drawing:
- Set the overall limits. Lightly mark the top, bottom, and widest points. Compare height with width as demonstrated. Leave a little space around the object on the page.
- Place two or three major shapes. For an upright bottle, you might use a large rectangle for the body, a trapezoid for the narrowing shoulders, and a smaller rectangle for the neck or cap. Compare their heights: where do the shoulders begin, and how much of the total height does the cap occupy? Use a faint centerline if it helps you align them.
- Check before refining. Look back at the object. Is the body wider than the neck by the right amount? Is its widest point at the right height? Adjust the framework now. You can draw a corrected light line beside an earlier one, then erase the line you no longer need.
- Follow the observed edges. Use the shapes as guides while drawing the actual contour. Round corners that are round; keep straight edges that are straight. As in the previous lesson, stop at edges that disappear from view. Leave labels, texture, and shading out of this study.
Your final outline need not follow every construction line. Some faint guidelines can remain visible: they show how you arrived at the drawing. The important result is an object whose overall height, width, and main sections agree with what you see.
Construction gives your contour drawing a foundation. Measure the whole object first, place its largest shapes next, and refine its visible edges last. If something looks wrong, compare a specific relationship—such as body width against cap width—rather than guessing at the entire drawing.
In the next lesson, you will use light and dark values to make a simple form appear three-dimensional. Today’s proportionate outline will give that shading a sound place to begin.