Recommended resources
The freely available resources this lesson will direct you to.
Hello! Last time, you used simple shapes to make an object’s outline proportionate. An accurate outline gives you a place to start, but it does not yet tell the viewer whether the object is flat or solid. Value—how light or dark an area appears—can make that difference.
In about 40 minutes, you’ll make a five-step value scale and use it to shade a simple rounded form under one light. You’ll need paper, a pencil, an eraser, and, if possible, a plain ball or round fruit and a lamp. A single pencil is enough; the differences between your five values matter more than achieving perfect black.
Let one light explain the form
Place your round object on a table and aim one lamp at it from above and to one side. Try to reduce competing light from nearby lamps or windows. Keep the object, lamp, and your viewing position steady while you draw. With one dominant light, the bright side and shadow side are easier to distinguish.
Watch the opening and sphere demonstration in How to Shade Basic Forms – Pencil Tutorial by Drawing & Painting – The Virtual Instructor. Notice that the instructor starts with a circle, then places darker values according to the light rather than filling the circle evenly.
How to Shade Basic Forms - Pencil Tutorial
Watch How to Shade Basic Forms – Pencil Tutorial by Drawing & Painting – The Virtual Instructor to see how shading gives a flat outline the appearance of volume.
Watch shape and value for the distinction between a circle and a sphere and the names of the main light and shadow areas. Continue with sphere shading; focus on how the darkest area is built gradually and how the cast shadow helps the sphere appear to rest on a surface.
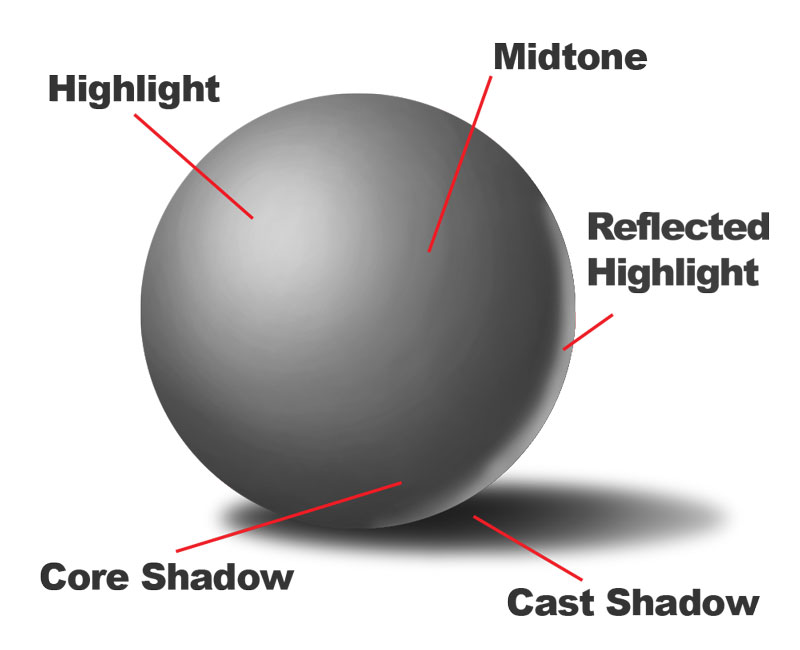
The labeled sphere below gives you a map. The highlight receives the strongest light; the midtone is less directly lit. The core shadow is a dark area on the sphere, while the cast shadow falls on the table because the sphere blocks the light. Light bouncing from the surroundings may brighten part of the shadow side; the image calls this a reflected highlight. It is not a second lamp or a second bright-side highlight.
Make five values you can reuse
A real sphere has many subtle changes in value. For this study, you will simplify them into five recognizable steps. In the image below, the upper bar changes continuously from white to black; the lower bar divides that range into five choices. You are making a version of the lower bar.
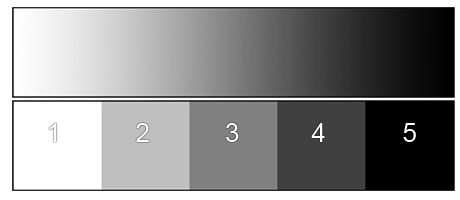
Draw five small boxes beside the area where you plan to draw your sphere. Leave box 1 as white paper. Shade box 2 lightly, box 3 to a clear middle gray, box 4 dark, and box 5 as dark as your pencil comfortably allows. Build the darker boxes with repeated light passes rather than pressing hard enough to dent the paper. Allow about 6 minutes for this scale.
You will use 1–3 for the light side and 4–5 for the shadow side. That separation is more important than making every box perfectly even. The following passage from Go From Flat to Realistic Shading! Here’s How by Proko shows why a limited set of tones can describe a form without a perfectly smooth gradient.
Go From Flat to Realistic Shading! Here’s How
Watch the five-value portion of Go From Flat to Realistic Shading! Here’s How by Proko. It offers a way to organize light and shadow into a few distinct values.
In five-tone grouping, look for three values assigned to the light side and two to the shadow side. Then watch value relationships for the reminder that values do not simply grow darker in a straight progression across the form: reflected light can brighten part of the shadow side.
Your five boxes are a set of choices, not five stripes that must cross the sphere in order. The core shadow might be value 5, while reflected light near the far edge might rise to value 4. Keep that reflected area darker than the lit midtones; otherwise the direction of the main light becomes unclear.
Shade one rounded form
Allow about 20 minutes for the drawing. If you do not have a suitable object and lamp, use the labeled sphere above as your lighting reference. Either way, commit to one light direction for the whole drawing.
- Establish the outline and light direction. Draw a light circle, roughly the width of your palm. Mark a small point outside it on the side from which the light comes. Imagine the sphere resting on a tabletop, and lightly indicate where it touches the surface.
- Find the two big groups. Look for the broad area facing the light and the area turning away from it. Leave the brightest patch at value 1. Shade much of the lit side with values 2 and 3, keeping your strokes light enough to add another layer where needed.
- Give the shadow side its own range. Lay in value 4 on the side turned away from the light. Deepen a portion to value 5 for the core shadow. If you see reflected light near the far edge, keep it subtle—approximately value 4, not white paper. Small, overlapping pencil strokes can soften a transition without losing the distinction between the light and shadow groups.
- Anchor the sphere. Add a cast shadow on the tabletop, extending generally away from the lamp. It can use value 4 across much of its area and value 5 close to where the sphere meets the table. Check that this shadow is on the surface, rather than inside the sphere’s outline.
Pause and compare your drawing with your five boxes. Is the midtone clearly lighter than the shadow side? Does the brightest area agree with the lamp’s position? If an area became too dark, lift graphite gently with your eraser instead of trying to cover it with heavier shading elsewhere. A clearly organized light side, shadow side, and cast shadow will convey volume even if the transitions are not perfectly smooth.
Your outline describes where the form ends; your values describe how it turns in light. Keep the five-step scale nearby as you draw: three lighter choices for the lit side, two darker choices for the shadow side, with a cast shadow that agrees with your single light source.
This completes the Drawing What You See module. Next, you’ll begin painting with color by mixing secondary and neutral colors from a limited set of primary paints. The habit of noticing light, middle, and dark values will remain useful when the medium changes.