Recommended resources
The freely available resources this lesson will direct you to.
Welcome back. In the previous lesson, you made focused commits in your local Maven repository. Those commits gave the expense-tracker project a history; now you can create a separate line of work without putting an unfinished change on the main branch.
In this lesson, you’ll develop a small Java change on a feature branch, verify it, and merge it into your repository’s main branch. Everything happens locally. You do not need a GitHub account yet.
Give a change its own branch
A branch lets you commit work for one task while the main line stays at its existing commit. It is more precise to think of a branch as a movable name for a commit than as a second copy of the entire project. Your current branch receives each new commit you make, and Git adjusts the files in your working directory when you switch between committed versions.
Watch how Git Branching and Merging - Detailed Tutorial by SuperSimpleDev introduces this workflow. The demonstration calls its main branch master; your repository may call it main.
Git Branching and Merging - Detailed Tutorial
Watch the branching demonstration to see why unfinished feature commits belong on a separate branch and how Git shows which branch is active.
Start with the motivation for separating feature work from an urgent fix. Then skip the sample repository setup and watch branch creation and feature commits. Focus on the fact that creating a branch and switching to it are distinct actions in the demonstration.
Let’s use your existing Maven repository rather than start another one. In the directory containing pom.xml, check both the branch name and the working tree:
git branch --show-current
git status
The commands below use main. If your main branch is named master, substitute master wherever you see main; there is no need to rename it. Before creating the feature branch, make sure you are on that main branch and that git status reports a clean working tree. If you still have edits in progress, commit the intended work separately before switching. Uncommitted changes can sometimes follow you between branches, or prevent a switch, so they are a poor starting point for this demonstration.
Create and switch to a branch named for the task in one command:
git switch -c feature/expense-display
git branch --show-current
The second command should print feature/expense-display. Git now has two branch names pointing at the same starting commit. They will diverge when you make a commit on the feature branch. If your Git installation does not recognize git switch, git checkout -b feature/expense-display performs the same create-and-switch operation.
Develop and commit the change
Make a small change that fits the project: add a helper that produces a readable label for an expense amount. If your project already has a Java package, put the class in that package’s directory and add the matching package declaration. Otherwise, create src/main/java/ExpenseDisplay.java with:
public final class ExpenseDisplay {
    private ExpenseDisplay() {
    }

    public static String label(String category, int amountInCents) {
        return category + ": " + amountInCents + " cents";
    }
}
This deliberately modest change keeps the Git workflow in view. It uses cents so that the example does not introduce floating-point currency calculations. The class can be extended or replaced when you design the expense API later.
Before committing, run the Maven checks available in your project:
mvn test
git status
Even if the project has no tests for this new class yet, mvn test checks that its main Java sources compile. It does not prove the new method’s behavior without an appropriate test. If the build fails, address the failure rather than merging a change you know is broken.
Stage only the file you intended to add, review the staged change, and commit it on the feature branch:
git add src/main/java/ExpenseDisplay.java
git diff --staged
git commit -m "Add expense display helper"
git status
Use the file’s actual path in git add if you placed it in a package directory. Your last status check should show a clean working tree. The staging area works just as it did in the previous lesson; the difference is which branch receives the commit.
Now switch back and inspect where the two branches point:
git switch main
git log --oneline --decorate --all --graph -6
The graph should show the new commit beside feature/expense-display, while main still points to the earlier commit. Because the new class was committed only on the feature branch, it should not appear in main’s checked-out files yet. It has not been lost: switching back to the feature branch would restore that committed version.
Merge into the branch you want to update
A merge updates the branch you are currently on by incorporating another branch’s work. Since you want the finished change on main, stay on main and merge feature/expense-display into it—not the reverse.
The video now shows the merge direction in a project where the main branch also gained a separate fix while the feature was in progress:
Git Branching and Merging - Detailed Tutorial
Continue the SuperSimpleDev tutorial to see how changes on separate branches are combined and why the active branch determines where the result goes.
Watch merge intuition, then the local merge. At the point where the presenter switches to master before merging, relate that choice to your own need to update main. The example’s branches have diverged, so its merge produces a merge commit; your simpler example will usually fast-forward instead.
That distinction is worth understanding before you run the command. Read the two relevant passages in Git - Basic Branching and Merging from the Git book:
Git - Basic Branching and Merging
Read the Git book’s contrasting examples to understand why some successful merges create a new merge commit and others do not.
In “Basic Branching,” find the hotfix example after the hotfix has been committed. Read the fast-forward example, continuing through the paragraph that names a “fast-forward.” Then, in “Basic Merging,” start where the text says to check out the branch you wish to merge into. Read the divergent case through the explanation of the merge commit. You can stop before “Basic Merge Conflicts”; resolving conflicts is the next lesson.
If main has not advanced since you created your feature branch, Git can simply move the main branch name to the feature commit. That is a fast-forward merge: the change is on main, but no extra merge commit is necessary.
If both branches have acquired different commits since their common starting point, Git must combine their snapshots. When it can do so automatically, it creates a merge commit with two parents. The Git book’s diagram shows that second situation:
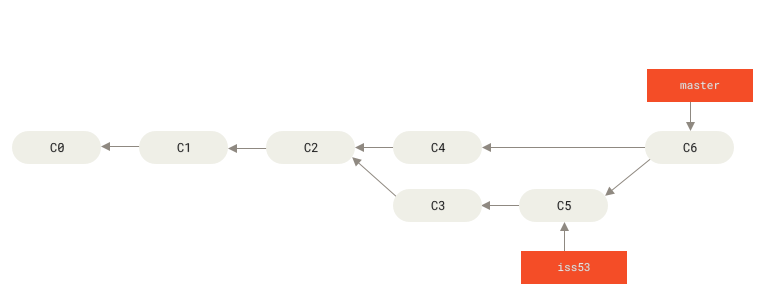
Your repository should be set up for the simpler fast-forward case. Confirm that you are on main and have no uncommitted changes, then merge:
git status
git merge feature/expense-display
git log --oneline --decorate --all --graph -6
Look for Fast-forward in the merge output. In the graph, main should now point to the commit that added ExpenseDisplay.java. That is a successful merge even though you see no separate “Merge branch” commit. If main had advanced independently, a clean merge could instead create a merge commit.
Finally, verify the result from the updated main branch:
mvn test
git status
Check that the new file is present. If the build succeeds and the working tree is clean, you can remove the now-unneeded local feature branch:
git branch -d feature/expense-display
Deleting its branch name does not delete the merged change: main now includes that commit. The -d option also guards against deleting a branch whose work has not been merged.
If git merge reports a conflict instead of completing, stop before deleting anything. Run git status to see which files need attention; Git has paused rather than silently choosing which change to keep. The next lesson will take you through resolving that situation without losing either intended change.
Key takeaways
Create a branch from a clean main branch, switch to it, and commit the change there. To bring the change back, switch to the destination branch and run git merge with the feature branch’s name. A fast-forward moves the destination branch name; divergent histories may require a merge commit. In either case, verify the resulting files and build on main before removing the feature branch.
Next, you’ll handle the case Git cannot merge automatically: two branches changing the same part of a file in incompatible ways.