Recommended resources
The freely available resources this lesson will direct you to.
- Finetune LLMs to teach them ANYTHING with Huggingface and Pytorch | Step-by-step tutorialwww.youtube.com
- LLM Fine-Tuning 14: Train LLMs on Your PDF/Text Data | Domain-Specific Fine-Tuning with Hugging Facewww.youtube.com
- Fine-Tuning Your First Large Language Model (LLM) with ...huggingface.co
- Quickstarthuggingface.co
Hello! Let's get started on the next phase of our fine-tuning project.
In our last two lessons, we prepared our raw data by formatting it into a structured prompt-response format and then splitting it into training and validation sets. We now have all the data we need, properly organized.
Today, we'll write the foundational script that brings everything together. The learning outcome for this lesson is to write a script to load a pre-trained model, tokenizer, and the prepared dataset. This is the final step in assembling our components before we can configure and launch the fine-tuning job.
The Fine-Tuning Pipeline: Key Components
At a high level, a fine-tuning script needs to orchestrate three main components:
- Tokenizer: Prepares the text data by converting it into a numerical format the model can process.
- Model: The pre-trained LLM that we will be fine-tuning.
- Dataset: Our collection of training and validation examples.
The following diagram illustrates this general flow. Our focus today is on loading and preparing the 'Tokenizer' and 'Model' for our custom 'Dataset'.
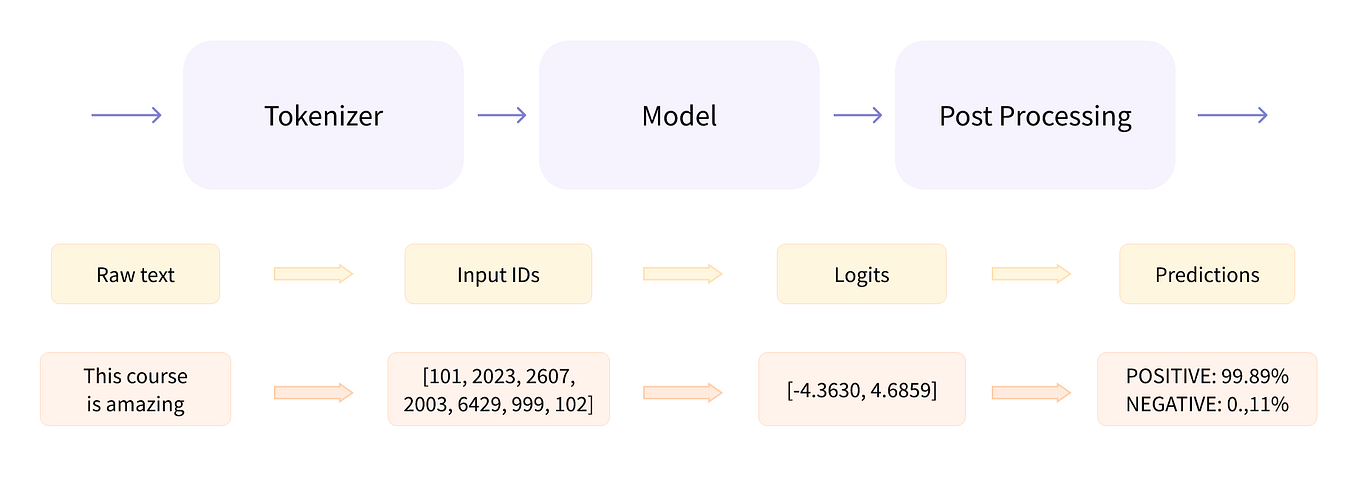
We'll use the Hugging Face transformers and datasets libraries, which provide convenient, high-level APIs for these tasks.
1. Loading the Model and Tokenizer
The first step in our script is to choose a base model and load it along with its corresponding tokenizer. It is critical that the tokenizer matches the model, as it knows the specific vocabulary and special tokens the model was trained on.
The Hugging Face Hub acts as a central repository for thousands of models. We can load them using the AutoClass feature, which automatically selects the correct architecture.
AutoTokenizeris used for loading tokenizers.AutoModelForCausalLMis used for loading models intended for text generation (Causal Language Modeling).
This video provides a great overview of this process.
Finetune LLMs to teach them ANYTHING with Huggingface and Pytorch | Step-by-step tutorial
The video 'Finetune LLMs to teach them ANYTHING with Huggingface and Pytorch' begins by showing exactly how to load a model and tokenizer from the Hugging Face Hub.
Watch from 2:12 to 3:58. The narrator demonstrates loading the Llama 3 model and its tokenizer using AutoModelForCausalLM and AutoTokenizer, explaining what these components are at a high level.
A Practical Concern: Memory Management
Large Language Models are, by definition, large. Loading a full-precision model can require tens or even hundreds of gigabytes of GPU RAM, which is often not feasible on consumer hardware.
A common solution is quantization, a technique that reduces the model's memory footprint by representing its weights with lower-precision numbers (e.g., 4-bit instead of 32-bit). This allows us to load and fine-tune massive models on more accessible hardware.
The transformers library integrates this capability through the BitsAndBytesConfig. You can specify the quantization settings and pass them directly to the from_pretrained method.
Let's look at how to load a model with 4-bit quantization and its tokenizer.
Fine-Tuning Your First Large Language Model (LLM) with PyTorch
The Hugging Face blog post 'Fine-Tuning Your First Large Language Model (LLM) with PyTorch' provides excellent, copy-and-paste ready code for this.
Please read two short sections: 'Loading a Quantized Base Model': This section shows how to create a BitsAndBytesConfig and use it to load a 4-bit quantized model with AutoModelForCausalLM.from_pretrained(). 'Tokenizer': This section demonstrates loading the corresponding tokenizer with AutoTokenizer.from_pretrained() and, importantly, shows how to set a pad_token if one is missing, which is a common requirement.
Here is a summary of the code from the article you just reviewed:
import torch
from transformers import AutoModelForCausalLM, AutoTokenizer, BitsAndBytesConfig


# 1. Define the model repository ID
repo_id = 'microsoft/Phi-3-mini-4k-instruct'


# 2. Configure quantization
bnb_config = BitsAndBytesConfig(
   load_in_4bit=True,
   bnb_4bit_quant_type="nf4",
   bnb_4bit_use_double_quant=True,
   bnb_4bit_compute_dtype=torch.float16 # Use float16 for faster computation
)


# 3. Load the quantized model
model = AutoModelForCausalLM.from_pretrained(
   repo_id,
   device_map="auto", # Automatically maps the model to available devices (e.g., GPU)
   quantization_config=bnb_config
)


# 4. Load the tokenizer
tokenizer = AutoTokenizer.from_pretrained(repo_id)


# 5. Set the padding token
# Some models don't have a pad token, so we set it to a special token like the end-of-sequence (eos) token.
if tokenizer.pad_token is None:
    tokenizer.pad_token = tokenizer.eos_token
2. Loading and Preparing the Dataset
In the previous lesson, you learned how to create a training and validation split. Now, we'll load this data in our script. The datasets library simplifies this with the load_dataset function, which can pull data directly from the Hugging Face Hub or local files.
Once loaded, the dataset isn't ready for the model yet. We need to apply the tokenizer to convert the text fields into input_ids. This step is often done using the dataset's .map() method, which efficiently applies a function to every example.
When fine-tuning for text generation, the goal is for the model to predict the next token in a sequence. To achieve this, we create labels for our training data. In the simplest case for Causal LMs, the labels are a copy of the input_ids. The model's loss function will then automatically handle shifting these labels to ensure it's always predicting the next token.
This short video demonstrates exactly this process: loading a dataset, defining a tokenization function that creates labels, and mapping it to the dataset.
LLM Fine-Tuning 14: Train LLMs on Your PDF/Text Data | Domain-Specific Fine-Tuning with Hugging Face
The video 'LLM Fine-Tuning 14' walks through preparing a custom dataset for non-instructional fine-tuning. The logic it shows for tokenization and label creation is standard practice.
Please watch from 1:21:55 to 1:25:36. Focus on these key steps: A pre-processing function is defined that takes a data sample. The tokenizer is called on the text. Notice the truncation and padding arguments. The labels are created by simply copying the input_ids. This function is applied to the entire dataset using .map().
Here's a code snippet that encapsulates this process, adapted from the official Hugging Face documentation. It loads a dataset, defines a tokenization function, and applies it.
from datasets import load_dataset


# We'll use the yoda dataset from the blog post, which is already formatted
dataset = load_dataset("dvgodoy/yoda_sentences", split="train")


# As you learned in the last lesson, we split it
split_dataset = dataset.train_test_split(test_size=0.1, seed=42)


# Define the tokenization function
def tokenize_function(examples):


    # This assumes your text is in a column named 'text'. Adjust if your column name is different.
    # We are tokenizing a formatted string that includes both prompt and completion.
    # The example uses a special format; a simpler approach is to concatenate:
    # formatted_text = [f"User: {p}\nAssistant: {c}" for p, c in zip(examples['sentence'], examples['translation_extra'])]
    # For now, let's just tokenize the input sentence for simplicity of demonstration.
    output = tokenizer(examples["sentence"], truncation=True, max_length=128)
    return output


# Apply the tokenization to our train and validation splits
tokenized_datasets = split_dataset.map(tokenize_function, batched=True)


# You can remove the original text columns as they are no longer needed
tokenized_datasets = tokenized_datasets.remove_columns(["sentence", "translation", "translation_extra"])

print(tokenized_datasets)


# Output will show a DatasetDict with 'train' and 'test' splits,
# now containing 'input_ids' and 'attention_mask'.
Note: The actual formatting of text before tokenization depends heavily on the model's expected format (e.g., chat templates). The key step shown here is the .map() operation itself.
Putting It All Together: A Complete Script
We now have all the building blocks. Let's assemble them into a single script that accomplishes our goal.
import torch
from datasets import load_dataset
from transformers import AutoModelForCausalLM, AutoTokenizer, BitsAndBytesConfig


# --- 1. Configuration ---
MODEL_ID = "microsoft/Phi-3-mini-4k-instruct"
DATASET_ID = "mrdbourke/FoodExtract-1k"


# --- 2. Load Tokenizer ---
tokenizer = AutoTokenizer.from_pretrained(MODEL_ID)


# Set padding token if it's not already set
if tokenizer.pad_token is None:
    tokenizer.pad_token = tokenizer.eos_token


# --- 3. Load Model ---
quantization_config = BitsAndBytesConfig(
    load_in_4bit=True,
    bnb_4bit_quant_type="nf4",
    bnb_4bit_compute_dtype=torch.float16,
)

model = AutoModelForCausalLM.from_pretrained(
    MODEL_ID,
    quantization_config=quantization_config,
    device_map="auto",
    trust_remote_code=True, # Needed for some models
)


# --- 4. Load and Prepare Dataset ---
# Load the dataset
dataset = load_dataset(DATASET_ID, split="train")


# Create a train/validation split
split_dataset = dataset.train_test_split(test_size=0.2, seed=42)
train_dataset = split_dataset['train']
validation_dataset = split_dataset['test']


# Define a function to format and tokenize the data
def formatting_and_tokenizing_function(example):


    # This is where you apply the format you designed in the previous lesson
    # For this dataset, the format is simple: instruction + output
    text = f"Extract the food entities from the following text:\n\nText: {example['text']}\n\n###\n\nEntities: {example['instance']}"


    # Tokenize the formatted text
    tokenized_inputs = tokenizer(
        text,
        return_tensors="pt",
        padding="max_length",
        truncation=True,
        max_length=512, # Adjust max_length as needed
    )


    # For causal LM, the labels are the same as the input_ids
    tokenized_inputs["labels"] = tokenized_inputs["input_ids"]

    return tokenized_inputs


# Apply the function to the datasets
tokenized_train_dataset = train_dataset.map(formatting_and_tokenizing_function, batched=False)
tokenized_validation_dataset = validation_dataset.map(formatting_and_tokenizing_function, batched=False)


# --- 5. Verify ---
print("--- Model ---")
print(model)
print("\n--- Tokenizer ---")
print(tokenizer)
print("\n--- Sample Tokenized Training Data ---")
print(tokenized_train_dataset[0].keys())
print(tokenized_train_dataset[0]['input_ids'][:20]) # Print first 20 tokens of a sample
This script is the complete foundation for a fine-tuning job. It loads the core components, manages memory through quantization, and prepares the data into the exact numerical format the model requires.
Conclusion
You have successfully written a script to load and prepare all the necessary components for fine-tuning. This is a major milestone that bridges the gap between data preparation and the training process itself.
Key Takeaways:
- Use
AutoModelForCausalLMandAutoTokenizerto easily load models and tokenizers from the Hugging Face Hub. - Quantization (e.g., via
BitsAndBytesConfig) is a critical technique for loading large models on commodity hardware. - The
datasetslibrary'sload_datasetand.map()functions are your primary tools for loading and processing data. - For text generation fine-tuning, the
labelsare typically a copy of the tokenizedinput_ids.
In our next lesson, we will build directly on the script we just created. Now that everything is loaded, we need to tell the trainer how to perform the fine-tuning. We will configure LoRA and training arguments using the Hugging Face ecosystem to control the training loop, learning rate, and other crucial hyperparameters.