Recommended resources
The freely available resources this lesson will direct you to.
Hello! Welcome back.
In our last lesson, we wrote a script that successfully loads a pre-trained model, its tokenizer, and our prepared dataset. We now have all the necessary ingredients for fine-tuning.
Today, we'll focus on the recipe—the instructions that tell the Hugging Face Trainer how to perform the fine-tuning. This lesson will cover how to configure LoRA and training arguments using the Hugging Face ecosystem. We will define the specifics of our parameter-efficient fine-tuning approach and set the rules for the training process itself, like learning rate and batch size.
This will bring us one step away from kicking off the actual training.
1. Configuring LoRA with LoraConfig
As we've discussed, LoRA (Low-Rank Adaptation) works by freezing the original model's weights and injecting small, trainable "adapter" layers. Instead of updating billions of parameters, we only update a few million in these adapters.
The image below provides a great visual intuition for this. The input is processed by the large, frozen pre-trained block, and in parallel, it's processed by the small, trainable LoRA adapter. The two outputs are then added together.
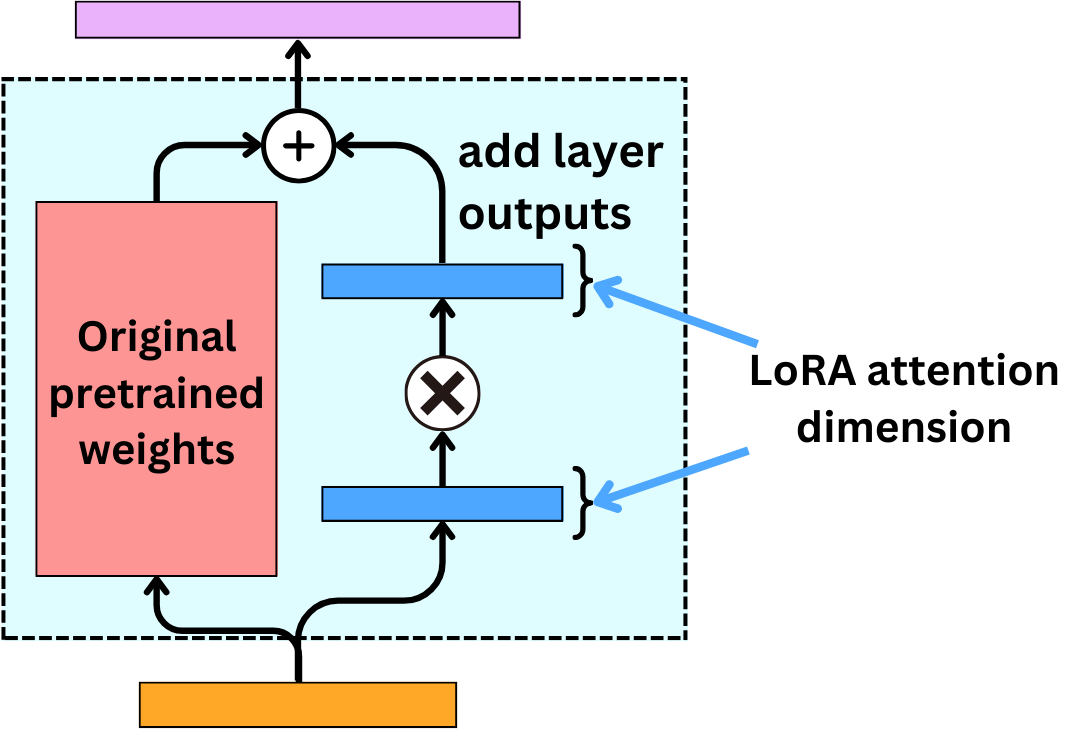
To implement this, we use the LoraConfig class from the Hugging Face peft (Parameter-Efficient Fine-Tuning) library. This object acts as a blueprint for creating the LoRA adapters.
The following video demonstrates how to set up this configuration in code.
Fine-tuning LLMs with PEFT and LoRA
The video 'Fine-tuning LLMs with PEFT and LoRA' by Sam Witteveen provides a clear, code-first walkthrough of creating a LoraConfig.
Please watch from 6:49 to 8:25. The presenter explains the key parameters of LoraConfig while showing the corresponding code. Pay close attention to r, lora_alpha, target_modules, and task_type.
To complement the video, let's dive into the most important parameters of LoraConfig. This article provides concise explanations.
Efficient LLM Fine-Tuning with LoRA
The article 'Efficient LLM Fine-Tuning with LoRA' by Raquel Vaz provides excellent written descriptions for the LoraConfig parameters.
Read the section titled 'LoRA Configuration (LoraConfig)'. It details each parameter and its role in the fine-tuning process.
Based on these resources, here are the key parameters you'll configure:
r: The rank of the update matrices. This is the most critical parameter. It determines the size of the LoRA adapter (specifically, the inner dimension of matrices A and B in the diagram). A smallerrmeans fewer trainable parameters and faster training, while a largerrallows for more expressive power at the cost of size. Common values are 8, 16, or 32.lora_alpha: A scaling factor for the learned weights. Think of it as a learning rate for the LoRA adapters. A common practice is to setlora_alphato be twice the value ofr.target_modules: A list of the specific layers in the model where you want to inject the LoRA adapters. These are typically the attention mechanism's projection layers, such asq_proj(query) andv_proj(value), as this is often where the most impactful learning occurs. Identifying these modules might require inspecting the model architecture (print(model)).lora_dropout: A dropout probability for the LoRA layers to help prevent overfitting.bias: Specifies which biases to train. Setting it to"none"is common, as it freezes all bias terms and further reduces trainable parameters.task_type: Informs thepeftlibrary about the task. For text generation models like GPT, this is set to"CAUSAL_LM".
Here is a typical LoraConfig setup:
from peft import LoraConfig, get_peft_model


# Define the LoRA configuration
lora_config = LoraConfig(
    r=16,
    lora_alpha=32,
    target_modules=["q_proj", "v_proj"],
    lora_dropout=0.1,
    bias="none",
    task_type="CAUSAL_LM"
)


```grasp
{
  "type": "exercise",
  "id": "7f0723a3-0a73-4f62-a1b5-26b4115855a4"
}
In the previous lesson, we loaded our 'model'.
Now, we apply the LoRA config to it.
lora_model = get_peft_model(model, lora_config)
You can print the trainable parameters to see the massive reduction
lora_model.print_trainable_parameters()
Example output: trainable params: 4,718,592 || all params: 3,004,851,968 || trainable%: 0.157032...
The `get_peft_model` function takes our original model and the LoRA config, and returns a new model where the specified adapters have been added and the original weights have been frozen.


### 2. Defining Training Rules with `TrainingArguments`

Now that we've configured *what* to train (the LoRA adapters), we need to configure *how* to train. For this, we use the `TrainingArguments` class from the `transformers` library. This class is a comprehensive configuration object that controls every aspect of the training loop.

Given your background, you can think of `TrainingArguments` as the master configuration file for a complex batch job.

Let's return to the video, which covers the most important training arguments.

```grasp
{
  "type": "video",
  "title": "Fine-tuning LLMs with PEFT and LoRA",
  "id": "[LINK](https://www.youtube.com/watch?v=Us5ZFp16PaU)",
  "video_id": "Us5ZFp16PaU",
  "relevant_section_indices": [
    5
  ],
  "par_intro": "The same video from Sam Witteveen also has a great segment on `TrainingArguments`.",
  "par_directions": "Watch from 10:01 to 11:48. The presenter explains arguments like `gradient_accumulation_steps`, `warmup_steps`, `max_steps`, and `fp16`, which are crucial for managing memory and stabilizing training."
}
And for a textual reference, the same article from before provides clear explanations.
Efficient LLM Fine-Tuning with LoRA
The article 'Efficient LLM Fine-Tuning with LoRA' also breaks down the essential TrainingArguments.
Read the section titled 'Training Arguments (TrainingArguments)'. Focus on understanding the interplay between batch size and gradient accumulation.
Let's summarize the key training arguments:
output_dir: A directory where the training outputs (checkpoints, adapters, etc.) will be saved.num_train_epochs: The total number of times to iterate over the entire training dataset.per_device_train_batch_size: The number of training examples to process on a single GPU in one forward/backward pass. A larger batch size can lead to more stable training but requires more memory.gradient_accumulation_steps: This is a crucial memory-saving technique. Instead of updating the model weights after every batch, it accumulates the gradients for a specified number of steps and then performs the update. The effective batch size becomesper_device_train_batch_size * gradient_accumulation_steps.learning_rate: The step size for the optimizer. A well-chosen learning rate is critical for successful training.5e-5(0.00005) is a common starting point for LoRA.warmup_steps: The number of initial steps during which the learning rate gradually increases from 0 to its target value. This helps stabilize training at the beginning.logging_steps: How often to log training metrics like loss.save_steps: How often to save a model checkpoint.
Here’s what this looks like in code:
from transformers import TrainingArguments

training_args = TrainingArguments(
    output_dir="./results",
    num_train_epochs=1,
    per_device_train_batch_size=2,
    gradient_accumulation_steps=8,  # Effective batch size = 2 * 8 = 16
    learning_rate=5e-5,
    warmup_steps=50,
    logging_steps=10,
    save_steps=50,
    fp16=True, # Use mixed-precision training for speed and memory savings if on a compatible GPU
)
3. Putting It All Together with the SFTTrainer
We now have all our configuration objects. The final step is to hand them over to a Trainer object, which orchestrates the entire training process.
The Hugging Face trl (Transformer Reinforcement Learning) library provides a convenient wrapper called SFTTrainer (Supervised Fine-Tuning Trainer). It's designed specifically for this kind of instruction-following fine-tuning and simplifies the setup.
It takes our LoRA-configured model, the training arguments, the datasets, the tokenizer, and the LoRA config.
Here is a complete script that builds on what we made in the last lesson, now incorporating LoraConfig, TrainingArguments, and the SFTTrainer.
import torch
from datasets import load_dataset
from transformers import AutoModelForCausalLM, AutoTokenizer, BitsAndBytesConfig, TrainingArguments
from peft import LoraConfig, get_peft_model
from trl import SFTTrainer


# --- 1. Load Model, Tokenizer, and Dataset (from previous lesson) ---
MODEL_ID = "microsoft/Phi-3-mini-4k-instruct"
DATASET_ID = "mrdbourke/FoodExtract-1k"


# Load tokenizer
tokenizer = AutoTokenizer.from_pretrained(MODEL_ID)
if tokenizer.pad_token is None:
    tokenizer.pad_token = tokenizer.eos_token


# Load quantized model
quantization_config = BitsAndBytesConfig(load_in_4bit=True, bnb_4bit_compute_dtype=torch.float16)
model = AutoModelForCausalLM.from_pretrained(MODEL_ID, quantization_config=quantization_config, device_map="auto")


# Load and split dataset
dataset = load_dataset(DATASET_ID, split="train").train_test_split(test_size=0.1, seed=42)
train_dataset = dataset['train']
eval_dataset = dataset['test']


# --- 2. Configure LoRA ---
lora_config = LoraConfig(
    r=16,
    lora_alpha=32,
    target_modules=["q_proj", "v_proj", "k_proj", "o_proj"], # Target all attention projections
    lora_dropout=0.1,
    bias="none",
    task_type="CAUSAL_LM"
)


# Note: get_peft_model is not explicitly needed with SFTTrainer, as it can handle the PEFT config directly.


# --- 3. Configure Training Arguments ---
training_args = TrainingArguments(
    output_dir="./food-extract-finetuned",
    per_device_train_batch_size=4,
    gradient_accumulation_steps=4,
    learning_rate=2e-4,
    num_train_epochs=1,
    logging_steps=10,
    fp16=True,
    save_total_limit=2,
    report_to="none", # Disables reporting to services like W&B
)


# --- 4. Initialize the SFTTrainer ---
# We need to define how to format our prompts for the SFTTrainer
def formatting_prompts_func(example):
    output_texts = []
    for i in range(len(example['text'])):


        # Apply the chat template format the model expects
        messages = [
            {"role": "user", "content": f"Extract the food entities from the following text:\n\nText: {example['text'][i]}"},
            {"role": "assistant", "content": f"Entities: {example['instance'][i]}"}
        ]
        output_texts.append(tokenizer.apply_chat_template(messages, tokenize=False))
    return output_texts

trainer = SFTTrainer(
    model=model,
    tokenizer=tokenizer,
    train_dataset=train_dataset,
    eval_dataset=eval_dataset,
    peft_config=lora_config,
    formatting_func=formatting_prompts_func, # Use our custom formatting function
    args=training_args,
    max_seq_length=512,
)


```grasp
{
  "type": "exercise",
  "id": "b8d4b0bb-4fe2-466f-b1ac-87eb6746b29e"
}
--- 5. Verify Setup ---
print("Trainer is configured and ready to go!")
print(f"Trainable parameters: {trainer.model.get_num_trainable_parameters()}")
With the `trainer` object fully initialized, our entire fine-tuning job is now defined and ready to run.


### Conclusion

In this lesson, you learned how to configure the two most important components for controlling a fine-tuning job in the Hugging Face ecosystem.

**Key Takeaways:**

*   **`LoraConfig`** is used to define the architecture of the LoRA adapters, including their size (`r`) and which parts of the model they target (`target_modules`).
*   **`TrainingArguments`** is a comprehensive class that sets the rules for the training process, such as learning rate, batch size, and number of epochs.
*   The **`SFTTrainer`** is a high-level utility that brings everything together: the model, tokenizer, datasets, and all your configurations, preparing you for training.

We have now assembled and configured every piece of our fine-tuning pipeline. In the next lesson, we will take the final, exciting step: **launching the fine-tuning job and monitoring its progress**.