Recommended resources
The freely available resources this lesson will direct you to.
Hello! Welcome to the next step in our fine-tuning journey.
In our last lesson, we focused on transforming raw data into a clean, structured format that an LLM can understand for supervised fine-tuning. We now have a dataset of prompt-response pairs, ready for the model to learn from.
But before we can start training, we need to answer a critical question: how do we know if the model is actually learning to generalize, or just memorizing the examples we show it? To answer this, we must properly partition our data.
Today's learning outcome is to create a training and validation split for a fine-tuning dataset. This is a fundamental practice in all of machine learning, and it's essential for building a model that performs well on new, unseen data.
The "Why": Preventing Overfitting with Data Splits
Imagine you're studying for an exam. If you only study the exact questions from a practice test, you might get 100% on that specific test. But when you face the real exam with new questions, you might struggle. This is because you memorized the answers instead of learning the underlying concepts.
Machine learning models can fall into the same trap, a problem known as overfitting. They become so tuned to the training data that they fail to perform well on data they haven't seen before. To prevent this, we split our dataset into at least two parts:
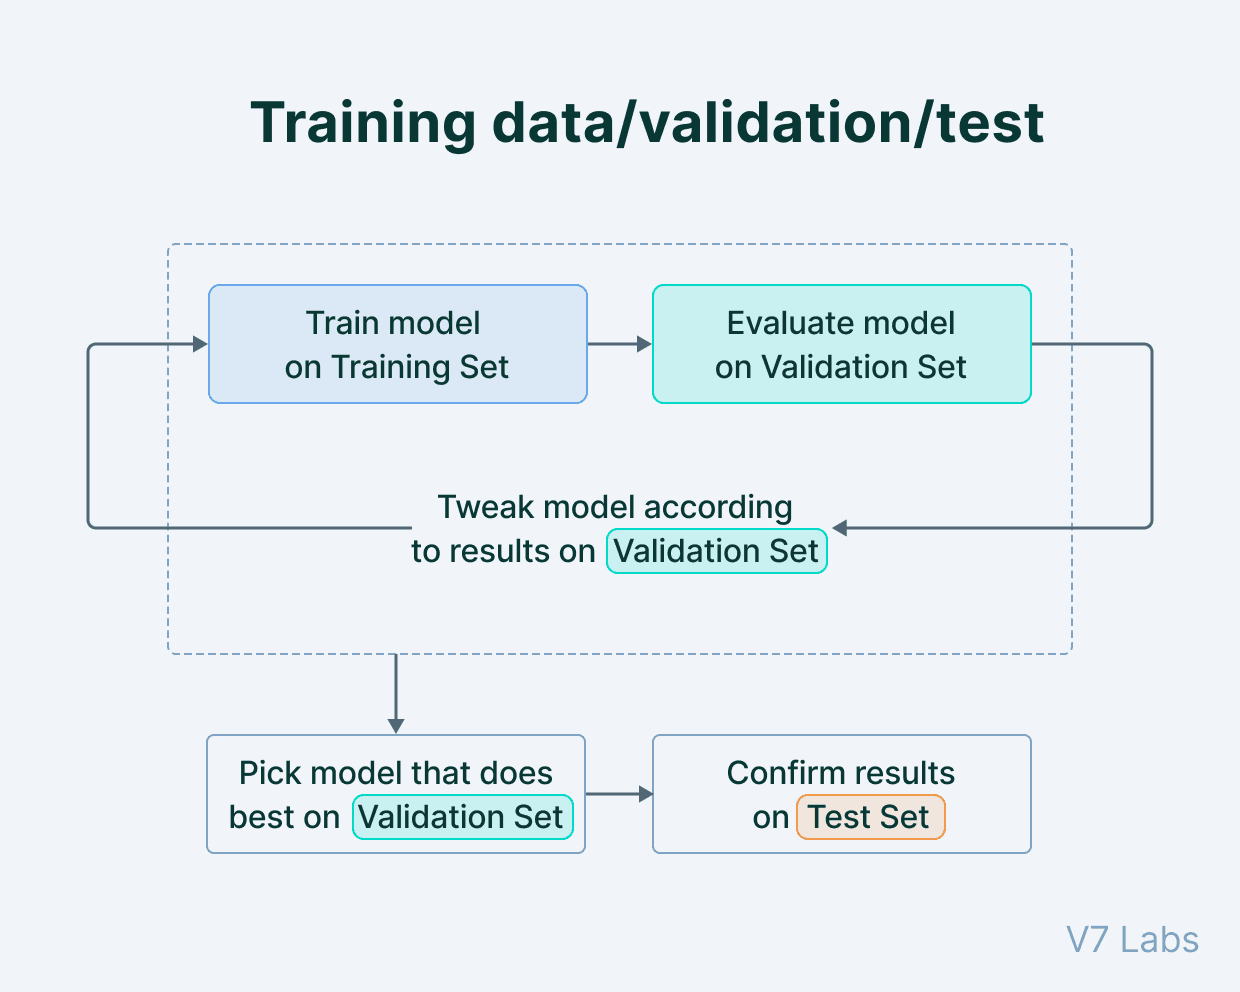
- Training Set: The bulk of the data, used by the model to learn patterns. This is the "practice test" the model studies.
- Validation Set: A smaller, separate portion of data the model does not train on. We use this set during training to evaluate the model's performance on unseen examples. This is like a mock exam to check if the learning is effective.
A third split, the Test Set, is often used as a final, completely untouched dataset to get an unbiased report of the model's real-world performance after all training and tuning are complete. For many practical fine-tuning projects, a train/validation split is sufficient, and you'll often see the terms "validation set" and "test set" used interchangeably in code and documentation.
To get a clear conceptual understanding of these roles, the following video provides an excellent analogy.
Validation data: How it works and why you need it - Machine Learning Basics Explained
The video 'Validation data: How it works and why you need it' from Galaxy Inferno Codes uses a teacher-student analogy to perfectly explain the purpose of each data split.
Please watch from the beginning to 5:37. Pay close attention to: The introduction to the train, validation, and test sets (0:00 - 0:59). The analogy explaining why the validation set is crucial for choosing the best model and avoiding overfitting (0:59 - 3:28). The role of the test set for the final, unbiased performance estimate and the concept of 'data leakage' (3:28 - 5:37).
The process described in the video can be visualized as a standard workflow in machine learning.
Splitting Datasets in Practice with Hugging Face
Now that we understand the "why," let's focus on the "how." The Hugging Face datasets library, which is the standard for handling data in the Hugging Face ecosystem, makes this process straightforward.
The key tool is the train_test_split() method. It allows you to take a dataset and split it into two, specifying the proportion for each.
The Hugging Face datasets documentation provides a clear, concise example of how to use this method.
Please read the subsection titled 'Split'. It demonstrates the use of the train_test_split() function with the test_size parameter. Notice that the function returns a DatasetDict containing the new 'train' and 'test' splits.
This very short video from Hugging Face also shows this method in action.
This clip from 'Slice and dice a dataset' quickly demonstrates shuffling and splitting.
Watch from 0:35 to 1:24. This shows how train_test_split() is applied to a dataset object.
Let's look at a concrete code example. Assuming you have a dataset loaded, you can split it into an 80% training set and a 20% validation set like this:
from datasets import load_dataset


# Load a dataset (we'll use the 'train' split as our source)
full_dataset = load_dataset("mrdbourke/FoodExtract-1k", split="train")


# Split the dataset into training and validation sets
# 80% for training, 20% for validation
split_dataset = full_dataset.train_test_split(test_size=0.2, seed=42)


# The result is a DatasetDict
print(split_dataset)


# You can access each split by its key
train_dataset = split_dataset['train']
validation_dataset = split_dataset['test'] # The 'test' key holds our validation set

print(f"\nNumber of training examples: {len(train_dataset)}")
print(f"Number of validation examples: {len(validation_dataset)}")
Key Parameters to Note:
test_size: This determines the proportion of the dataset allocated to the test/validation split. It can be a float between 0.0 and 1.0 (representing a percentage) or an integer (representing an absolute number of samples).shuffle: This isTrueby default. It's crucial to shuffle the data before splitting to ensure both splits are representative of the overall data distribution and not biased by any original ordering.seed: Setting a seed (an integer) ensures that the random shuffle and split are reproducible. Every time you run the code with the same seed, you will get the exact same split. This is vital for consistent experiments.
Common Ratios and a Practical Example
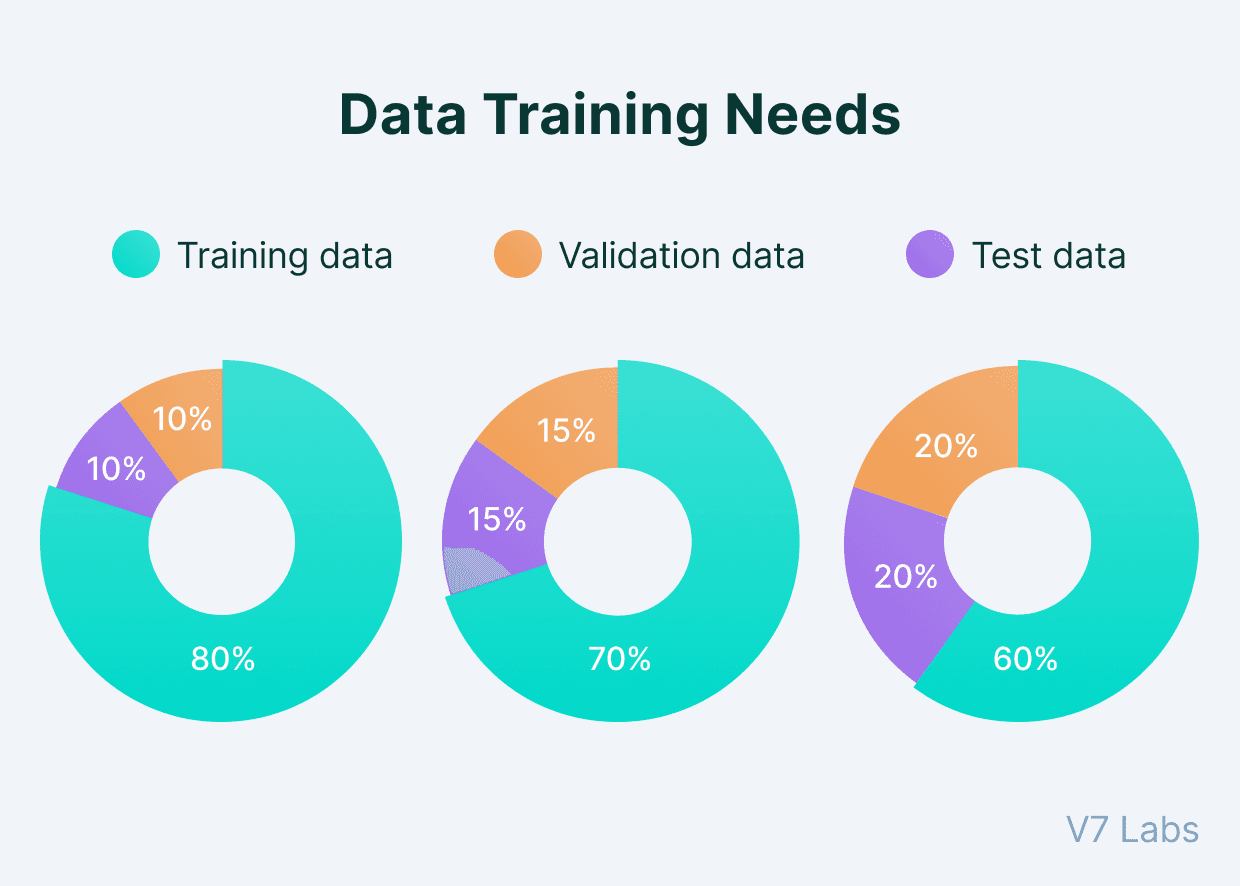
There's no single perfect ratio for splitting data, but some common conventions exist. For small to medium-sized datasets, an 80/20 or 90/10 split is very common. If a final test set is also used, you might see splits like 70/15/15.
To see this step in the context of a full fine-tuning script, let's look at a practical tutorial.
Fully Fine-tune a Small Language Model with Hugging Face Tutorial
The tutorial 'Fully Fine-tune a Small Language Model with Hugging Face' demonstrates dataset splitting as part of a complete workflow.
In this notebook, find the subsection titled 'Create a train/test split'. The code here is a perfect real-world example of what we've just discussed, creating a DatasetDict with 'train' and 'test' keys from a single dataset.
This example solidifies how a single command prepares your formatted data for the two key phases of the training process: learning and validation.
Conclusion
You've now learned one of the most important principles of applied machine learning: how to properly partition your data to reliably train and evaluate a model. This simple step is your primary defense against overfitting and the key to understanding how your model will actually perform in the wild.
Key Takeaways:
- Splitting data into training and validation sets is essential for monitoring model performance and preventing overfitting.
- The training set is for the model to learn from; the validation set is for evaluating it on unseen data during training.
- The Hugging Face
datasetslibrary provides thetrain_test_split()method to easily perform this split. - Always shuffle the data before splitting and use a
seedfor reproducibility. - Common splits for fine-tuning are 80/20 or 90/10 for train/validation.
In our last two lessons, we've formatted our data and split it for training. We are now ready to bring all the pieces together.
In the next lesson, we will write a script to load a pre-trained model, tokenizer, and the prepared dataset. This is where we'll start assembling the core components of our fine-tuning pipeline.