Recommended resources
The freely available resources this lesson will direct you to.
- Obsidian: The King of Learning Tools (FULL GUIDE + SETUP)www.youtube.com
- Notion Tutorial: Making Notes for University/College (Cornell Notes Method)www.youtube.com
- Obsidian vs Notion: Choose Privacy or Collaboration Faster - AFFiNEaffine.pro
- 10 Best Apps For The Cornell Method Of Note Taking In 2026 | AFFiNEaffine.pro
Hello! Welcome back to our module on designing your personal learning system.
In our last lesson, we explored the "why" behind effective note-taking, contrasting the structured, source-based Cornell Method with the networked, idea-based Zettelkasten method. We concluded that your choice of method should align with your learning goals, and that an effective system must be built on the principles of elaboration and retrieval.
Today, we move from the "why" to the "how." Our learning outcome is to choose and set up a tool (digital or analog) for your selected note-taking method. A well-chosen tool should feel like an extension of your thinking, reducing friction and making it easier to apply the learning principles we’ve discussed. Think of this process like setting up your design environment in Figma: the goal is to create a workspace with the right libraries, plugins, and structure to let you focus on the creative work, not the tool itself.
1. Choosing Your Tool: Core Philosophies
Before we dive into specific apps, it's crucial to understand that a tool must serve your chosen method, not the other way around. The Zettelkasten method, for instance, began with physical index cards. While powerful, digital tools offer immense advantages in searching, linking, and backing up your knowledge. For this reason, we will focus primarily on digital options.
The market for note-taking apps is vast and can be overwhelming. To simplify the choice, we'll focus on two of the most popular and powerful contenders that represent two distinct philosophies: Obsidian and Notion. Understanding their core differences will help you make an informed decision for your primary system.
Obsidian vs Notion: Choose Privacy or Collaboration Faster
To understand the fundamental trade-offs, let's start with an article from AFFiNE that masterfully contrasts the core philosophies of Obsidian and Notion. This will help you decide which approach aligns best with your personal and professional needs.
Please read the 'Introduction', 'Understanding Obsidian and Notion Core Philosophies', and 'Data Privacy and Ownership' sections. As you read, think about your own priorities regarding data ownership, collaboration, and offline access.
As the article highlights, your choice boils down to a key trade-off:
- Obsidian: The Personal Knowledge Garden. It operates on local, plain-text files (Markdown). This gives you complete ownership, privacy, and offline access. It's infinitely customizable with plugins and is built around the idea of creating a network of linked thoughts. This is the purist's choice for a digital Zettelkasten.
- Notion: The All-in-One Digital Workspace. It's a cloud-based tool built for collaboration, structuring information in databases, and integrating everything from notes to project management. Its interface is more polished out-of-the-box and user-friendly for beginners.
Here’s a summary of the key differences to help you decide:
| Feature | Obsidian | Notion |
|---|---|---|
| Data Storage | Local plain-text files on your device. You own your data completely. | Cloud-based. Notion stores your data on their servers. |
| Primary Use | Personal knowledge management, networked thinking (Zettelkasten). | Team collaboration, project management, structured databases. |
| Structure | A network of linked notes (like a personal wiki). | A hierarchy of pages and powerful databases (like filterable spreadsheets). |
| Offline Access | Fully functional offline. | Limited offline capabilities; primarily needs an internet connection. |
| Customization | Extremely high via community plugins and themes. You build your ideal tool. | High via templates and database views. You customize a pre-built tool. |
| Learning Curve | Steeper initially, especially if new to Markdown and plugins. | More beginner-friendly, but mastering databases can be complex. |
Your background in UI/UX gives you a unique lens here. Choosing Obsidian is like building a bespoke design system from the ground up, giving you total control but requiring more initial setup. Choosing Notion is like adopting a mature, comprehensive platform like Figma, which offers powerful features and collaboration out-of-the-box.
2. Deep Dive & Setup: Obsidian for a Digital Zettelkasten
For the goal of long-term knowledge retention and synthesis, the Zettelkasten method is unparalleled. Obsidian is widely considered the best-in-class tool for implementing it digitally. Let's walk through how to set up a robust, yet simple, system.
The following guide is incredibly thorough. Crucially, it starts with a warning against the common pitfall of over-optimizing your setup—a form of productive procrastination. The goal is to build a simple, functional system so you can get to the real work of thinking and writing.
Obsidian: The King of Learning Tools (FULL GUIDE + SETUP)
This video by Odysseas, 'Obsidian: The King of Learning Tools', is a complete walkthrough from philosophy to practical setup. We'll use it to build your Zettelkasten foundation.
Follow this multi-step guide, pausing the video as you implement each step. The goal is to have a functional Obsidian vault by the end of this section. Estimated time includes watching and performing the setup.
Step 1: Installation and The Mindset (Video: 00:00 - 02:57 & 13:37 - 14:59)
First, watch the introduction to understand the benefits and the "perfectionism trap." Then, skip ahead to install Obsidian and create your first "vault." A vault is just a folder on your computer where your notes will live. I recommend storing it in a cloud-synced folder (like Google Drive, iCloud, or Dropbox) for automatic backup.
Step 2: Create Your Folder Structure (Video: 14:59 - 20:40)
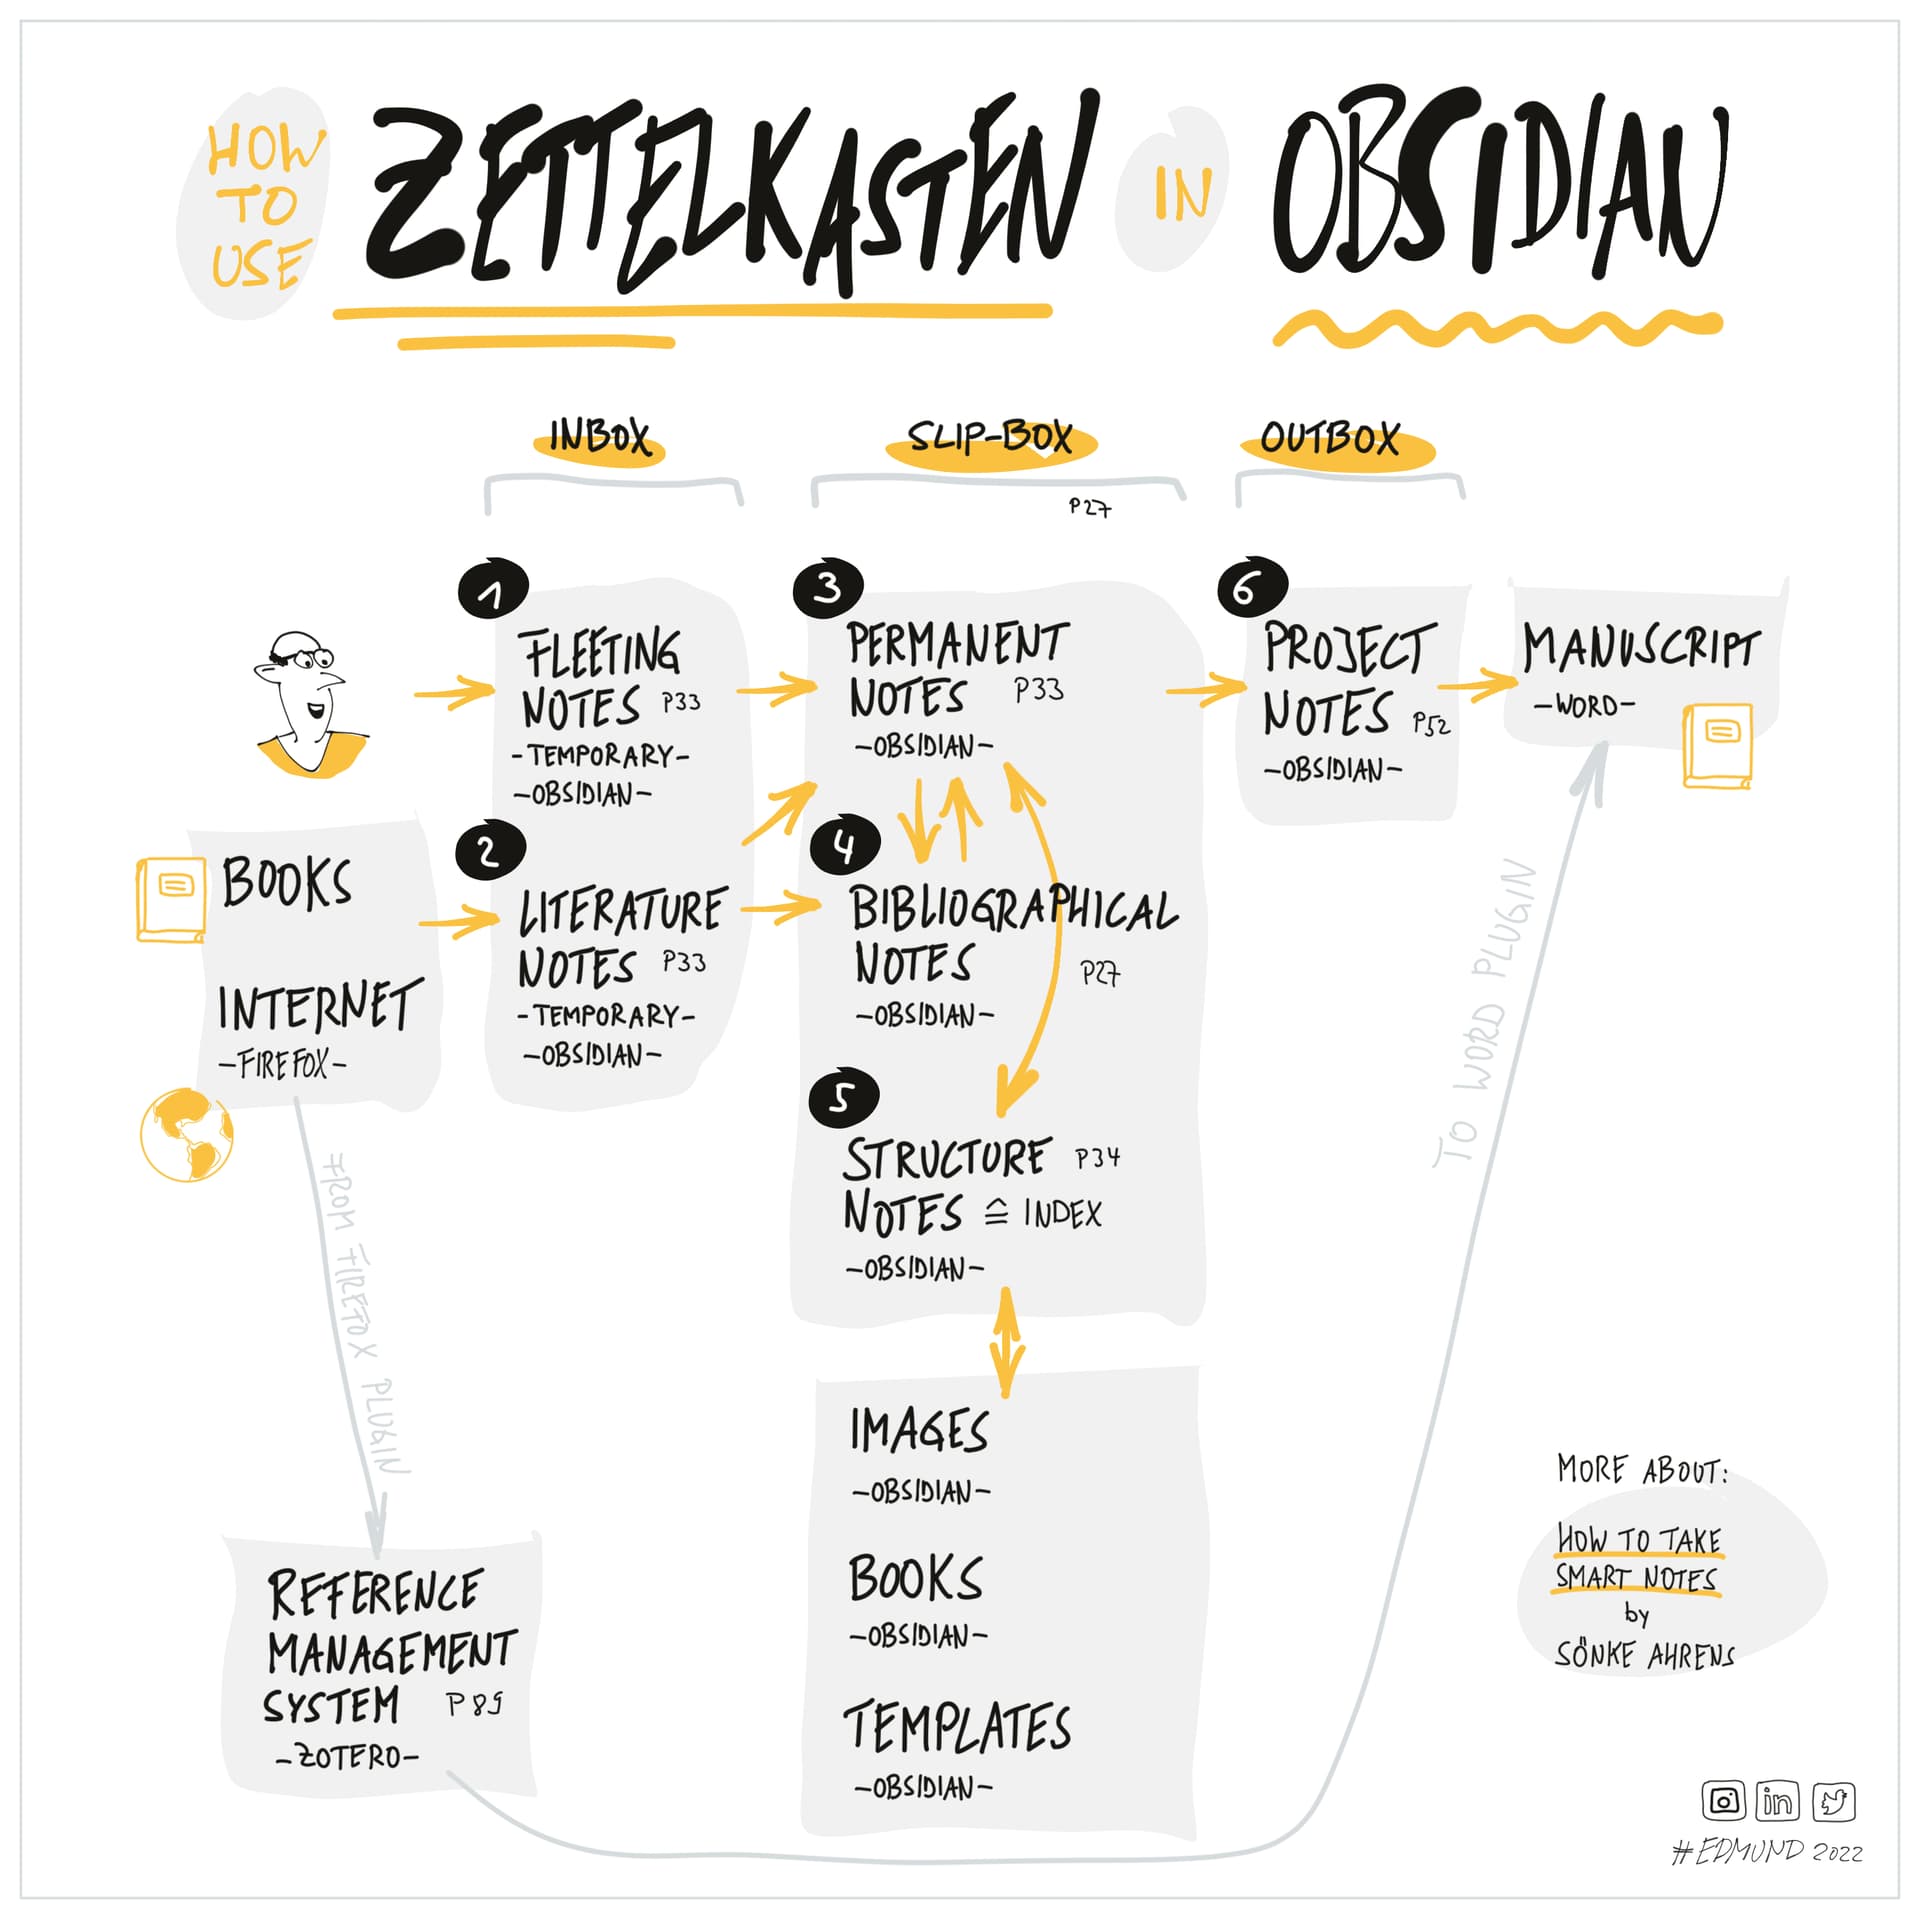
A good folder structure provides clarity. The video suggests a simple, powerful setup. Create the following folders in your Obsidian vault:
01_Main_Notes(orZettelkasten): This is the heart of your system, where your permanent, atomic notes will live.02_Source_Material: For notes directly captured from books, articles, or videos. These are temporary "literature notes."03_Rough_Notes: A digital scratchpad for fleeting ideas and temporary thoughts.04_Tags: A clever system where each tag is an empty note, keeping your tag system clean.05_Templates: To store templates for your notes, streamlining your workflow.
Step 3: Configure Your Workspace (Video: 20:40 - 23:47)
Now, let's configure Obsidian to support this workflow.
- Go to Settings > Files and Links and set the "Default location for new notes" to your
01_Main_Notesfolder. - Go to Settings > Core Plugins and ensure Templates is enabled.
- Go to Settings > Templates and set the "Template folder location" to your
05_Templatesfolder. Create your first template in that folder as shown in the video (e.g., with fields for Date, Tags, and References). - Go to Settings > Hotkeys and set a hotkey for "Insert template" (e.g.,
Ctrl+TorCmd+T).
Step 4: The Note-Taking Workflow (Video: 23:47 - 28:10)
Finally, watch the last section to see the entire process in action:
- Create a note in your
02_Source_Materialfolder for a book or article you're reading. - As you read, add quotes, page numbers, and your initial thoughts.
- Once finished, process these source notes. For each key idea you want to remember, create a new, self-contained note in your
01_Main_Notesfolder. Write it in your own words. - Use your template to structure the note. Add tags and, most importantly, link it to other notes in your system using
[[Note Name]]. This is the core of Zettelkasten—the act of connection.
You now have a functional "second brain" ready to be populated.
3. Alternative: Notion for Structured & Hybrid Note-Taking
If you prioritize collaboration or prefer a more integrated, database-driven environment, Notion is an excellent choice. While Obsidian is king for pure Zettelkasten, Notion is more of a jack-of-all-trades.
You can set it up effectively for the Cornell Method, which is perfect for capturing notes from lectures, meetings, or readings in a structured way.
Notion Tutorial: Making Notes for University/College (Cornell Notes Method)
This short tutorial from Connor Dibblin demonstrates how to set up a practical Cornell Notes template in Notion. It clearly shows how to use Notion's features to support active recall and summarization.
Watch from 01:25 to 05:31. Notice how the template includes not just the Cues/Notes/Summary, but also sections for 'Recall Questions' and 'Actions Needed', turning it into a complete learning tool.
You can even create a hybrid system. Use a Notion Cornell template for initial capture, and then create a separate database for your "Permanent Notes," linking between them to build a knowledge network. This gives you the best of both worlds: structured capture and networked synthesis.
Conclusion
Today, we've bridged the gap from theory to practice by selecting and setting up a tool for your personal learning system.
Key Takeaways:
- The choice of a note-taking tool is a philosophical one, often a trade-off between the privacy and control of a local-first tool like Obsidian and the collaboration and convenience of a cloud-based tool like Notion.
- Obsidian is the ideal tool for implementing a Zettelkasten system, allowing you to build a powerful, private, and networked "second brain."
- Notion excels at structured note-taking like the Cornell Method and is a strong choice if collaboration and an all-in-one workspace are your priorities.
- The key to success is to start simple. Your system will evolve over time. Avoid the trap of endless tinkering and focus on the process of capturing and connecting ideas.
What's Next?
Having a system to capture and process knowledge is the first half of the equation. The second half is ensuring you retain that knowledge. In our next lesson, we will focus on the review process, addressing the learning outcome: "Select appropriate review methods (e.g., flashcards, free recall, practice problems) for different types of knowledge." We will explore how to build an effective review habit using both manual techniques and powerful tools.