Recommended resources
The freely available resources this lesson will direct you to.
- How to Create & Verify a Google Play Developer Account in 2024www.youtube.com
- How to Publish an Android App to Google Play | Updated 2024www.youtube.com
- The Ultimate Google Play Console Guide - Studio MosaicStudio Mosaicstudiomosaicapps.com
- How to Set Up Google Play Console: A Complete Step-by-Step Guide – Applikationapplikation.co.uk
Welcome back! In our last lesson, we navigated the meticulous process of submitting an app to the Apple App Store, from preparing your marketing materials to handling the final review. You now have a solid understanding of how one of the major mobile ecosystems operates. Now, it's time to turn our attention to the other half of the mobile world: Android.
This lesson will introduce you to the Google Play Console, the Android equivalent of Apple's App Store Connect. We will walk through the key steps required to set up your own Google Play developer account. Just like with Apple, this is the foundational step you must complete before you can publish an app. You'll discover that while the overall goal is the same—to create a secure and trusted marketplace—Google's approach has some notable differences in its process and philosophy.
What is the Google Play Console?
Before diving into the setup, let's clarify what the Google Play Console is. Think of it as your mission control for any app you want to launch on the Google Play Store. It’s the central web-based dashboard where you will manage every aspect of your app's lifecycle.
The Ultimate Google Play Console Guide - Studio MosaicStudio Mosaic
This article from Studio Mosaic offers a great high-level introduction to the purpose of the Google Play Console.
Read the introduction to understand its role. The article describes it as the "central command center" and your "partner in app management and optimization," which is a perfect way to frame its function.
Just as App Store Connect was your hub for TestFlight, store listings, and review submissions on iOS, the Play Console is where you'll do all of that and more for Android. You'll upload your app, create its public-facing store page, monitor its performance, view user reviews, and manage updates.
Setting Up Your Google Play Developer Account
Unlike Apple's recurring annual fee, Google requires a one-time $25 registration fee. This small barrier to entry helps deter spam and ensures that publishers on the platform are serious about their projects. The entire setup process is a sequence of providing information and verifying your identity. Let's break it down.
Step 0: Preparation is Key
As with any administrative process, having your information ready beforehand will make everything much smoother. The most common delays happen when people have to stop mid-process to find a document or enable a security setting.
How to Set Up Google Play Console: A Complete Step-by-Step Guide – Applikation
This guide from Applikation provides an excellent pre-flight checklist.
First, review the prerequisites section. Don't worry about the D-U-N-S® Number unless you are formally registering a large business. The key items for a personal account are: A Google Account with 2-Step Verification enabled. Your contact information. A credit or debit card for the registration fee. Then, quickly scan the Quick Reference Checklist to see how these prerequisites map to the setup steps.
Step 1: Creating the Account
With your information gathered, you're ready to begin. The process starts at the Google Play Console signup page. The very first decision you'll make is a critical one: are you signing up as an individual or for an organization?
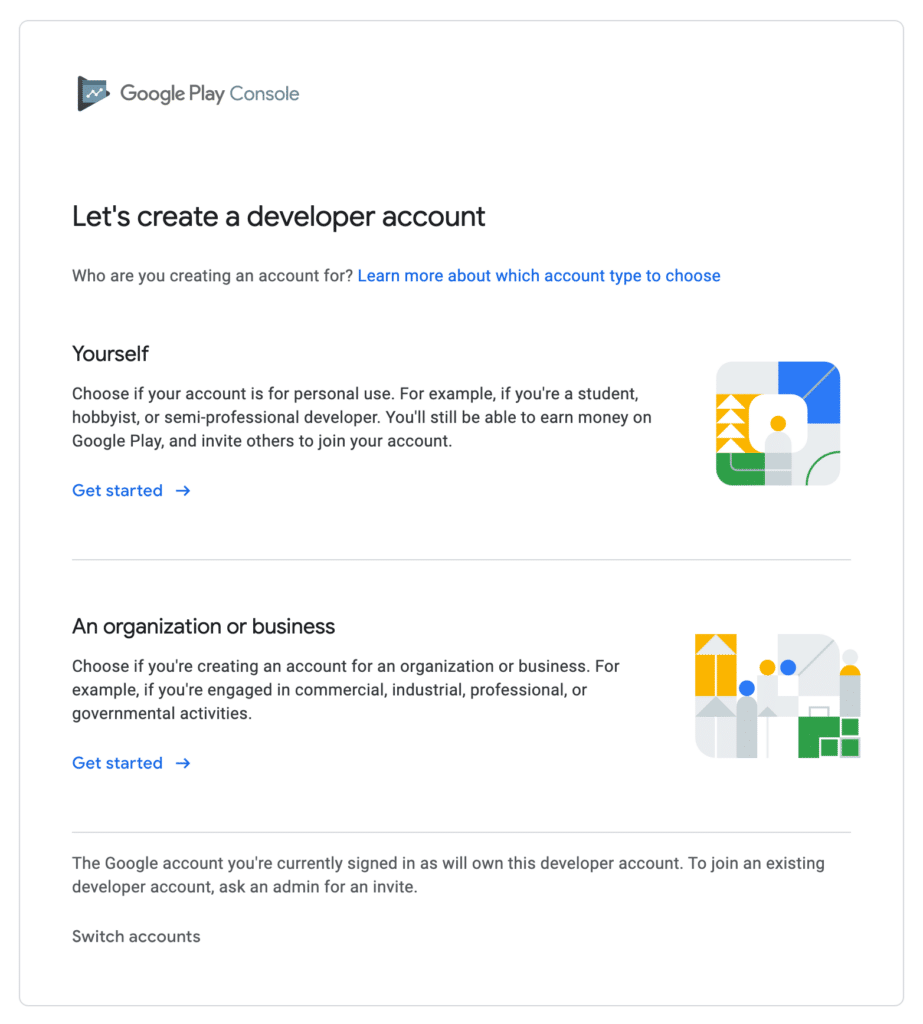
For your "vibe coding" projects, the "Yourself" option is the right choice. It's designed for individuals, hobbyists, and semi-professional developers. As the prompt on this screen notes, you can still earn money and invite others to collaborate later.
The following video provides a complete and up-to-date walkthrough of the entire account creation and verification process. We will refer to it for each step.
How to Create & Verify a Google Play Developer Account in 2024
This video from MJSD Coding is an excellent visual guide to the modern developer account setup process, including the new verification requirements.
First, watch the initial part of the video that covers getting started. This will show you how to navigate to the sign-up page and what to expect when choosing your account type.
Once you select your account type, Google presents a summary of what you'll need, reinforcing the preparation we just did.
Step 2: Providing Your Details & Paying the Fee
The next series of screens will ask you for several pieces of information. It's important to understand the distinction between what will be public and what will remain private.
- Developer Name: This is public and will appear on the Play Store under your app's name. It can be your name, a studio name, or a brand name.
- Contact Information: You'll provide both a public email for users and private contact details (name, email, phone number) that Google will use to contact you.
How to Create & Verify a Google Play Developer Account in 2024
Continue with the walkthrough video to see these steps in action.
Watch the segment from providing details and paying. This section covers: Choosing your public developer name. Filling out your public and private contact information. Accepting the terms of service. Completing the $25 payment.
Step 3: Verification - The New Hurdle
After payment, your account is created, but you can't publish apps just yet. In an effort to increase security and trust on the platform, Google recently introduced a mandatory verification process. This is the most important new part of the setup and is where many people get stuck.
This process has two parts:
- Identity Verification: You must prove you are who you say you are by providing official identification.
- Device Verification: You must prove you have access to an Android device.
How to Create & Verify a Google Play Developer Account in 2024
The final and most crucial part of the setup is verification. The video guide clearly explains what to expect.
Watch the section covering identity verification. You'll see that you need to upload images of a government-issued ID (like a driver's license or passport) and possibly a separate document for proof of address. Be sure to use clear, readable images. Next, watch how to complete the device verification. This involves downloading the Play Console app onto an Android device, signing in with your new developer account, and tapping a button to confirm access.
Account approval is not instant. After you submit your documents, Google's team will review them, which can take a few days. You will receive an email once your identity has been verified.
Conclusion
You've now seen the full process of establishing your presence as an Android developer. While it involves several steps and a bit of waiting, it's a one-time setup that unlocks your ability to publish apps to millions of users worldwide.
Let's summarize the key takeaways:
- The Google Play Console is your dashboard for managing all aspects of your Android apps, from upload to analytics.
- Account setup requires a one-time $25 fee, unlike Apple's annual subscription.
- Preparation is crucial: Have your Google account with 2-Step Verification, contact details, and payment method ready.
- The key steps are: choosing an account type, providing public and private details, paying the fee, and completing the mandatory identity and device verification.
- Verification can take time, so plan for a waiting period of a few days after submitting your documents.
With your developer account approved, the next step is to prepare your actual app file for upload. In our next lesson, we'll dive into the technical side of this, where you'll learn what APK and AAB build files are and understand why app signing is a mandatory security step for all Android apps.