Recommended resources
The freely available resources this lesson will direct you to.
- App Store Submission Guide (2025): Publish Your iOS App to the Store (Xcode & App Store Connect)www.youtube.com
- Don't Submit Your App Until You Watch This: App Store Launch Checklist (2025)www.youtube.com
- App Store Submission Process: A Guide for iOS App Owners | InspiringAppswww.inspiringapps.com
- Apple: Detail Guide to Publish an App using App Store Connectmedium.com
Welcome back! In our last lesson, we saw how TestFlight provides a controlled environment to gather feedback and squash bugs before a public launch. You've prepared your developer account, tested your app with internal and external users, and iterated on the design. Now, you're standing at the final step before your creation goes live: submitting it to the Apple App Store.
This lesson will demystify the App Store submission process. While it might sound daunting, you'll see it's less about complex code and more about careful preparation, clear communication, and thoughtful presentation—all areas where your design background gives you a significant advantage. We will outline the entire workflow, from preparing your marketing assets to navigating the App Store Connect dashboard and understanding the review itself.
The "Why" Behind the Review
Before we dive into the steps, it's important to understand why Apple has a review process at all. Unlike the open web, the App Store is a curated ecosystem. Apple's goal is to ensure that every app is safe, performs well, respects user privacy, and provides a good experience. This gatekeeping is what builds user trust in the platform.
The infographic below shows some recent statistics and highlights the five key areas that Apple's review team focuses on.
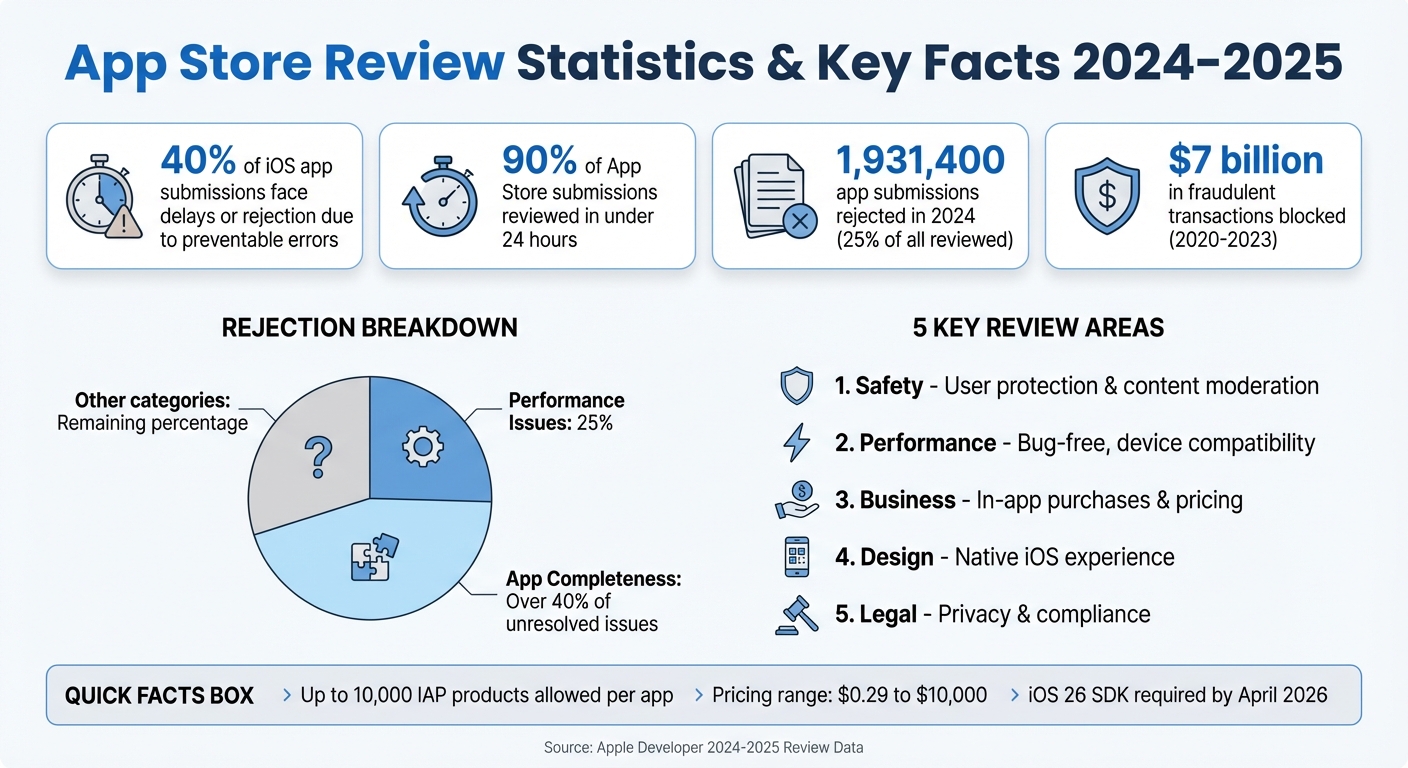
As you can see, the review covers everything from technical performance to the fairness of your business model. For you as a designer, the "Design" and "Performance" categories are especially relevant. Apple wants apps that feel native to the iOS experience and are free of crashes and bugs. Getting through the review means proving your app meets these quality standards.
The Submission Workflow: An Overview
The entire submission process can be broken down into a series of clear steps. While your LLM assistant might automate some of the technical parts (like packaging the app), you will be the one managing the most critical pieces in App Store Connect.
This image provides a great high-level summary of the journey.
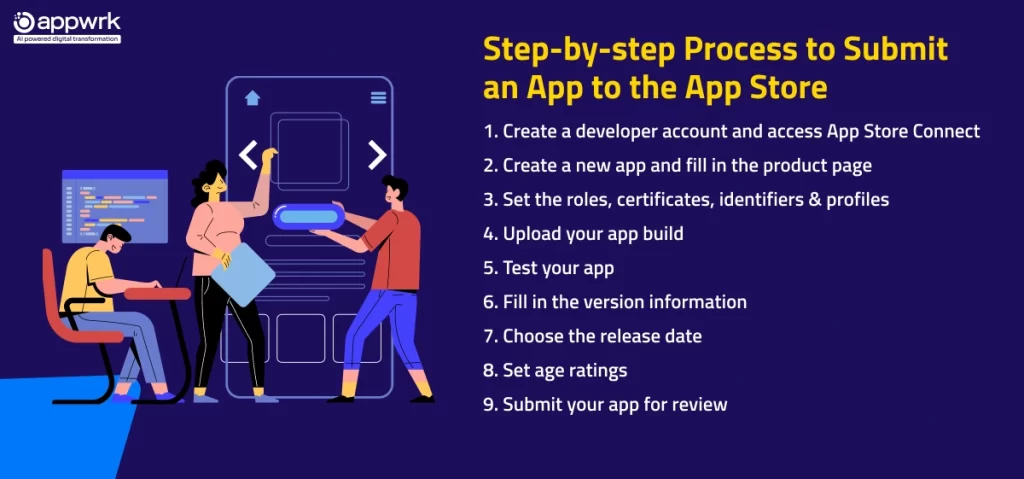
We'll group these steps into three main phases:
- Preparation: Gathering all your assets and information before you even log in.
- Configuration: Filling out your app's product page and technical details in App Store Connect.
- Submission & Review: Sending your app to Apple and handling the outcome.
Phase 1: Preparation is Everything
Getting your app approved often comes down to how well you prepare. Rushing this stage is a common reason for rejection. As a product designer, you can think of this as preparing a final presentation—every detail matters.
App Store Submission Process: A Guide for iOS App Owners | InspiringApps
This article from InspiringApps provides an excellent checklist of what you need to prepare before starting the submission process.
Read the section on App Store Submission: Preparation. Pay close attention to the "Showcase Materials" and "Testing" subsections, as these are where you have the most control over the quality of your submission.
The key takeaways from this preparation phase are:
- A Polished, Tested App: Your app should be stable. The build you submit should be the one you've already vetted through TestFlight. A crashing app is an instant rejection.
- Showcase Materials: This is your "storefront." You need high-quality screenshots, a compelling app icon, and possibly an app preview video. This is a purely creative task where you can shine.
- Legal Requirements: Every app needs a privacy policy. You must have a URL that links to a page explaining what data your app collects and how you use it. You also need to ensure you have the rights to all content in your app.
This short video emphasizes why this upfront work is non-negotiable.
Don't Submit Your App Until You Watch This: App Store Launch Checklist (2025)
The "Code with me" channel explains the mindset needed for a successful launch, focusing on polishing the app and its store presence.
Watch the first minute to understand the importance of thorough testing and how to approach creating your storefront assets.
Phase 2: Configuration in App Store Connect
With your materials ready, it's time to assemble everything in App Store Connect. This is the web dashboard where you will build your app's public-facing page and submit it for review. The following video provides a comprehensive, screen-by-screen walkthrough of this entire process. We will reference it throughout this section.
App Store Submission Guide (2025): Publish Your iOS App to the Store (Xcode & App Store Connect)
This detailed guide from the NDC channel is your primary resource for understanding the App Store Connect interface and submission workflow.
We will break down the video into several parts as we go through the steps.
1. Create the App Record
First, you need to create a new app record in App Store Connect. This acts as a container for all the information and builds related to your app.
- Watch the video: See how to create a new app record from
adding a new app . The presenter explains each field, including:- Name: Must be unique across the entire App Store.
- Primary Language: The default language for your store listing.
- Bundle ID: The unique identifier from your Xcode project that links your code to this record.
- SKU (Stock Keeping Unit): An internal ID for your own tracking. It's not visible to users.
2. Archive and Upload Your Build
Next, you need to upload the actual app file (the "build") from your computer to App Store Connect. In a "vibe coding" workflow, your LLM assistant will likely give you a command to run that does this automatically. The video shows the manual process in Xcode, which is helpful to understand.
- Watch the video: See the process of preparing and uploading a build from
preparing the build . The key steps are archiving the app and distributing it to App Store Connect.
3. Craft Your Product Page
This is the most important part of the process for attracting users. Your product page is a mix of marketing and information. Your goal is to convince someone to download your app in just a few seconds.
- Watch the video: Follow along as the presenter fills out all the metadata for the product page from
filling out app details . The key components are:- Screenshots: These are critical. They must be from the app itself (not mockups) and accurately represent the experience. The video shows a great tip on how to generate perfectly sized screenshots from the Xcode Simulator.
- Promotional Text & Description: Your chance to tell a story. The promo text is short and appears at the top, while the description can be more detailed.
- Keywords: Think like a user. What terms would they search for to find an app like yours?
- Support URL: A link where users can get help.
- Age Rating & Category: Classify your app so it appears in the right place.
4. Finalize the Submission Details
With the product page ready, you need to attach your uploaded build and provide information for the reviewer.
- Watch the video: See how to add the build and provide reviewer notes from
adding the build . This part is crucial:- Attach the Build: You'll select the build you uploaded earlier.
- Answer Compliance Questions: You'll be asked about your app's use of encryption. For most standard apps, this is a simple "no."
- App Review Information: If your app requires a login, you must provide a demo account (username and password) for the reviewer. Without this, they can't test your app, and it will be rejected. You can also add notes to explain complex features or point them to specific areas to test.
5. Set Pricing and Availability
Finally, you'll decide how much your app costs (it can be free) and where in the world it will be available.
- Watch the video: Learn how to set the price and manage availability from
setting the price .
Phase 3: Hitting Submit and Navigating the Review
Once every field is complete and every required asset is uploaded, a blue "Add for Review" button will appear at the top of the page.
- Watch the video: See the final submission step and learn what happens next from
submitting for review .
After you submit, the status of your app will change to "Waiting for Review." The review process is surprisingly fast, with Apple reviewing 90% of submissions in under 24 hours.
What happens if you're approved?
Congratulations! Your app will go live according to the release option you chose (either immediately or on a date you specified).
What happens if you're rejected?
Don't panic! This is very common and a normal part of the process.
Don't Submit Your App Until You Watch This: App Store Launch Checklist (2025)
This video offers great advice on how to handle Apple's guidelines and the outcome of the review process.
First, watch the segment on understanding guidelines to see common reasons for rejection, like privacy issues or mismatched ownership. Then, skip to the end to hear advice on how to handle rejections as a form of feedback.
If your app is rejected, Apple will provide a detailed explanation in the Resolution Center in App Store Connect. They will tell you which guideline you violated and often include screenshots. Your job is to fix the issue, upload a new build if necessary, and resubmit with a note explaining how you addressed the problem.
Conclusion
You now have a complete outline of the journey from a finished app to a live product on the App Store. While it involves many steps, none of them are insurmountable. It's a process that rewards preparation, attention to detail, and clear communication.
Let's recap the key takeaways:
- The Review is a Quality Check: Apple's review process exists to protect users and ensure a high-quality ecosystem. The five key areas are Safety, Performance, Business, Design, and Legal.
- Preparation is Key: A successful submission starts long before you log into App Store Connect. Have your tested build, screenshots, app description, and privacy policy URL ready to go.
- The Product Page is Your Storefront: As a designer, this is your domain. Use compelling visuals and clear copy to convince users to download your app.
- Help the Reviewer Help You: Providing clear notes and a demo account for login-required apps is essential for a smooth review.
- Rejection is Feedback, Not Failure: If you get rejected, read the feedback carefully, address the issues, and resubmit. It's a standard part of the learning curve.
In the next lesson, we will explore the other major mobile platform. We'll describe the Google Play Console and the key steps to set up a developer account, allowing you to see the similarities and differences in publishing an app for Android.