Recommended resources
The freely available resources this lesson will direct you to.
- [ DETAILED ] HOW TO: MAKE BASIC BODICE BLOCK PATTERN | BUST DART | BODICE FITTING | CILLA SIwww.youtube.com
- How to draft a simple fitted bodice block with darts? Beginners STEP-BY-STEP tutorialwww.youtube.com
- How to draft the Basic Bodice Patternwww.theshapesoffabric.com
- Drafting the Bodice Front (Metric Version) - Dresspatternmakingdresspatternmaking.com
In our previous lesson, you successfully drafted the upper contours of the front bodice, establishing the neckline and shoulder slope. Your pattern currently has its foundational framework, but it remains a flat, two-dimensional shape. Today, we will bring it to life by introducing three-dimensional form.
This lesson focuses on drafting the two essential front darts: the side-bust dart and the waist dart. In patternmaking, darts are the primary tool for sculpting flat fabric to fit the body's curves. Given your background in industrial design, you can think of this process as analogous to creating forming darts or relief cuts in a sheet material to allow it to conform to a complex 3D surface. We will locate the central anchor point—the bust apex—and then systematically remove wedges of fabric to create volume for the bust and shape for the waist.
Locating the Bust Point: The Apex
Before we can create any shaping, we must first identify the precise location of the bust point, also known as the apex. This is the fullest point of the bust and serves as the epicenter from which all front shaping radiates. For this, we'll use two of your key body measurements: the Bust Depth and the Bust Span.
The resource from Dresspatternmaking provides a highly precise, measurement-driven method to plot this point.
Drafting the Bodice Front (Metric Version) - Dresspatternmaking
This guide walks through the technical steps of locating the bust point using your specific measurements. This point is the most critical landmark on the front bodice.
Locate the Bust Level: First, follow the instructions to establish the bust level. Find the paragraph starting with "Now taking your Bust-Depth measurement". You will measure your Bust Depth down from the shoulder point (G) to find point H, then draw a horizontal line across to the Center Front line (H2). This line is your bust level. Mark the Bust Point: Next, find the paragraph starting with "The Bust-Span is measurement". On the bust level line you just drew, measure out from the Center Front (H2) by half of your Bust Span measurement. This marks point H3. Finally, as the text instructs, rename this point H3 to simply "Bust Point" or "Apex". This is the pivotal point for the rest of our work in this lesson.
Take a moment to mark this point clearly on your pattern block. All the shaping we are about to create will be directed towards this apex.
Creating the Darts: A Two-Step Method
A standard fitted bodice has two darts on the front: one originating from the side seam to create room for the bust, and another from the waist to contour the torso.
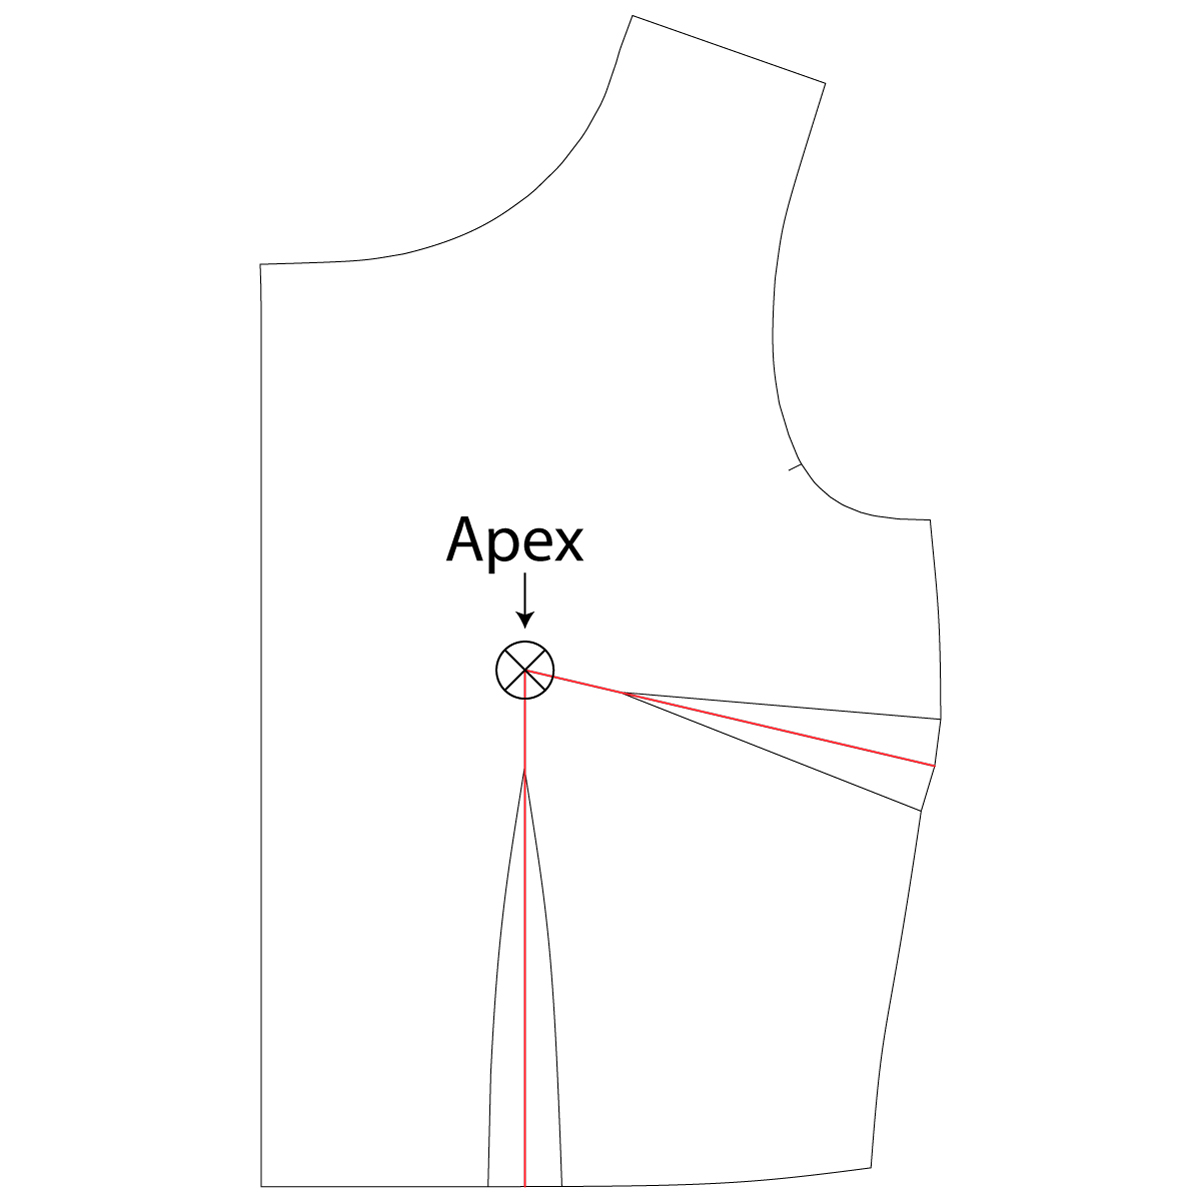
We will use a classic and very logical pattern drafting technique called "slash-and-spread." First, we will consolidate all the shaping needed for the waist and bust into a single, large dart. Then, we will strategically cut and pivot the pattern to divide this single dart into the two required darts. This method clearly illustrates how dart volume can be transferred around a pattern piece—a core concept you'll use again when creating princess seams.
Step 1: Create a Single Large Waist Dart
First, we need to calculate the total amount of excess fabric at the waistline and contain it within one large dart pointing to the bust apex.
Drafting the Bodice Front (Metric Version) - Dresspatternmaking
These instructions guide you through calculating the excess fabric at your waist and drafting it into a single dart.
Follow the instructions under the sub-heading "Now we’ll do the Waist." The text will guide you to: Draw the first dart leg (N2), extending from the bust point down to the waistline. Calculate the second dart leg's position (O) by subtracting your target waist measurement from the current width of the block. Draw the second dart leg (O2) to complete the single, large dart.
At the end of this step, your block will have one very wide dart at the waist. All the shaping required for the front of your bodice is currently contained within this single dart.
Step 2: Slash, Spread, and Pivot
Now for the transformative step. We will cut into the pattern and pivot a section to move some of the dart's volume from the waist to the side seam, creating our two-dart system.
Drafting the Bodice Front (Metric Version) - Dresspatternmaking
This section explains the "cut and spread" method. Pay close attention to the cutting lines and the pivot point.
Find the section titled "The way we’re going to convert this into a 2-Dart Block is by cutting and spreading." Follow the instructions carefully: Cut along the bust line from your side seam to the bust point, and then cut down along one of the dart legs, leaving a small paper hinge at the bust point. Pivot the cut piece down until the side seam becomes a straight line again. Tape paper underneath the new, opened-up V-shape at the side seam.
You have now successfully moved some of the shaping from the waist dart into a new side-bust dart. Your pattern now has two smaller darts, which will provide a much better and more distributed fit.
Refining the Darts for a Professional Finish
Our darts are in the right place, but for a high-quality result, we need to make two crucial refinements.
1. Backing Off the Apex
A dart that is sewn all the way to the bust point will create an unflattering, pointy look. The dart's tip should always end a short distance away from the apex to create a smooth, rounded shape over the bust. The amount of this distance depends on your cup size.
The following video provides a clear demonstration of how to adjust the dart tips.
How to draft a simple fitted bodice block with darts? Beginners STEP-BY-STEP tutorial
This video tutorial clearly shows how to move the tip of the dart away from the bust apex for both the side dart and the waist dart.
Watch the segment from locating the new dart point where the side dart is created. The presenter marks a new point 1.5 inches away from the original bust apex. Then, skip to drawing the new dart to see how the new dart legs are drawn to this adjusted point.
On your pattern, measure about 1 to 1.5 inches (2.5 to 4 cm) from your bust apex towards the side seam and mark a new point for your side-bust dart. Do the same vertically, moving down from the apex, for your waist dart. Redraw your dart legs to these new points. The original apex mark remains as a reference point, but the darts themselves will not extend to it.
2. Truing the Dart Legs
Finally, we need to adjust the shape of the side-bust dart's "mouth" at the side seam. When you fold and sew the dart, you want the raw edges of the side seam to line up perfectly. A simple V-shape won't achieve this.
The Dresspatternmaking guide explains a geometric method to ensure the dart folds down smoothly.
Drafting the Bodice Front (Metric Version) - Dresspatternmaking
This section explains a professional technique for shaping the dart legs to ensure a smooth side seam after sewing.
Find the section beginning with "So now we’ll finish off". Follow the steps in images A, B, and C to redraw the outer edges of your side-bust dart. This ensures that when the dart is folded downwards, the side seam forms a clean, continuous line. The same logic applies to the waist dart to create a smooth, curved waistline, as explained next in the resource.
After this step, your front bodice block is nearly complete. It now has the necessary shaping to transform a flat piece of fabric into a fitted garment.

Key Takeaways
In this lesson, you have embedded three-dimensional shaping into your front bodice pattern. You have:
- Located the bust apex, the critical anchor point for all front shaping.
- Used the slash-and-spread method to create both a side-bust dart and a waist dart, learning how dart volume can be manipulated.
- Refined the dart points by backing them off the apex to ensure a smooth, rounded bust shape.
- Trued the dart legs to ensure the seams will align perfectly during construction.
Next Steps
Your front and back pattern pieces are now drafted with their basic shaping. However, before they are ready to be used, we must verify that they will sew together correctly. In the next lesson, you will learn how to "walk" the seams to check for and correct any length discrepancies, and then add the final, essential pattern markings like seam allowances and grainlines to complete your bodice sloper.