Recommended resources
The freely available resources this lesson will direct you to.
In our last discussion, we drew a line between the "interactive sketches" you get from AI chat artifacts and the "digital workshop" needed to build a real application. We established that for anything more than a quick prototype, you need to bring the code onto your own computer and run it in a local development environment.
Today, we're going to build that workshop. This lesson is all about setting up the central piece of machinery: your code editor. We'll install Visual Studio Code (VS Code), which is the industry standard for developers and a fantastic tool for "vibe coding." Then, we'll equip it with a few essential extensions—think of them as the power tools and specialized jigs that will make your work faster, easier, and more professional.
Why VS Code for Vibe Coding?
While you can generate code in a browser, the real work of assembling, testing, and refining an application happens in a code editor. We're choosing VS Code for a few key reasons:
- It's the Standard: It's the most popular code editor in the world. This means almost any tutorial, guide, or AI-generated instruction you find will assume you're using it.
- It's Free and Powerful: It costs nothing but has features that rival expensive, specialized software.
- It's Your AI's Native Language: Tools like Cursor are great, but as you've noted, they can be another subscription. VS Code has incredible extensions that bring AI assistants like Claude directly into your local environment. This is a common workflow, as described by other designers and builders who are also "vibe coding".
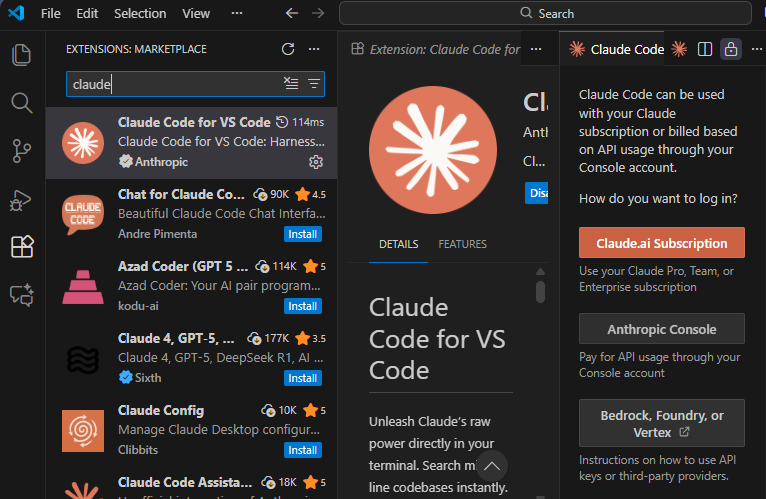
The image below shows exactly what this integration looks like—the VS Code Extensions Marketplace, where you can find and install the Claude Code extension from Anthropic, bringing your AI collaborator right into your workshop.
Step 1: Installing VS Code and a Quick Tour
First things first, let's get the application installed on your computer and take a brief tour of its interface. The video below provides a very clear, step-by-step walkthrough for absolute beginners.
VS Code for Absolute Beginners
This video from the Coder Coder channel is an excellent, concise introduction to getting started with VS Code.
Please watch the first few minutes, which cover downloading, installing, and the basic layout of the user interface. Pay attention to the names of the different areas, like the Activity Bar (on the left) and the sidebars. Don't worry about memorizing everything; the goal is just to get familiar with the landscape.
Step 2: The Most Important Habit: Opening a Folder
This might sound trivial, but it's the single most important habit to build when starting with a code editor. You don't open individual files; you open the entire folder that contains your project. This gives VS Code the full context of your project, which is essential for its features and extensions to work correctly.
Developer Kevin Powell explains this concept perfectly.
How to get started with VS Code
In his "How to get started with VS Code" video, Kevin Powell emphasizes the crucial difference between opening a file and opening a folder.
Watch this short segment where he explains why opening a project folder is the correct workflow. This is what enables extensions like Live Server to function and helps you keep your project organized.
From now on, whenever you start working on a project—whether it's one you've just downloaded from GitHub or a new one you're starting—your first step will always be File > Open Folder... and selecting the project's root directory.
Step 3: Installing Your "Power Tools" (Extensions)
A fresh installation of VS Code is like a bare workshop. Extensions are the tools you add to it. They are small programs that add new functionality, similar to plugins in Figma or Sketch. We'll install three essential extensions to start.
The Coder Coder video you watched earlier has a great walkthrough of the installation process for the first two.
VS Code for Absolute Beginners
Let's return to the "VS Code for Absolute Beginners" video to guide us through installing extensions from the marketplace.
Follow along as she installs and configures two extensions that are invaluable for web development: Prettier: Watch from this point to see how to install this code formatter and, crucially, how to set it to format your code automatically every time you save. This is a lifesaver, as it keeps your files clean and consistently styled without any effort. Live Server: Next, watch from this section to install Live Server. This brilliant extension creates a simple local web server and automatically reloads your browser when you save a file. It's the magic that lets you see your changes instantly. After installing both, you'll have an auto-formatting editor and a live preview server ready to go.
With those two installed, there's one more to add to complete your "vibe coding" setup:
- Claude Code: Go to the Extensions tab in the Activity Bar (the icon with four squares) and search for
Claude Code. Install the official extension by Anthropic. Once installed, you'll be prompted to log in. This connects VS Code to your Claude account, allowing it to read your project files and suggest code changes directly in your editor.
Step 4 (Optional, but Recommended): Make It Your Own
As a designer, you know the value of a comfortable and aesthetically pleasing workspace. VS Code is highly customizable. You can change everything from the color scheme to the file icons. This isn't just for fun; a good theme can improve code readability and reduce eye strain.
If you're interested, you can explore how to change themes and icons by watching another segment from the Coder Coder video.
VS Code for Absolute Beginners
This part of the video shows you how to browse and install themes and icon packs from the marketplace.
Watch from Customizing VS Code to see how you can personalize the look and feel of your editor. Finding a theme you like can make the experience of coding much more enjoyable.
Conclusion
You've now successfully built your digital workshop. This is a huge and essential step. Let's quickly review what you accomplished:
Key Takeaways:
- You installed VS Code, the standard professional code editor.
- You learned the most important workflow habit: always open the project folder, not individual files.
- You equipped your editor with three essential extensions:
- Prettier to keep your code clean automatically.
- Live Server to preview your web projects locally with live updates.
- Claude Code to integrate your AI assistant directly into your workflow.
- You know how to personalize your environment with themes and icons to make it your own.
Your workshop is now ready for its first project. In the next lesson, we will put these tools to use. You'll create your first HTML file, write some code, and use the Live Server extension to see your work come to life in a web browser, completing your first full local development cycle.