Recommended resources
The freely available resources this lesson will direct you to.
In the previous lesson, we explored the "why" behind choosing a backend service, comparing the structured, relational world of Supabase with the flexible, document-based approach of Firebase. You now understand the core philosophies that guide each platform and can make an informed choice based on your project's needs.
Today, we transition from theory to practice. This lesson is all about taking the next step your AI coding assistant would guide you through: setting up your chosen platform. We will walk through creating a project and your very first database, either in Supabase or Firebase. By the end of this session, you'll have a live backend in the cloud, a tangible "brain" ready and waiting for your app to connect to it.
I'll provide clear, step-by-step instructions for both platforms. Feel free to choose the one that you feel is a better fit for the kind of project you have in mind and follow that path.
Choosing Your Path: A Quick Reminder
As we discussed, the choice largely comes down to your data:
- Choose Supabase if you're building something with structured, predictable data, like a blog, a portfolio, or a product inventory. Its relational nature promotes organization from the start, which is great for projects you intend to grow.
- Choose Firebase if you're building something where the data structure might evolve, like a social feed or a chat app, or if you are prioritizing maximum speed for a quick prototype.
Once you've made your choice, follow the corresponding section below.
Path 1: Setting Up a Supabase Project
Supabase's visual Table Editor makes it an excellent choice for designers and builders who appreciate a structured, understandable interface. It feels a lot like organizing components in a design system. We'll use a helpful guide from the Refine blog to walk through this process.
Step 1: Create Your Supabase Project
First, you'll need an account and a project. A project is the main container for your app's database, authentication, and file storage.
Create Your Own Supabase Database In 5 Minutes - Refine
This article provides a concise, step-by-step guide to get your first Supabase project up and running.
Follow the instructions in this first step. Go to the Supabase website, sign up (using GitHub is easiest if you have an account), and click "New project." When choosing a region, picking one geographically close to you or your primary users can make your app feel slightly faster. Don't forget to save the database password you create—you'll need it later!
After a minute or two, you'll land on your project dashboard. This is your command center for your app's entire backend.
Step 2: Create Your First Table
With your project ready, it's time to define the structure for your data. In Supabase, this means creating a "table." Think of a table as a spreadsheet with predefined columns. The Table Editor is a visual tool that lets you do this without writing any code.
Let's create a simple table to store posts for a hypothetical blog or social feed.
Create Your Own Supabase Database In 5 Minutes - Refine
This part of the article explains the Table Editor and walks you through creating your first table with specific columns and data types.
First, read the brief explanation of the Table Editor in Step 2 to understand the interface. Next, follow the instructions in Step 3, but with a slight modification for our example. Instead of an employees table, we'll make a posts table. Click New Table in the Table Editor. Name the table posts. Add the following columns: id: Leave this as uuid with the default gen_random_uuid(). This is a unique identifier for each post. created_at: Leave this as timestamptz with the default now(). This automatically records when a post is made. Click Add column to create a new field named title with the type text. Add another column named content with the type text. Leave "Enable Row Level Security" checked. This is a crucial security feature that keeps your data private by default. We'll explore it more later. Click Save.
Just like that, you've created a structured place for your app's data to live. You've essentially designed the data model for your application.
Step 3: Add Some Sample Data
Your table is currently empty. Let's add a row of data directly from the dashboard to make it feel real. This is also a great way to test that everything is working as expected.
Create Your Own Supabase Database In 5 Minutes - Refine
This final step shows you how to add data directly through the Supabase interface.
Follow the guide in Step 5. Select your posts table and click the Insert Row button. You only need to fill in the title and content fields; the id and created_at fields will be filled in automatically. For example: title: "My First Post" content: "This is the content of my very first post. Hello, world!" Click Save. You should now see your first row of data in the posts table.
Congratulations! You have successfully set up a complete, production-ready backend with a structured database on Supabase.
Path 2: Setting Up a Firebase Project
Firebase is known for its speed and developer-friendly experience, tightly integrated with the Google ecosystem. Its flexible data model is perfect for projects where you want to iterate quickly without defining a rigid structure upfront.
Step 1: Create Your Firebase Project
Your journey begins in the Firebase console, where you'll create a "project." This project will house all the Firebase services for your app, including its database.
Stop Building Websites — Build REAL Web Apps with Google AI + Firebase
This video provides a clear, screen-recorded walkthrough of creating a new Firebase project.
Watch from the beginning of the setup. Go to the Firebase website, enter the console, and click to add a new project. You can name it whatever you like. The video creator disables Google Analytics for this simple project, and you can do the same to keep things minimal. Once the project is ready, you'll select to add a "Web app" and give it a name.
After registering your web app, Firebase will show you some code to install its SDK. You can ignore this for now and just click "Continue to the console." We'll handle connecting the code in our next lesson.
Step 2: Create Your Firestore Database
Unlike Supabase, a Firebase project doesn't automatically come with a database. You need to create one. Firebase's primary database offering is called Cloud Firestore.
Stop Building Websites — Build REAL Web Apps with Google AI + Firebase
This section of the video guides you through the process of enabling and configuring your Firestore database.
Navigate to the "Build" menu on the left and select "Firestore Database." Now, watch from this point to follow the setup: Click Create database. Choose a region close to you or your users. For security rules, select Start in production mode. This is important! It ensures your data is secure by default, and nobody can read or write to your database until you explicitly grant them permission. "Test mode" leaves your data open and should be avoided for real projects. Click Create.
Your database will take a moment to provision. Once it's ready, you'll be presented with the Firestore data viewer.
Step 3: Understand and Create Your First Data
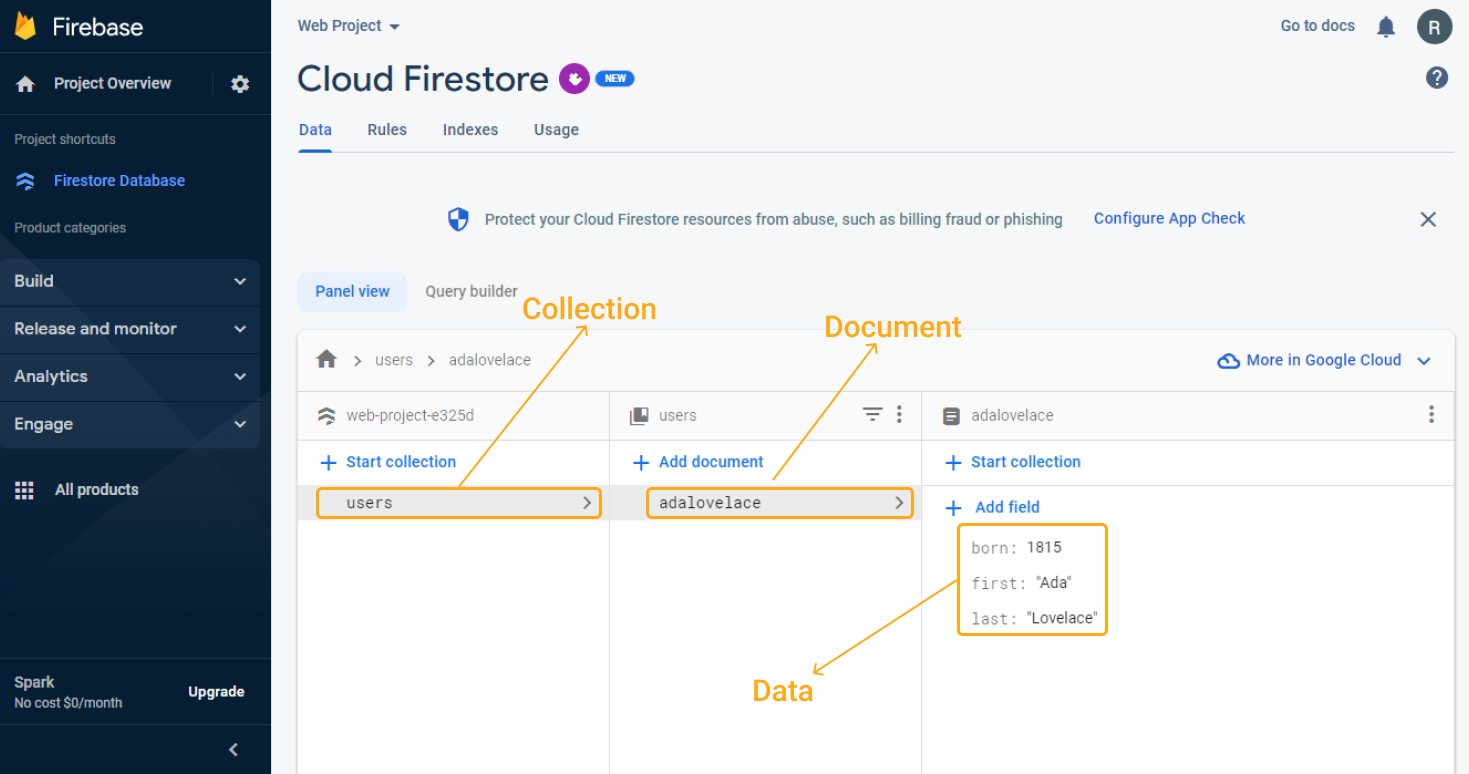
Firestore uses a NoSQL model, which you can visualize as a set of digital filing cabinets. The structure is Collections > Documents > Data.
- A Collection is like a folder (e.g.,
posts,users). - A Document is a single file within that folder, which has a unique ID.
- Data consists of the fields (key-value pairs) inside that document.
This image perfectly illustrates the hierarchy you'll be working with.
Let's create your first piece of data.
- In the Firestore data viewer, click Start collection.
- For the "Collection ID," type
posts. Click Next. - Now you need to create the first document in this collection. For the "Document ID," click Auto-ID. Firebase will generate a unique ID for you.
- Now, add the fields for this document.
- In the "Field" box, type
title. In the "Value" box, type "My First Post". - Click the Add field button.
- For the new field, type
content. For its value, type "This is the content of my very first post. Hello, world!". - You can also add another field named
createdAtand selecttimestampas the type. Set it to the current date and time.
- In the "Field" box, type
- Click Save.
You will now see your posts collection on the left, your first document with its unique ID in the middle, and the fields of that document on the right.
Congratulations! You have successfully set up a Firebase project with a flexible NoSQL database ready to power your application.
Conclusion
Whether you chose the structured path of Supabase or the flexible route of Firebase, you have now accomplished a critical step in building a real application. You've moved beyond just the frontend code and have provisioned a piece of cloud infrastructure—a database—that can store, manage, and persist your app's data. This is a foundational skill that separates simple web pages from dynamic web applications.
Key Takeaways:
- Setting up a backend project involves creating an account, provisioning a project, and configuring the database.
- Supabase guides you to create structured tables with defined columns using a visual Table Editor.
- Firebase lets you create a Firestore database where data is organized into collections of flexible documents.
- Both platforms allow you to add and view data directly from their dashboards, which is great for setup and testing.
In our next lesson, we will bridge the gap between your local project and this new cloud database. You'll learn how to install the necessary package (the SDK) and write the code to connect your app, finally allowing it to read and write data from the database you just created.